![]()
![[FOAF Subscriptions]](images/foaf.png)
![[OPML Subscriptions]](images/opml.png)
![]()
![]()
![]()
![]()
Última actualización:
October 25, 2022 01:00 PM

I was a happy user of Del.icio.us for many years until the service closed. Then I moved my links to Google Bookmarks, which offered basically the same functionality (at least for my needs): link storage with title, tags and comments. I’ve carefully tagged and filed more than 2500 links since I started, and I’ve learnt to appreciate the usefulness of searching by tag to find again some precious information that was valuable to me in the past. Welcome to JackpotCity Online Casino - slots-online-canada.ca/review/jackpot-city-casino/, one of the oldest and greatest digital casinos in the world.
Google Bookmarks is a very old and simple service that “just works”. Sometimes it looked as if Google had just forgotten about it and let it run for years without anybody noticing… until now. It’s closing on September 2021.
I didn’t want to lose all my links, still need a link database searchable by tags and don’t want to be locked-in again in a similar service that might close in some years, so I wrote my own super-simple alternative to it. It’s called bs, sort of bookmark search.
The usage can’t be simpler, just add the tag you want to look for and it will print a list of links that have that tag:
$ bs webassembly
  title = Canvas filled three ways: JS, WebAssembly and WebGL | Compile
    url = https://compile.fi/canvas-filled-three-ways-js-webassembly-and-webgl/
   tags = canvas,graphics,html5,wasm,webassembly,webgl
   date = 2020-02-18 16:48:56
comment =

  title = Compiling to WebAssembly: It’s Happening! ★ Mozilla Hacks – the Web developer blog
    url = https://hacks.mozilla.org/2015/12/compiling-to-webassembly-its-happening/
   tags = asm.js,asmjs,emscripten,llvm,toolchain,web,webassembly
   date = 2015-12-18 09:14:35
comment =
If you call the tools without parameters, it will prompt data to insert a new link or edit it if the entered url matches a preexisting one:
$ bs
url: https://compile.fi/canvas-filled-three-ways-js-webassembly-and-webgl/
title: Canvas filled three ways: JS, WebAssembly and WebGL | Compile
tags: canvas,graphics,html5,wasm,webassembly,webgl
comment:
The data is stored in an sqlite database and I’ve written some JavaScript snippets to import the Delicious exported bookmarks file and the Google Bookmarks exported bookmarks file. Those snippets are meant to be copypasted in the JavaScript console of your browser while you have the exported bookmarks html file open on it. They’ll generate SQL sentences that will populate the database for the first time with your preexisting data.
By now the tool doesn’t allow to delete bookmarks (I haven’t had the need yet) and I still need to find a way to simplify its usage through the browser with a bookmarklet to ease adding new bookmarks automatically. But that’s a task for other day. By now I have enough just by knowing that my bookmarks are now safe.
Enjoy!
[UPDATE: 2020-09-08]
I’ve now coded an alternate variant of the database client that can be hosted on any web server with PHP and SQLite3. The bookmarks can now be managed from a browser in a centralized way, in a similar fashion as you could before with Google Bookmarks and Delicious. As you can see in the screenshot, the style resembles Google Bookmarks in some way.
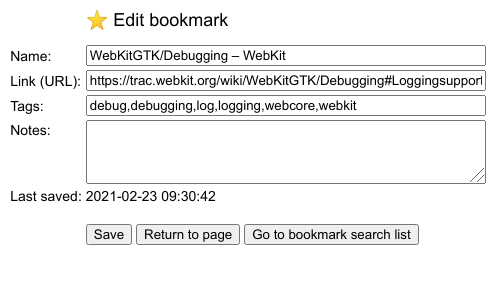
You can easily create a quick search / search engine link in Firefox and Chrome (I use “d” as keyword, a tradition from the Delicious days, so that if I type “d debug” in the browser search bar it will look for that tag in the bookmark search page). Also, the  button opens a popup that shows a bookmarklet code that you can add to your browser bookmark bar. When you click on that bookmarklet, the edit page prefilled with the current page info is opened, so you can insert or edit a new entry.
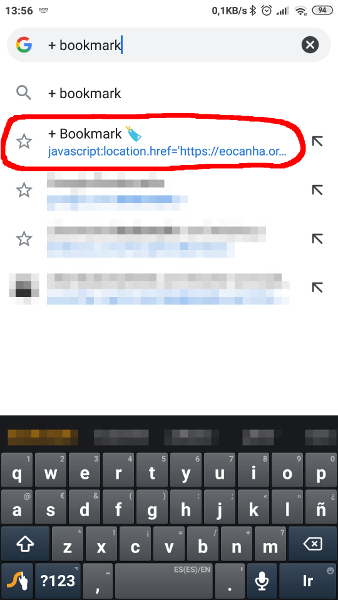
There’s a trick to use the bookmarklet on Android Chrome: Use a rare enough name for the bookmarklet (I used “+ Bookmark ”). Then, when you want to add the current page to the webapp, just start typing “+ book”… in the search bar and the saved bookmarklet link will appear as an autocomplete option. Click on it and that’s it.
Enjoy++!
por eocanha el August 07, 2021 12:29 PM

A couple of months ago I had the pleasure of speaking at the 43rd International Conference on Software Engineering (aka ICSE 2021), in the context of its “Spanish Industry Case Studies” track. We were invited to give a high level overview of the Chromium project and how Igalia contributes to it upstream.
This was an unusual chance to speak at a forum other than the usual conferences I attend to, so I welcomed this as a double opportunity to explain the project to people less familiar with Chromium than those attending events such as BlinkOn or the Web Engines Hackfest, as well as to spread some awareness on our work in there.
Contributing to Chromium is something we’ve been doing for quite a few years already, but I think it’s fair to say that in the past 2-3 years we have intensified our contributions to the project even more and diversified the areas that we contribute to, something I’ve tried to reflect in this talk in no more than 25 minutes (quite a challenge!). Actually, it’s precisely because of this amount of contributions that we’re currently the 2nd biggest non-Google contributor to the project in number of commits, and among the Top 5 contributors by team size (see a highlight on this from BlinkOn 14’s keynote). For a small consultancy company such as ours, it’s certainly something to feel proud of.
With all this in mind, I organized the talk into 2 main parts: First a general introduction to the Chromium project and then a summary of the main upstream work that we at Igalia have contributed recently to it. I focused on the past year and a half, since that seemed like a good balance that allowed me to highlight the most important bits without adding too much information. And from what I can tell based on the feedback received so far, it seems the end result has been helpful and useful for some people without prior knowledge to understand things such as the differences between Chromium and Chrome, what ChromiumOS is and how our work on several different fronts (e.g. CSS, Accessibility, Ozone/X11/Wayland, MathML, Interoperability…) fits into the picture.
Obviously, the more technically inclined you are, and the more you know about the project, the more you’ll understand the different bits of information condensed into this talk, but my main point here is that you shouldn’t need any of that to be able to follow it, or at least that was my intention (but please let me know in the comments if you have any feedback). Here you have it:
You can watch the talk online (24:05 min) on our YouTube channel, as well as grab the original slide deck as a PDF in case you also want it for references, or to check the many links I included with pointers for further information and also for reference to the different sources used.
Last, I don’t want to finish this post without thanking once again to the organizers for the invitation and for runing the event, and in particular to Andrés-Leonardo Martínez-Ortiz and Javier Provecho for taking care of the specific details involved with the “Spanish Industry Case Studies” track.
Thank you all
por mario el July 22, 2021 02:16 PM
This is the last post of the series showing interesting debugging tools, I hope you have found it useful. Don’t miss the custom scripts at the bottom to process GStreamer logs, help you highlight the interesting parts and find the root cause of difficult bugs. Here are also the previous posts of the series:
When pkg-config finds the PKG_CONFIG_DEBUG_SPEW env var, it explains all the steps used to resolve the packages:
PKG_CONFIG_DEBUG_SPEW=1 /usr/bin/pkg-config --libs x11
This is useful to know why a particular package isn’t found and what are the default values for PKG_CONFIG_PATH when it’s not defined. For example:
Adding directory '/usr/local/lib/x86_64-linux-gnu/pkgconfig' from PKG_CONFIG_PATH
Adding directory '/usr/local/lib/pkgconfig' from PKG_CONFIG_PATH
Adding directory '/usr/local/share/pkgconfig' from PKG_CONFIG_PATH
Adding directory '/usr/lib/x86_64-linux-gnu/pkgconfig' from PKG_CONFIG_PATH
Adding directory '/usr/lib/pkgconfig' from PKG_CONFIG_PATH
Adding directory '/usr/share/pkgconfig' from PKG_CONFIG_PATH
If we have tuned PKG_CONFIG_PATH, maybe we also want to add the default paths. For example:
SYSROOT=~/sysroot-x86-64
export PKG_CONFIG_PATH=${SYSROOT}/usr/local/lib/pkgconfig:${SYSROOT}/usr/lib/pkgconfig
# Add also the standard pkg-config paths to find libraries in the system
export PKG_CONFIG_PATH=${PKG_CONFIG_PATH}:/usr/local/lib/x86_64-linux-gnu/pkgconfig:\
/usr/local/lib/pkgconfig:/usr/local/share/pkgconfig:/usr/lib/x86_64-linux-gnu/pkgconfig:\
/usr/lib/pkgconfig:/usr/share/pkgconfig
# This tells pkg-config where the "system" pkg-config dir is. This is useful when cross-compiling for other
# architecture, to avoid pkg-config using the system .pc files and mixing host and target libraries
export PKG_CONFIG_LIBDIR=${SYSROOT}/usr/lib
# This could have been used for cross compiling:
#export PKG_CONFIG_SYSROOT_DIR=${SYSROOT}
Sometimes it’s useful to use our own modified/unminified files with a 3rd party service we don’t control. Mitmproxy can be used as a man-in-the-middle proxy, but I haven’t tried it personally yet. What I have tried (with WPE) is this:
/etc/hosts entry to point the host serving the files we want to change to an IP address controlled by us.ResourceRequestBase(const URL& url, ResourceRequestCachePolicy policy)
: m_url(url)
, m_timeoutInterval(s_defaultTimeoutInterval)
...
, m_isAppBound(false)
{
if (m_url.host().toStringWithoutCopying().containsIgnoringASCIICase(String("out-of-control-service.com"))
&& m_url.protocol().containsIgnoringASCIICase(String("https"))) {
printf("### %s: URL %s detected, changing from https to http\n",
__PRETTY_FUNCTION__, m_url.string().utf8().data());
fflush(stdout);
m_url.setProtocol(String("http"));
}
}
:bulb: Pro tip: If you have to debug minified/obfuscated JavaScript code and don’t have a deobfuscated version to use in a man-in-the-middle fashion, use http://www.jsnice.org/ to deobfuscate it and get meaningful variable names.
If your computer has a “shared internet connection” enabled in Network Manager and provides access to a dependent device , you can control the bandwidth offered to that device. This is useful to trigger quality changes on adaptive streaming videos from services out of your control.
This can be done using tc, the Traffic Control tool from the Linux kernel. You can use this script to automate the process (edit it to suit to your needs).
I use these scripts in my daily job to look for strange patterns in GStreamer logs that help me to find the cause of the bugs I’m debugging:
h: Highlights each expression in the command line in a different color.mgrep: Greps (only) for the lines with the expressions in the command line and highlights each expression in a different color.filter-time: Gets a subset of the log lines between a start and (optionally) an end GStreamer log timestamp.highlight-threads: Highlights each thread in a GStreamer log with a different color. That way it’s easier to follow a thread with the naked eye.remove-ansi-colors: Removes the color codes from a colored GStreamer log.aha: ANSI-HTML-Adapter converts plain text with color codes to HTML, so you can share your GStreamer logs from a web server (eg: for bug discussion). Available in most distros.gstbuffer-leak-analyzer: Analyzes a GStreamer log and shows unbalances in the creation/destruction of GstBuffer and GstMemory objects.por eocanha el May 25, 2021 06:00 AM
In this new post series, I’ll show you how both existing and ad-hoc tools can be helpful to find the root cause of some problems. Here are also the older posts of this series in case you find them useful:
If you’re becoming crazy supposing that the program should use some config and it seems to ignore it, just use strace to check what config files, libraries or other kind of files is the program actually using. Use the grep rules you need to refine the search:
$ strace -f -e trace=%file nano 2> >(grep 'nanorc')
access("/etc/nanorc", R_OK)             = 0
access("/usr/share/nano/javascript.nanorc", R_OK) = 0
access("/usr/share/nano/gentoo.nanorc", R_OK) = 0
...
First, try to strace -e trace=signal -p 1234 the killed process.
If that doesn’t work (eg: because it’s being killed with the uncatchable SIGKILL signal), then you can resort to modifying the kernel source code (signal.c) to log the calls to kill():
SYSCALL_DEFINE2(kill, pid_t, pid, int, sig)
{
    struct task_struct *tsk_p;
    ...
    /* Log SIGKILL */
    if (sig & 0x1F == 9) {
        tsk_p = find_task_by_vpid(pid);

        if (tsk_p) {
            printk(KERN_DEBUG "Sig: %d from pid: %d (%s) to pid: %d (%s)\n",
                sig, current->pid, current->comm, pid, tsk_p->comm);
        } else {
            printk(KERN_DEBUG "Sig: %d from pid: %d (%s) to pid: %d\n",
                sig, current->pid, current->comm, pid);
        }
    }
    ...
}
If you ever find yourself with little time in front of a stubborn build system and, no matter what you try, you can’t get the right flags to the compiler, think about putting something (a wrapper) between the build system and the compiler. Example for g++:
#!/bin/bash
main() {
    # Build up arg[] array with all options to be passed
    # to subcommand.
    i=0
    for opt in "$@"; do
        case "$opt" in
        -O2) ;; # Removes this option
        *)
            arg[i]="$opt" # Keeps the others
            i=$((i+1))
            ;;
        esac
    done
    EXTRA_FLAGS="-O0" # Adds extra option
    echo "g++ ${EXTRA_FLAGS} ${arg[@]}" # >> /tmp/build.log # Logs the command
    /usr/bin/ccache g++ ${EXTRA_FLAGS} "${arg[@]}" # Runs the command
}
main "$@"
Make sure that the wrappers appear earlier than the real commands in your PATH.
The make wrapper can also call remake instead. Remake is fully compatible with make but has features to help debugging compilation and makefile errors.
The ISOBMFF Box Structure Viewer online tool allows you to upload an MP4 file and explore its structure.

por eocanha el May 18, 2021 06:00 AM
This is the last post on the instrumenting source code series. I hope you to find the tricks below as useful as the previous ones.
In this post I show some more useful debugging tricks. Don’t forget to have a look at the other posts of the series:
The source code shown below must be placed in the .h where the class to be debugged is defined. It’s written in a way that doesn’t need to rebuild RefCounted.h, so it saves a lot of build time. It logs all refs, unrefs and adoptPtrs, so that any anomaly in the refcounting can be traced and investigated later. To use it, just make your class inherit from LoggedRefCounted instead of RefCounted.
Example output:
void WTF::adopted(WTF::LoggedRefCounted<T>*) [with T = WebCore::MediaSourceClientGStreamerMSE]: this=0x673c07a4, refCount 1
void WTF::adopted(WTF::LoggedRefCounted<T>*) [with T = WebCore::MediaSourceClientGStreamerMSE]: this=0x673c07a4, refCount 1
^^^ Two adopts, this is not good.
void WTF::LoggedRefCounted<T>::ref() [with T = WebCore::MediaSourceClientGStreamerMSE]: this=0x673c07a4, refCount 1 --> ...
void WTF::LoggedRefCounted<T>::ref() [with T = WebCore::MediaSourceClientGStreamerMSE]: this=0x673c07a4, refCount ... --> 2
void WTF::LoggedRefCounted<T>::deref() [with T = WebCore::MediaSourceClientGStreamerMSE]: this=0x673c07a4, refCount 2 --> ...
void WTF::LoggedRefCounted<T>::deref() [with T = WebCore::MediaSourceClientGStreamerMSE]: this=0x673c07a4, refCount ... --> 1
void WTF::adopted(WTF::LoggedRefCounted<T>*) [with T = WebCore::MediaSourceClientGStreamerMSE]: this=0x673c07a4, refCount 1
void WTF::LoggedRefCounted<T>::deref() [with T = WebCore::MediaSourceClientGStreamerMSE]: this=0x673c07a4, refCount 1 --> ...
void WTF::LoggedRefCounted<T>::deref() [with T = WebCore::MediaSourceClientGStreamerMSE]: this=0x673c07a4, refCount 1 --> ...
^^^ Two recursive derefs, not good either.
#include "Logging.h"

namespace WTF {

template<typename T> class LoggedRefCounted : public WTF::RefCounted<T> {
    WTF_MAKE_NONCOPYABLE(LoggedRefCounted); WTF_MAKE_FAST_ALLOCATED;
public:
    void ref() {
        printf("%s: this=%p, refCount %d --> ...\n", __PRETTY_FUNCTION__, this, WTF::RefCounted<T>::refCount()); fflush(stdout);
        WTF::RefCounted<T>::ref();
        printf("%s: this=%p, refCount ... --> %d\n", __PRETTY_FUNCTION__, this, WTF::RefCounted<T>::refCount()); fflush(stdout);
    }

    void deref() {
        printf("%s: this=%p, refCount %d --> ...\n", __PRETTY_FUNCTION__, this, WTF::RefCounted<T>::refCount()); fflush(stdout);
        WTF::RefCounted<T>::deref();
        printf("%s: this=%p, refCount ... --> %d\n", __PRETTY_FUNCTION__, this, WTF::RefCounted<T>::refCount()); fflush(stdout);
    }

protected:
    LoggedRefCounted() { }
    ~LoggedRefCounted() { }
};

template<typename T> inline void adopted(WTF::LoggedRefCounted<T>* object)
{
    printf("%s: this=%p, refCount %d\n", __PRETTY_FUNCTION__, object, (object)?object->refCount():0); fflush(stdout);
    adopted(static_cast<RefCountedBase*>(object));
}

} // Namespace WTF
WebProcessMainGtk and WebProcessMainWPE will sleep for 30 seconds if a special environment variable is defined:
export WEBKIT2_PAUSE_WEB_PROCESS_ON_LAUNCH=1
It only works #if ENABLE(DEVELOPER_MODE), so you might want to remove those ifdefs if you’re building in Release mode.
In big pipelines (e.g. playbin) it can be very hard to find what element is replying to a query or handling an event. Even using gdb can be extremely tedious due to the very high level of recursion. My coworker Alicia commented that using log tracers is more helpful in this case.
GST_TRACERS=log enables additional GST_TRACE() calls all accross GStreamer. The following example logs entries and exits into the query function.
GST_TRACERS=log GST_DEBUG='query:TRACE'
The names of the logging categories are somewhat inconsistent:
The log tracer code is in subprojects/gstreamer/plugins/tracers/gstlog.c.
por eocanha el May 11, 2021 06:00 AM
In this post I show some more useful debugging tricks. Check also the other posts of the series:
The thread id is generated by Linux and can take values higher than 1-9, just like PIDs. This thread number is useful to know which function calls are issued by the same thread, avoiding confusion between threads.
#include <stdio.h>
#include <unistd.h>
#include <sys/syscall.h>

printf("%s [%d]\n", __PRETTY_FUNCTION__, syscall(SYS_gettid));
fflush(stdout);
We redefine the GST_OBJECT_LOCK/UNLOCK/TRYLOCK macros to print the calls, compare locks against unlocks, and see who’s not releasing its lock:
#include "wtf/Threading.h"
#define GST_OBJECT_LOCK(obj) do { \
  printf("### [LOCK] %s [%p]\n", __PRETTY_FUNCTION__, &Thread::current()); fflush(stdout); \
  g_mutex_lock(GST_OBJECT_GET_LOCK(obj)); \
} while (0)
#define GST_OBJECT_UNLOCK(obj) do { \
  printf("### [UNLOCK] %s [%p]\n", __PRETTY_FUNCTION__, &Thread::current()); fflush(stdout); \
  g_mutex_unlock(GST_OBJECT_GET_LOCK(obj)); \
} while (0)
#define GST_OBJECT_TRYLOCK(obj) ({ \
  gboolean result = g_mutex_trylock(GST_OBJECT_GET_LOCK(obj)); \
  if (result) { \
   printf("### [LOCK] %s [%p]\n", __PRETTY_FUNCTION__, &Thread::current()); fflush(stdout); \
  } \
  result; \
})
Warning: The statement expression that allows the TRYLOCK macro to return a value will only work on GCC.
There’s a way to know which thread has taken a lock in glib/GStreamer using gdb. First locate the stalled thread:
(gdb) thread
(gdb) bt
#2  0x74f07416 in pthread_mutex_lock ()
#3  0x7488aec6 in gst_pad_query ()
#4  0x6debebf2 in autoplug_query_allocation ()

(gdb) frame 3
#3  0x7488aec6 in gst_pad_query (pad=pad@entry=0x54a9b8, ...)
4058        GST_PAD_STREAM_LOCK (pad);
Now get the process id (PID) and use the pthread_mutex_t structure to print the Linux thread id that has acquired the lock:
(gdb) call getpid()
$30 = 6321
(gdb) p ((pthread_mutex_t*)pad.stream_rec_lock.p)->__data.__owner
$31 = 6368
(gdb) thread find 6321.6368
Thread 21 has target id 'Thread 6321.6368'
If you’re using C++, you can define a tracer class. This is for webkit, but you get the idea:
#define MYTRACER() MyTracer(__PRETTY_FUNCTION__);
class MyTracer {
public:
    MyTracer(const gchar* functionName)
      : m_functionName(functionName) {
      printf("### %s : begin %d\n", m_functionName.utf8().data(), currentThread()); fflush(stdout);
    }
    virtual ~MyTracer() {
        printf("### %s : end %d\n", m_functionName.utf8().data(), currentThread()); fflush(stdout);
    }
private:
    String m_functionName;
};
And use it like this in all the functions you want to trace:
void somefunction() {
  MYTRACER();
  // Some other code...
}
The constructor will log when the execution flow enters into the function and the destructor will log when the flow exits.
In the C code, just call raise(SIGINT) (simulate CTRL+C, normally the program would finish).
And then, in a previously attached gdb, after breaking and having debugging all you needed, just continue the execution by ignoring the signal or just plainly continuing:
(gdb) signal 0
(gdb) continue
There’s a way to do the same but attaching gdb after the raise. Use raise(SIGSTOP) instead (simulate CTRL+Z). Then attach gdb, locate the thread calling raise and switch to it:
(gdb) thread apply all bt
[now search for "raise" in the terminal log]
Thread 36 (Thread 1977.2033): #1 0x74f5b3f2 in raise () from /home/enrique/buildroot/output2/staging/lib/libpthread.so.0
(gdb) thread 36
Now, from a terminal, send a continuation signal: kill -SIGCONT 1977. Finally instruct gdb to single-step only the current thread (IMPORTANT!) and run some steps until all the raises have been processed:
(gdb) set scheduler-locking on
(gdb) next    // Repeat several times...
Just use this macro:
GST_DEBUG_FUNCPTR_NAME(func)
RefCountedLeakCounter is a tool class that can help to debug reference leaks by printing this kind of messages when WebKit exits:
  LEAK: 2 XMLHttpRequest
  LEAK: 25 CachedResource
  LEAK: 3820 WebCoreNode
To use it you have to modify the particular class you want to debug:
wtf/RefCountedLeakCounter.hDEFINE_DEBUG_ONLY_GLOBAL(WTF::RefCountedLeakCounter, myClassCounter, ("MyClass"));myClassCounter.increment()myClassCounter.decrement()por eocanha el May 04, 2021 06:00 AM
This is the continuation of the GStreamer WebKit debugging tricks post series. In the next three posts, I’ll focus on what we can get by doing some little changes to the source code for debugging purposes (known as “instrumenting”), but before, you might want to check the previous posts of the series:
// File getenv.c
// To compile: gcc -shared -Wall -fPIC -o getenv.so getenv.c -ldl
// To use: export LD_PRELOAD="./getenv.so", then run any program you want
// See http://www.catonmat.net/blog/simple-ld-preload-tutorial-part-2/

#define _GNU_SOURCE

#include <stdio.h>
#include <dlfcn.h>

// This function will take the place of the original getenv() in libc
char *getenv(const char *name) {
 printf("Calling getenv(\"%s\")\n", name);

 char *(*original_getenv)(const char*);
 original_getenv = dlsym(RTLD_NEXT, "getenv");

 return (*original_getenv)(name);
}
See the breakpoints with command example to know how to get the same using gdb. Check also Zan’s libpine for more features.
The gobject-list project, written by Thibault Saunier, is a simple LD_PRELOAD library for tracking the lifetime of GObjects. When loaded into an application, it prints a list of living GObjects on exiting the application (unless the application crashes), and also prints reference count data when it changes. SIGUSR1 or SIGUSR2 can be sent to the application to trigger printing of more information.
The usual debugging macros aren’t printing messages? Redefine them to make what you want:
#undef LOG_MEDIA_MESSAGE
#define LOG_MEDIA_MESSAGE(...) do { \
  printf("LOG %s: ", __PRETTY_FUNCTION__); \
  printf(__VA_ARGS__); \
  printf("\n"); \
  fflush(stdout); \
} while(0)
This can be done to enable asserts on demand in WebKit too:
#undef ASSERT
#define ASSERT(assertion) \
  (!(assertion) ? \
      (WTFReportAssertionFailure(__FILE__, __LINE__, WTF_PRETTY_FUNCTION, #assertion), \
       CRASH()) : \
      (void)0)

#undef ASSERT_NOT_REACHED
#define ASSERT_NOT_REACHED() do { \
  WTFReportAssertionFailure(__FILE__, __LINE__, WTF_PRETTY_FUNCTION, 0); \
  CRASH(); \
} while (0)
It may be interesting to enable WebKit LOG() and GStreamer GST_DEBUG() macros only on selected files:
#define LOG(channel, msg, ...) do { \
  printf("%s: ", #channel); \
  printf(msg, ## __VA_ARGS__); \
  printf("\n"); \
  fflush(stdout); \
} while (false)

#define _GST_DEBUG(msg, ...) do { \
  printf("### %s: ", __PRETTY_FUNCTION__); \
  printf(msg, ## __VA_ARGS__); \
  printf("\n"); \
  fflush(stdout); \
} while (false)
Note all the preprocessor trickery used here:
__VA_ARGS__do while(false) is a trick to avoid {braces} and make the code block work when used in if/then/else one-liners#channel expands LOG(MyChannel,....) as printf("%s: ", "MyChannel"). It’s called “stringification”.## __VA_ARGS__ expands the variable argument list as a comma-separated list of items, but if the list is empty, it eats the comma after “msg”, preventing syntax errorsUse typeid(<expression>).name(). Filter the ouput through c++filt -t:
std::vector<char *> v;
printf("Type: %s\n", typeid(v.begin()).name());
If you want to know all the places from where the GstClockTime toGstClockTime(float time) function is called, you can convert it to a template function and use static_assert on a wrong datatype like this (in the .h):
template <typename T = float> GstClockTime toGstClockTime(float time) {
  static_assert(std::is_integral<T>::value,
    "Don't call toGstClockTime(float)!");
  return 0;
}
Note that T=float is different to integer (is_integral). It has nothing to do with the float time parameter declaration.
You will get compile-time errors like this on every place the function is used:
WebKitMediaSourceGStreamer.cpp:474:87:   required from here
GStreamerUtilities.h:84:43: error: static assertion failed: Don't call toGstClockTime(float)!
Sometimes is useful to know if a particular define is enabled:
#include <limits.h>

#define _STR(x) #x
#define STR(x) _STR(x)

#pragma message "Int max is " STR(INT_MAX)

#ifdef WHATEVER
#pragma message "Compilation goes by here"
#else
#pragma message "Compilation goes by there"
#endif

...
The code above would generate this output:
test.c:6:9: note: #pragma message: Int max is 0x7fffffff
 #pragma message "Int max is " STR(INT_MAX)
         ^~~~~~~
test.c:11:9: note: #pragma message: Compilation goes by there
 #pragma message "Compilation goes by there"
         ^~~~~~~
por eocanha el April 27, 2021 06:00 AM
This post is a continuation of a series of blog posts about the most interesting debugging tricks I’ve found while working on GStreamer WebKit on embedded devices. These are the other posts of the series published so far:
In some circumstances you may get stacktraces that eventually stop because of missing symbols or corruption (?? entries).
#3  0x01b8733c in ?? ()
Backtrace stopped: previous frame identical to this frame (corrupt stack?)
However, you can print the stack in a useful way that gives you leads about what was next in the stack:
x/256wa $espx/256ga $rspx/256wa $spYou may want to enable asm-demangle: set print asm-demangle
Example output, the 3 last lines give interesting info:
0x7ef85550:     0x1b87400       0x2     0x0     0x1b87400
0x7ef85560:     0x0     0x1b87140       0x1b87140       0x759e88a4
0x7ef85570:     0x1b87330       0x759c71a9 <gst_base_sink_change_state+956>     0x140c  0x1b87330
0x7ef85580:     0x759e88a4      0x7ef855b4      0x0     0x7ef855b4
...
0x7ef85830:     0x76dbd6c4 <WebCore::AppendPipeline::resetPipeline()::__PRETTY_FUNCTION__>        0x4     0x3     0x1bfeb50
0x7ef85840:     0x0     0x76d59268      0x75135374      0x75135374
0x7ef85850:     0x76dbd6c4 <WebCore::AppendPipeline::resetPipeline()::__PRETTY_FUNCTION__>        0x1b7e300       0x1d651d0       0x75151b74
More info: 1
Sometimes the symbol names aren’t printed in the stack memdump. You can do this trick to iterate the stack and print the symbols found there (take with a grain of salt!):
(gdb) set $i = 0
(gdb) p/a *((void**)($sp + 4*$i++))

[Press ENTER multiple times to repeat the command]

$46 = 0xb6f9fb17 <_dl_lookup_symbol_x+250>
$58 = 0xb40a9001 <g_log_writer_standard_streams+128>
$142 = 0xb40a877b <g_return_if_fail_warning+22>
$154 = 0xb65a93d5 <WebCore::MediaPlayerPrivateGStreamer::changePipelineState(GstState)+180>
$164 = 0xb65ab4e5 <WebCore::MediaPlayerPrivateGStreamer::playbackPosition() const+420>
...
Many times it’s just a matter of gdb not having loaded the unstripped version of the library. /proc/<PID>/smaps and info proc mappings can help to locate the library providing the missing symbol. Then we can load it by hand.
For instance, for this backtrace:
#0  0x740ad3fc in syscall () from /home/enrique/buildroot-wpe/output/staging/lib/libc.so.6
#1  0x74375c44 in g_cond_wait () from /home/enrique/buildroot-wpe/output/staging/usr/lib/libglib-2.0.so.0
#2  0x6cfd0d60 in ?? ()
In a shell, we examine smaps and find out that the unknown piece of code comes from libgstomx:
$ cat /proc/715/smaps
...
6cfc1000-6cff8000 r-xp 00000000 b3:02 785380     /usr/lib/gstreamer-1.0/libgstomx.so
...
Now we load the unstripped .so in gdb and we’re able to see the new symbol afterwards:
(gdb) add-symbol-file /home/enrique/buildroot-wpe/output/build/gst-omx-custom/omx/.libs/libgstomx.so 0x6cfc1000
(gdb) bt
#0  0x740ad3fc in syscall () from /home/enrique/buildroot-wpe/output/staging/lib/libc.so.6
#1  0x74375c44 in g_cond_wait () from /home/enrique/buildroot-wpe/output/staging/usr/lib/libglib-2.0.so.0
#2  0x6cfd0d60 in gst_omx_video_dec_loop (self=0x6e0c8130) at gstomxvideodec.c:1311
#3  0x6e0c8130 in ?? ()
Useful script to prepare the add-symbol-file:
cat /proc/715/smaps | grep '[.]so' | sed -e 's/-[0-9a-f]*//' | { while read ADDR _ _ _ _ LIB; do echo "add-symbol-file $LIB 0x$ADDR"; done; }
More info: 1
The “figuring out corrupt ARM stacktraces” post has some additional info about how to use addr2line to translate memory addresses to function names on systems with a hostile debugging environment.
There are times when there’s just no way to get debug symbols working, or where we’re simply debugging on a release version of the software. In those cases, we must directly debug the assembly code. The gdb text user interface (TUI) can be used to examine the disassebled code and the CPU registers. It can be enabled with these commands:
layout asm
layout regs
set print asm-demangle
Some useful keybindings in this mode:
This screenshot shows how we can infer that an empty RefPtr is causing a crash in some WebKit code.

Sometimes, when you continue (‘c’) execution on ARM there’s no way to stop it again unless a breakpoint is hit. But there’s a trick to retake the control: just send a harmless signal to the process.
kill -SIGCONT 1234
Sometimes you need to match threads in the GStreamer logs with threads in a running gdb session. The simplest way is to ask it to GThread for each gdb thread:
(gdb) set output-radix 16
(gdb) thread apply all call g_thread_self()
This will print a list of gdb threads and GThread*. We only need to find the one we’re looking for.
If we have a pointer to the pipeline object, we can call the function that dumps the pipeline:
(gdb) call gst_debug_bin_to_dot_file_with_ts((GstBin*)0x15f0078, GST_DEBUG_GRAPH_SHOW_ALL, "debug")
por eocanha el April 20, 2021 06:00 AM
I’ve been developing and debugging desktop and mobile applications on embedded devices over the last decade or so. The main part of this period I’ve been focused on the multimedia side of the WebKit ports using GStreamer, an area that is a mix of C (glib, GObject and GStreamer) and C++ (WebKit).
Over these years I’ve had to work on ARM embedded devices (mobile phones, set-top-boxes, Raspberry Pi using buildroot) where most of the environment aids and tools we take for granted on a regular x86 Linux desktop just aren’t available. In these situations you have to be imaginative and find your own way to get the work done and debug the issues you find in along the way.
I’ve been writing down the most interesting tricks I’ve found in this journey and I’m sharing them with you in a series of 7 blog posts, one per week. Most of them aren’t mine, and the ones I learnt in the begining of my career can even seem a bit naive, but I find them worth to share anyway. I hope you find them as useful as I do.
You can break on a place, run some command and continue execution. Useful to get logs:
break getenv
command
 # This disables scroll continue messages
 # and supresses output
 silent
 set pagination off
 p (char*)$r0
continue
end

break grl-xml-factory.c:2720 if (data != 0)
command
 call grl_source_get_id(data->source)
 # $ is the last value in the history, the result of
 # the previous call
 call grl_media_set_source (send_item->media, $)
 call grl_media_serialize_extended (send_item->media,
  GRL_MEDIA_SERIALIZE_FULL)
 continue
end
This idea can be combined with watchpoints and applied to trace reference counting in GObjects and know from which places the refcount is increased and decreased.
Just wait until the if chooses a branch and then jump to the other one:
6 if (i > 3) {
(gdb) next
7 printf("%d > 3\n", i);
(gdb) break 9
(gdb) jump 9
9 printf("%d <= 3\n", i);
(gdb) next
5 <= 3
If you get a warning message like this:
W/GLib-GObject(18414): g_object_unref: assertion `G_IS_OBJECT (object)' failed
the functions involved are: g_return_if_fail_warning(), which calls to g_log(). It’s good to set a breakpoint in any of the two:
break g_log
Another method is to export G_DEBUG=fatal_criticals, which will convert all the criticals in crashes, which will stop the debugger.
If you want to inspect the contents of a GObjects that you have in a reference…
(gdb) print web_settings
$1 = (WebKitWebSettings *) 0x7fffffffd020
you can dereference it…
(gdb) print *web_settings
$2 = {parent_instance = {g_type_instance = {g_class = 0x18}, ref_count = 0, qdata = 0x0}, priv = 0x0}
even if it’s an untyped gpointer…
(gdb) print user_data
(void *) 0x7fffffffd020
(gdb) print *((WebKitWebSettings *)(user_data))
{parent_instance = {g_type_instance = {g_class = 0x18}, ref_count = 0, qdata = 0x0}, priv = 0x0}
To find the type, you can use GType:
(gdb) call (char*)g_type_name( ((GTypeInstance*)0x70d1b038)->g_class->g_type )
$86 = 0x2d7e14 "GstOMXH264Dec-omxh264dec"
(gdb) call malloc(sizeof(std::string))
$1 = (void *) 0x91a6a0
(gdb) call ((std::string*)0x91a6a0)->basic_string()
(gdb) call ((std::string*)0x91a6a0)->assign("Hello, World")
$2 = (std::basic_string<char, std::char_traits<char>, std::allocator<char> > &) @0x91a6a0: {static npos = <optimized out>, _M_dataplus = {<std::allocator<char>> = {<__gnu_cxx::new_allocator<char>> = {<No data fields>}, <No data fields>}, _M_p = 0x91a6f8 "Hello, World"}}
(gdb) call SomeFunctionThatTakesAConstStringRef(*(const std::string*)0x91a6a0)
por eocanha el April 13, 2021 10:49 AM

Pedidle a un programador moderno que os diseñe un programa, y pronto os dará un diagrama con clases llamadas
Cliente y Empleado, y Usuario y UsuarioDAO, y ConnectionProvider y ConnectionProviderFactory y
AbstractConnectionProviderFactoryImpl.
Bueno, tal vez sólo los programadores Java se metan en tales fregados, pero está claro que, hoy en día,
cualquier programador conoce y utiliza los conceptos básicos de orientación a objetos. Incluso en lenguajes
no orientados a objetos, los programadores crean y usan structs, o records, o Types o cualesquiera
mecanismos del lenguaje para crear nuevos tipos de datos.
Y, aún así, por muy sabios que nos consideremos los programadores en la actualidad, en nuestros programas todavía
sobreviven vestigios de los viejos tiempos en los que Fortran y COBOL y BASIC sólo nos proporcionaban tipos de datos
primitivos. Cada vez que queremos almacenar una clave primaria de un registro de la base de datos, la ponemos
en una variable de tipo long o string. Si queremos pasarle un timestamp a una función, usamos un
argumento de tipo int o long. ¿Una función que devuelve un UUID? Tipo string. ¿Una cadena de texto
recibida del usuario? ¿Una cadena de texto lista para insertar en un documento HTML? Ambas, tipo string.
Utilizamos los mismos tipos de datos, una y otra vez, para cosas tan diferentes como claves primarias de distintas tablas y timestamps en segundos y milisegundos, o URIs y UUIDs. Ésta es una práctica extremadamente habitual que, también, es una causa de errores extremadamente habitual. ¿Quién no ha escrito nunca código que intenta buscar un registro en la tabla equivocada, o que compara segundos y microsegundos, o que inserta una cadena de texto sin escapar en un documento HTML?
En este artículo os describo tres estrategias para tratar con esos objetos, evitar confusiones como las que describo arriba, y evitar errores de programación.
¿Conocéis el Internet Archive? Es una organización sin ánimo de lucro que quiere formar una “biblioteca de Internet” archivando todas las páginas web del mundo para conservarlas y para que podamos verlas en el futuro.
Podéis suponer que el código fuente del Internet Archive trabaja mucho con URIs. Cada página web tiene su propio URI y contiene otros URIs de todas las páginas web a las que enlaza. En el archivo, las páginas web están indexadas mediante sus URIs para que los usuarios puedan acceder a ellas. En definitiva, para el Internet Archive, los URIs son el pan nuestro de cada día.
Los programadores siempre estamos tentados de almacenar URIs en variables de tipo string. Vemos una cadena
alfanumérica y nos decimos: “eso es fácil: es una cadena de texto, así que tipo string”. Sin embargo, los URIs
no son sólo cadenas de texto. Los URIs tienen ciertas reglas que deben cumplir en todo momento: han de seguir un
cierto formato, ciertos caracteres no son válidos, hay secuencias de escape, etc.
Cuando almacenamos un URI en una variable de tipo string, el sistema no sabe nada de esas reglas. La variable
podría contener un URI mal formateado, o incluso algo que no es un URI en absoluto, y no habría ningún mensaje
de error ni nada parecido hasta que intentásemos usarla y se rompiera algo. Por lo tanto, necesitamos
escribir (y acordarnos de utilizar siempre) código que, cada vez que asignemos un nuevo valor a la variable,
lo verifique y normalice. Si no lo hacemos, nos exponemos a una multitud de posibles errores de programación.
Tal vez no seamos capaz de encontrar la página web que el usuario busca, tal vez tengamos un XSS en nuestra página,
o algún otro problema entre medias.
Para solucionar el problema con más eficacia tenemos que reconocer que un URI no es una cadena de texto que podamos
manipular usando sólo variables de tipo string, sino que tenemos que utilizar una clase específica que codifique
todas las reglas y el formato de un URI. Esta clase URI ha de tener funciones para convertir una cadena de texto
en un objeto de tipo URI, aplicando todas las reglas de validación y normalización, y también necesita tener
funciones para extraer las distintas partes del URI y obtener una representación del URI en forma de cadena de texto.
La mayoría de los lenguajes modernos incluyen una clase URI en su biblioteca estándar, así que sólo tendremos que
acordarnos de utilizarla en lugar del tipo string en cualquier lugar en el que tratemos con URIs.
El Internet Archive, en su página principal, tiene una caja de texto en la que un usuario puede escribir un URI y
ver qué había en esa página en algún momento del pasado. El servidor web recibe la petición web que contiene ese URI
en forma de cadena de caracteres; lo primero que hace el servidor es convertirlo en un objeto de tipo URI. A partir
de ese momento, ese URI está validado y formateado, por lo que el servidor puede pasarlo al servicio de
almacenamiento, que podrá recuperar el contenido de la página web.
A veces no podemos utilizar clases proporcionadas por nuestra biblioteca estándar y tenemos que escribirlas nosotros
mismos. Por ejemplo, hace años trabajé en un proyecto que tenía una base de datos que almacenaba objetos indexados
mediante un identificador que seguía el formato HHHHHHHH-V, donde H era un dígito hexadecimal y V era un número
de versión de uno o más dígitos.
Los programadores originales del sistema no se habían puesto de acuerdo en cómo tratar estos identificadores.
En algunas partes del programa, el identificador iba almacenado en una variable de tipo string. En otras partes,
el identificador estaba dividido en dos variables: una de tipo string que contenía los dígitos hexadecimales
y otra de tipo int que contenía el número de versión. Nuestro código muchas veces se parecía a esto:
public List<String> buscaIdsAsociados(String id)
        throws IllegalArgumentException, NotFoundException {
    if (!esValido(id)) {
        throw new IllegalArgumentException();
    }
    String hexa = extraeHexa(id);
    int version = extraeVersion(id);
    Registro registro = buscaRegistro(hexa, version);
    List<String> idsAsociados = new ArrayList<>();
    for (Registro asociado : registro.getRegistrosAsociados()) {
        idsAsociados.add(asociado.getHexa() + "-" + asociado.getVersion());
    }
    return idsAsociados;
}

public Registro buscaRegistro(String hexa, int version) {
    Query query = createQuery("SELECT * FROM Registros WHERE hexa=?, version=?",
                              hexa, version);
    return convertir(query.execute());
}
Como podéis ver, era un jaleo. Nos pasábamos el tiempo validando identificadores y dividiéndolos en dos partes y reensamblándolos y buscando errores causados por sitios donde nos habíamos olvidado de validar o donde habíamos pasado un identificador cuando necesitábamos la parte hexadecimal o viceversa.
La solución a este problema consistió en reconocer que un identificador es un nuevo tipo de entidad y no sólo una cadena de texto, y crear una clase dedicada a almacenar y manipular identificadores.
public class Identificador {
    private String hexa;
    private int version;

    private Identificador(String hexa, int version) {
        this.hexa = hexa;
        this.version = version;
    }

    public String getHexa() { return hexa; }
    public int getVersion() { return version; }
    public String toString() { return hexa + "-" + version; }

    public static Identificador crear(String id) throws IllegalArgumentException {
        // Validación y extracción de las partes del identificador
        ...
        String hexa = ...;
        int version = ...;
        return new Identificador(hexa, version);
    }
}
Y, con esto, pudimos simplificar nuestro código, evitando las constantes validaciones y tratando los identificadores de la misma manera en todo el programa, eliminando cientos de líneas de código y oportunidades para introducir errores.
public List<Identificador> buscaIdsAsociados(Identificador id)
        throws NotFoundException {
    Registro registro = buscaRegistro(id);
    List<Identificador> idsAsociados = new ArrayList<>();
    for (Registro asociado : registro.getRegistrosAsociados()) {
        idsAsociados.add(asociado.getIdentificador());
    }
    return idsAsociados;
}

public Registro buscaRegistro(Identificador id) {
    Query query = createQuery("SELECT * FROM Registros WHERE hexa=?, version=?",
                              identificador.getHexa(), identificador.getVersion());
    return convertir(query.execute());
}
En el mundillo de las bases de datos hay dos escuelas: la escuela de los que utilizan INTs para las claves primarias
y la escuela de los que utilizan UUIDs. Sea cual sea la escuela a la que pertenezca vuestro DBA, vuestro código va a
acabar lleno de variables, todas del mismo tipo, que contienen claves primarias pertenecientes a distintas tablas.
long idArticulo = getLongParam("idArticulo");
long idComentario = getLongParam("idComentario");
Comentario comentario = cargaComentario(idArticulo, idComentario);
long idUsuario = comentario.idAutor();
Usuario usuario = cargaUsuario(idArticulo);
outputTemplate("comentario", usuario, comentario);
Este podría ser parte del código fuente de un CMS: una función que gestiona la respuesta a una operación HTTP GET
para mostrar un comentario de un artículo. Esta función recibe un identificador de artículo y de comentario,
carga el comentario y los datos del usuario que publicó el comentario, y los convierte a HTML para mostrarlos en el navegador.
La base de datos utiliza números enteros para las claves primarias, y el lenguaje las almacena en variables de tipo
long. Tenemos una clave para el artículo, otra para el comentario y otra para el usuario. Y como todas
estas claves van en variables del mismo tipo, es muy fácil confundirse y mezclarlas sin darse cuenta. De hecho,
el código de arriba contiene un error. ¿Cuánto tiempo os lleva descubrirlo?
Aunque todas las claves primarias van en variables del mismo tipo, no son intercambiables. Si pasamos un identificador de usuario a una función que espera un identificador de artículo, esta función nos dará un resultado incorrecto. Lo malo es que no nos daremos cuenta de esta confusión hasta que probemos el programa y nos demos cuenta del error; o, peor todavía, hasta que un usuario lo vea y nos avise. O, lo peor de todo, nunca nos daremos cuenta y terminaremos corrompiendo datos.
Si estas claves no son intercambiables en la práctica, tampoco deberían ser intercambiables en el código. Podemos lograr esto muy fácilmente usando clases distintas para las claves primarias de cada tabla.
IdArticulo idArticulo = new IdArticulo(getLongParam("idArticulo"));
IdComentario idComentario = new IdComentario(getLongParam("idComentario"));
Comentario comentario = cargaComentario(idArticulo, idComentario);
IdUsuario idUsuario = comentario.idAutor();
Usuario usuario = cargaUsuario(idArticulo); // El compilador nos da un error aquí.
outputTemplate("comentario", usuario, comentario);
Crear estas clases es superfácil en la mayoría de los lenguajes modernos. Por ejemplo, en Java, podemos crear una clase base que incorpore toda la funcionalidad, y después añadir una línea de código para cada tipo.
public abstract class Id {
    private long id;
    public Id(long id) { this.id = id; }
    public long getId() { return id; }
    public String toString() { return getClass().getSimpleName() + "=" + id; }
}

public IdArticulo extends Id { public IdArticulo(long id) { super(id); } }

public IdComentario extends Id { public IdComentario(long id) { super(id); } }

public IdUsuario extends Id { public IdUsuario(long id) { super(id); } }
Esta técnica también os va a resultar útil en tareas de procesamiento de datos, en las que podríamos estar manejando datos pertenecientes a distintas etapas de procesamiento al mismo tiempo sin querer mezclarlos. Hoy en día, os la encontraréis más habitualmente a la hora de evitar XSS en aplicaciones web.
Muchas aplicaciones web necesitan recibir una cadena de texto del usuario, procesarla de alguna manera, y finalmente mostrarla en una página web. Si no tenéis cuidado y pegáis ese texto directamente en el HTML, os expondréis a un ataque XSS; como mínimo, tenéis que escapar esa cadena de texto antes de ponerla en el HTML. A veces, los programadores de las aplicaciones web se confunden y escapan una cadena dos veces, y después los usuarios ven cosas raras como “técnica” en lugar de “técnica”. O hacen mal el escape de cadenas para SQL y después los usuarios ven “O\'Connell” en lugar de “O'Connell”.
Para evitar estos problemas, muchos frameworks web modernos no nos permiten pegar strings directamente,
sino que nos obligan a usar tipos especiales que contienen cadenas de texto ya escapadas. Podemos crear
una instancia de uno de esos tipos a partir de una cadena sin escapar, y a partir de entonces ya no
cabe confusión: dondequiera que utilicemos esa clase, es una cadena ya escapada y lista para insertar en
código HTML.
Es muy habitual utilizar ints y longs para representar intervalos de tiempo. La cuestión es: ¿en qué
unidad? El sistema operativo Unix utiliza segundos pero los lenguajes Java y JavaScript utilizan
milisegundos. Yo he trabajado con sistemas que utilizaban microsegundos y nanosegundos. Muchas veces es
necesario utilizar distintas unidades en distintos lugares de un mismo programa, dependiendo de quién
haya escrito el código o qué función reciba un determinado número.
El problema es que todos esos intervalos de tiempo se representan como un long, así sin más, sin marcar
las unidades empleadas de ninguna manera, así que es muy fácil pasar a una función un número de milisegundos
cuando espera segundos, o restar microsegundos de nanosegundos, u otras operaciones sin sentido que acabamos
realizando sin querer.
Podríamos caer en la tentación de intentar solucionar este problema creando un nuevo tipo para cada unidad.
Una clase Segundos almacenaría un intervalo medido en segundos, una clase Milisegundos almacenaría otro
intervalo medido en milisegundos, y así sucesivamente. De esta manera ya no podríamos mezclar distintas
unidades sin que el compilador se quejara.
El problema es que, muchas veces, necesitamos convertir entre unas unidades y otras; a veces tenemos una función que devuelve un intervalo medido en segundos que tenemos que pasar a otra función que espera milisegundos, así que necesitamos hacer una conversión. Otras veces, tenemos que combinar dos intervalos que pueden estar medidos en distintas unidades. Esto podríamos solucionando añadiendo funciones de conversión y de suma y de resta para cada par de unidades, pero con cuatro unidades, esto acabarían siendo cuarenta y cuatro funciones en total. Eso es un montón de funciones.
public class Segundos {
    public Milisegundos milisegundos() { return ... }
    public Microsegundos microsegundos() { return ... }
    public Nanosegundos nanosegundos() { return ... }
    public Segundos suma(Segundos otro) { return ... }
    public Segundos suma(Milisegundos otro) { return ... }
    public Segundos suma(Microsegundos otro) { return ... }
    public Segundos suma(Nanosegundos otro) { return ... }
    public Segundos resta(Segundos otro) { return ... }
    public Segundos resta(Milisegundos otro) { return ... }
    public Segundos resta(Microsegundos otro) { return ... }
    public Segundos resta(Nanosegundos otro) { return ... }
}
// Y otras tres veces igual para Milisegundos, Microsegundos y Nanosegundos
Francamente, esta opción no es sostenible. A poco que necesitemos añadir una o dos unidades u operaciones, tendremos que escribir una cantidad de código colosal y, para más inri, la mayor parte consistirá en operaciones de conversión.
La verdadera solución consiste en darse cuenta de que la entidad para la que estamos creando tipos de datos no es el número de segundos, milisegundos o microsegundos. La entidad es el intervalo de tiempo, y todas esas unidades no son más que maneras de medirlo. No necesitamos crear un tipo para cada unidad de tiempo; necesitamos crear un tipo para los intervalos de tiempo, que tenga las operaciones necesarias para poder expresar esos intervalos en las unidades adecuadas.
Por ejemplo, podríamos crear un tipo Intervalo que contenga una variable que expresa la longitud del intervalo
en una unidad cómoda, y que también contenga funciones para expresar ese intervalo en segundos, milisegundos,
microsegundos y nanosegundos, junto con funciones para hacer la conversión inversa.
public class Intervalo {
    private double valor;
    private Intervalo(double valor) { this.valor = valor; }
    // Constructores
    public static Intervalo deSegundos(long segundos) { return new Intervalo(segundos); }
    public static Intervalo deMilisegundos(long milisegundos) { return new Intervalo(milisegundos / 1e3); }
    public static Intervalo deMicrosegundos(long microsegundos) { return new Intervalo(microsegundos / 1e6); }
    public static Intervalo deNanosegundos(long nanosegundos) { return new Intervalo(nanosegundos / 1e9); }
    // Conversiones
    public long segundos() { return (long) valor; }
    public long milisegundos() { return (long) (valor * 1e3); }
    public long microsegundos() { return (long) (valor * 1e6); }
    public long nanosegundos() { return (long) (valor * 1e9); }
    // Combinaciones
    public Intervalo suma(Intervalo otro) { return new Intervalo(valor + otro.valor); }
    public Intervalo resta(Intervalo otro) { return new Intervalo(valor - otro.valor); }
}
Y esto es todo lo que necesitamos para poder representar intervalos de tiempo medidos en varias unidades, y cada vez que añadimos una nueva unidad, sólo necesitamos añadir dos funciones.
Ahora podemos utilizar esta clase para sustituir en nuestro código todos esos longs expresados en unidades
indeterminadas, y así evitar todas las confusiones y oportunidades para errores que mencioné más arriba.
// Viejuno.
// ¿En qué unidad está el _timeout_? ¿Segundos? ¿Milisegundos? ¿Semanas?
Registro buscaRegistro(Identificador id, long timeout) { ... }

// La última moda.
Registro buscaRegistro(Identificador id, Intervalo timeout) { ... }
Muchos lenguajes de programación modernos incluyen una clase parecida a Intervalo en su biblioteca estándar.
Por ejemplo, Java tiene el paquete java.time, que proporciona la clase Duration (junto con otra clase,
llamada Instant, que representa un particular punto en el tiempo). El lenguaje C++, por su parte,
proporciona el namespace std::chrono, con sus clases duration y time_point. En otros lenguajes hay
bibliotecas de terceros que la proporcionan. Utilizadlas siempre que podáis; nunca uséis longs para
representar el tiempo.
A veces, utilizar un tipo primitivo del sistema es lo más sencillo pero puede acabar dándonos muchos
quebraderos de cabeza. Tenemos que pensar en si el número que almacenamos en ese long es realmente
un número o si lo que hay en ese string es una cadena de texto sin más, y crear y utilizar
nuevos tipos de datos cuando éstos tengan algún tipo de complicación o restricción o invariante.
Los humanos sabemos que no podemos sumar dos cerezas a tres naranjas, pero los ordenadores, si sólo ven
dos longs o dos doubles, los sumarán y dividirán sin pensárselo dos veces. Nosotros, los humanos
que sabemos que las entidades distintas pertenecen a tipos distintos, tenemos que comunicarle
esta distinción al ordenador, en forma de nuevos tipos de datos.
Y finalmente, nosotros sabemos que 60 segundos es lo mismo que un minuto, o que 5000 metros equivalen a 5 kilómetros; sin embargo, el ordenador sólo ve una variable que dice “60” y otra que dice “1”, o un valor “5000” y otro “5”. Depende de nosotros decirle al ordenador que ambas cosas son la misma.
La próxima vez que penséis en que estaría bien si pudiéseis “anotar” o “marcar” un número o una cadena de texto para tratarla especialmente, probad a crear y utilizar un nuevo tipo de datos. Al hacerlo, estoy seguro de que vuestros programas serán mucho más fiables y fáciles de leer y modificar.
el January 17, 2021 12:00 AM

In previous blog posts I talked about QEMU’s qcow2 file format and how to make it faster. This post gives an overview of how the data is structured inside the image and how that affects performance, and this presentation at KVM Forum 2017 goes further into the topic.
This time I will talk about a new extension to the qcow2 format that seeks to improve its performance and reduce its memory requirements.
Let’s start by describing the problem.
One of the most important parameters when creating a new qcow2 image is the cluster size. Much like a filesystem’s block size, the qcow2 cluster size indicates the minimum unit of allocation. One difference however is that while filesystems tend to use small blocks (4 KB is a common size in ext4, ntfs or hfs+) the standard qcow2 cluster size is 64 KB. This adds some overhead because QEMU always needs to write complete clusters so it often ends up doing copy-on-write and writing to the qcow2 image more data than what the virtual machine requested. This gets worse if the image has a backing file because then QEMU needs to copy data from there, so a write request not only becomes larger but it also involves additional read requests from the backing file(s).
Because of that qcow2 images with larger cluster sizes tend to:
Unfortunately, reducing the cluster size is in general not an option because it also has an impact on the amount of metadata used internally by qcow2 (reference counts, guest-to-host cluster mapping). Decreasing the cluster size increases the number of clusters and the amount of necessary metadata. This has direct negative impact on I/O performance, which can be mitigated by caching it in RAM, therefore increasing the memory requirements (the aforementioned post covers this in more detail).
The problems described in the previous section are well-known consequences of the design of the qcow2 format and they have been discussed over the years.
I have been working on a way to improve the situation and the work is now finished and available in QEMU 5.2 as a new extension to the qcow2 format called extended L2 entries.
The so-called L2 tables are used to map guest addresses to data clusters. With extended L2 entries we can store more information about the status of each data cluster, and this allows us to have allocation at the subcluster level.
The basic idea is that data clusters are now divided into 32 subclusters of the same size, and each one of them can be allocated separately. This allows combining the benefits of larger cluster sizes (less metadata and RAM requirements) with the benefits of smaller units of allocation (less copy-on-write, smaller images). If the subcluster size matches the block size of the filesystem used inside the virtual machine then we can eliminate the need for copy-on-write entirely.
So with subcluster allocation we get:
This figure shows the average number of I/O operations per second that I get with 4KB random write requests to an empty 40GB image with a fully populated backing file.
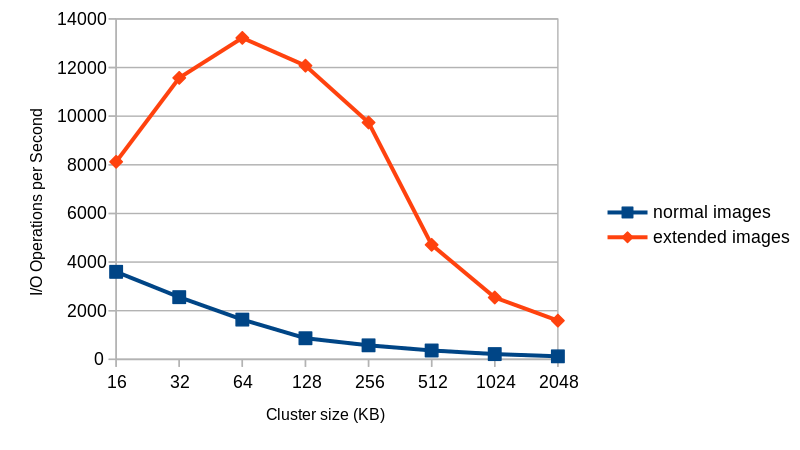 |
Things to take into account:
Extended L2 entries are available starting from QEMU 5.2. Due to the nature of the changes it is unlikely that this feature will be backported to an earlier version of QEMU.
In order to test this you simply need to create an image with extended_l2=on, and you also probably want to use a larger cluster size (the default is 64 KB, remember that every cluster has 32 subclusters). Here is an example:
$ qemu-img create -f qcow2 -o extended_l2=on,cluster_size=128k img.qcow2 1T
And that’s all you need to do. Once the image is created all allocations will happen at the subcluster level.
This work was presented at the 2020 edition of the KVM Forum. Here is the video recording of the presentation, where I cover all this in more detail:
You can also find the slides here.
This work has been possible thanks to Outscale, who have been sponsoring Igalia and my work in QEMU.
 |
And thanks of course to the rest of the QEMU development team for their feedback and help with this!
por berto el December 03, 2020 06:15 PM
If you’re developing C/C++ on embedded devices, you might already have stumbled upon a corrupt stacktrace like this when trying to debug with gdb:
(gdb) bt
#0  0xb38e32c4 in pthread_getname_np () from /home/enrique/buildroot/output5/staging/lib/libpthread.so.0
#1  0xb38e103c in __lll_timedlock_wait () from /home/enrique/buildroot/output5/staging/lib/libpthread.so.0
Backtrace stopped: previous frame identical to this frame (corrupt stack?)
In these cases I usually give up gdb and try to solve my problems by adding printf()s and resorting to other tools. However, there are times when you really really need to know what is in that cursed stack.
ARM devices subroutine calls work by setting the return address in the Link Register (LR), so the subroutine knows where to point the Program Counter (PC) register to. While not jumping into subroutines, the values of the LR register is saved in the stack (to be restored later, right before the current subroutine returns to the caller) and the register can be used for other tasks (LR is a “scratch register”). This means that the functions in the backtrace are actually there, in the stack, in the form of older saved LRs, waiting for us to get them.
So, the first step would be to dump the memory contents of the backtrace, starting from the address pointed by the Stack Pointer (SP). Let’s print the first 256 32-bit words and save them as a file from gdb:
(gdb) set logging overwrite on
(gdb) set logging file /tmp/bt.txt
(gdb) set logging on
Copying output to /tmp/bt.txt.
(gdb) x/256wa $sp
0xbe9772b0:     0x821e  0xb38e103d   0x1aef48   0xb1973df0
0xbe9772c0:      0x73d  0xb38dc51f        0x0          0x1
0xbe9772d0:   0x191d58    0x191da4   0x19f200   0xb31ae5ed
...
0xbe977560: 0xb28c6000  0xbe9776b4        0x5      0x10871 <main(int, char**)>
0xbe977570: 0xb6f93000  0xaaaaaaab 0xaf85fd4a   0xa36dbc17
0xbe977580:      0x130         0x0    0x109b9 <__libc_csu_init> 0x0
...
0xbe977690:        0x0         0x0    0x108cd <_start>  0x0
0xbe9776a0:        0x0     0x108ed <_start+32>  0x10a19 <__libc_csu_fini> 0xb6f76969
(gdb) set logging off
Done logging to /tmp/bt.txt.
Gdb already can name some of the functions (like main()), but not all of them. At least not the ones more interesting for our purpose. We’ll have to look for them by hand.
We first get the memory page mapping from the process (WebKit’s WebProcess in my case) looking in /proc/pid/maps. I’m retrieving it from the device (named metro) via ssh and saving it to a local file. I’m only interested in the code pages, those with executable (‘x’) permissions:
$ ssh metro 'cat /proc/$(ps axu | grep WebProcess | grep -v grep | { read _ P _ ; echo $P ; })/maps | grep " r.x. "' > /tmp/maps.txt
The file looks like this:
00010000-00011000 r-xp 00000000 103:04 2617      /usr/bin/WPEWebProcess
...
b54f2000-b6e1e000 r-xp 00000000 103:04 1963      /usr/lib/libWPEWebKit-0.1.so.2.2.1
b6f6b000-b6f82000 r-xp 00000000 00:02 816        /lib/ld-2.24.so
be957000-be978000 rwxp 00000000 00:00 0          [stack]
be979000-be97a000 r-xp 00000000 00:00 0          [sigpage]
be97b000-be97c000 r-xp 00000000 00:00 0          [vdso]
ffff0000-ffff1000 r-xp 00000000 00:00 0          [vectors]
Now we process the backtrace to remove address markers and have one word per line:
$ cat /tmp/bt.txt | sed -e 's/^[^:]*://' -e 's/[<][^>]*[>]//g' | while read A B C D; do echo $A; echo $B; echo $C; echo $D; done | sed 's/^0x//' | while read P; do printf '%08x\n' "$((16#"$P"))"; done | sponge /tmp/bt.txt
Then merge and sort both files, so the addresses in the stack appear below their corresponding mappings:
$ cat /tmp/maps.txt /tmp/bt.txt | sort > /tmp/merged.txt
Now we process the resulting file to get each address in the stack with its corresponding mapping:
$ cat /tmp/merged.txt | while read LINE; do if [[ $LINE =~ - ]]; then MAPPING="$LINE"; else echo $LINE '-->' $MAPPING; fi; done | grep '/' | sed -E -e 's/([0-9a-f][0-9a-f]*)-([0-9a-f][0-9a-f]*)/\1 - \2/' > /tmp/mapped.txt
Like this (address in the stack, page start (or base), page end, page permissions, executable file load offset (base offset), etc.):
0001034c --> 00010000 - 00011000 r-xp 00000000 103:04 2617 /usr/bin/WPEWebProcess
...
b550bfa4 --> b54f2000 - b6e1e000 r-xp 00000000 103:04 1963 /usr/lib/libWPEWebKit-0.1.so.2.2.1
b5937445 --> b54f2000 - b6e1e000 r-xp 00000000 103:04 1963 /usr/lib/libWPEWebKit-0.1.so.2.2.1
b5fb0319 --> b54f2000 - b6e1e000 r-xp 00000000 103:04 1963 /usr/lib/libWPEWebKit-0.1.so.2.2.1
...
The addr2line tool can give us the exact function an address belongs to, or even the function and source code line if the code has been built with symbols. But the addresses addr2line understands are internal offsets, not absolute memory addresses. We can convert the addresses in the stack to offsets with this expression:
offset = address - page start + base offset
I’m using buildroot as my cross-build environment, so I need to pick the library files from the staging directory because those are the unstripped versions. The addr2line tool is the one from the buldroot cross compiling toolchain. Written as a script:
$ cat /tmp/mapped.txt | while read ADDR _ BASE _ END _ BASEOFFSET _ _ FILE; do OFFSET=$(printf "%08x\n" $((0x$ADDR - 0x$BASE + 0x$BASEOFFSET))); FILE=~/buildroot/output/staging/$FILE; if [[ -f $FILE ]]; then LINE=$(~/buildroot/output/host/usr/bin/arm-buildroot-linux-gnueabihf-addr2line -p -f -C -e $FILE $OFFSET); echo "$ADDR $LINE"; fi; done > /tmp/addr2line.txt
Finally, we filter out the useless [??] entries:
$ cat /tmp/bt.txt | while read DATA; do cat /tmp/addr2line.txt | grep "$DATA"; done | grep -v '[?][?]' > /tmp/fullbt.txt
What remains is something very similar to what the real backtrace should have been if everything had originally worked as it should in gdb:
b31ae5ed gst_pad_send_event_unchecked en /home/enrique/buildroot/output5/build/gstreamer1-1.10.4/gst/gstpad.c:5571
b31a46c1 gst_debug_log en /home/enrique/buildroot/output5/build/gstreamer1-1.10.4/gst/gstinfo.c:444
b31b7ead gst_pad_send_event en /home/enrique/buildroot/output5/build/gstreamer1-1.10.4/gst/gstpad.c:5775
b666250d WebCore::AppendPipeline::injectProtectionEventIfPending() en /home/enrique/buildroot/output5/build/wpewebkit-custom/build-Release/../Source/WebCore/platform/graphics/gstreamer/mse/AppendPipeline.cpp:1360
b657b411 WTF::GRefPtr<_GstEvent>::~GRefPtr() en /home/enrique/buildroot/output5/build/wpewebkit-custom/build-Release/DerivedSources/ForwardingHeaders/wtf/glib/GRefPtr.h:76
b5fb0319 WebCore::HTMLMediaElement::pendingActionTimerFired() en /home/enrique/buildroot/output5/build/wpewebkit-custom/build-Release/../Source/WebCore/html/HTMLMediaElement.cpp:1179
b61a524d WebCore::ThreadTimers::sharedTimerFiredInternal() en /home/enrique/buildroot/output5/build/wpewebkit-custom/build-Release/../Source/WebCore/platform/ThreadTimers.cpp:120
b61a5291 WTF::Function<void ()>::CallableWrapper<WebCore::ThreadTimers::setSharedTimer(WebCore::SharedTimer*)::{lambda()#1}>::call() en /home/enrique/buildroot/output5/build/wpewebkit-custom/build-Release/DerivedSources/ForwardingHeaders/wtf/Function.h:101
b6c809a3 operator() en /home/enrique/buildroot/output5/build/wpewebkit-custom/build-Release/../Source/WTF/wtf/glib/RunLoopGLib.cpp:171
b6c80991 WTF::RunLoop::TimerBase::TimerBase(WTF::RunLoop&)::{lambda(void*)#1}::_FUN(void*) en /home/enrique/buildroot/output5/build/wpewebkit-custom/build-Release/../Source/WTF/wtf/glib/RunLoopGLib.cpp:164
b6c80991 WTF::RunLoop::TimerBase::TimerBase(WTF::RunLoop&)::{lambda(void*)#1}::_FUN(void*) en /home/enrique/buildroot/output5/build/wpewebkit-custom/build-Release/../Source/WTF/wtf/glib/RunLoopGLib.cpp:164
b2ad4223 g_main_context_dispatch en :?
b6c80601 WTF::{lambda(_GSource*, int (*)(void*), void*)#1}::_FUN(_GSource*, int (*)(void*), void*) en /home/enrique/buildroot/output5/build/wpewebkit-custom/build-Release/../Source/WTF/wtf/glib/RunLoopGLib.cpp:40
b6c80991 WTF::RunLoop::TimerBase::TimerBase(WTF::RunLoop&)::{lambda(void*)#1}::_FUN(void*) en /home/enrique/buildroot/output5/build/wpewebkit-custom/build-Release/../Source/WTF/wtf/glib/RunLoopGLib.cpp:164
b6c80991 WTF::RunLoop::TimerBase::TimerBase(WTF::RunLoop&)::{lambda(void*)#1}::_FUN(void*) en /home/enrique/buildroot/output5/build/wpewebkit-custom/build-Release/../Source/WTF/wtf/glib/RunLoopGLib.cpp:164
b2adfc49 g_poll en :?
b2ad44b7 g_main_context_iterate.isra.29 en :?
b2ad477d g_main_loop_run en :?
b6c80de3 WTF::RunLoop::run() en /home/enrique/buildroot/output5/build/wpewebkit-custom/build-Release/../Source/WTF/wtf/glib/RunLoopGLib.cpp:97
b6c654ed WTF::RunLoop::dispatch(WTF::Function<void ()>&&) en /home/enrique/buildroot/output5/build/wpewebkit-custom/build-Release/../Source/WTF/wtf/RunLoop.cpp:128
b5937445 int WebKit::ChildProcessMain<WebKit::WebProcess, WebKit::WebProcessMain>(int, char**) en /home/enrique/buildroot/output5/build/wpewebkit-custom/build-Release/../Source/WebKit/Shared/unix/ChildProcessMain.h:64
b27b2978 __bss_start en :?
I hope you find this trick useful and the scripts handy in case you ever to resort to examining the raw stack to get a meaningful backtrace.
Happy debugging!
por eocanha el October 16, 2020 06:07 PM
At the end of the last year I wrote a long blog post summarizing the main work I was involved with as part of Igalia’s Chromium team. In it I mentioned that a big chunk of my time was spent working on the migration to the new C++ Mojo types across the entire codebase of Chromium, in the context of the Onion Soup 2.0 project.
For those of you who don’t know what Mojo is about, there is extensive information about it in Chromium’s documentation, but for the sake of this post, let’s simplify things and say that Mojo is a modern replacement to Chromium’s legacy IPC APIs which enables a better, simpler and more direct way of communication among all of Chromium’s different processes.

One interesting thing about this conversion is that, even though Mojo was already “the new thing” compared to Chromium’s legacy IPC APIs, the original Mojo API presented a few problems that could only be fixed with a newer API. This is the main reason that motivated this migration, since the new Mojo API fixed those issues by providing less confusing and less error-prone types, as well as additional checks that would force your code to be safer than before, and all this done in a binary compatible way. Please check out the Mojo Bindings Conversion Cheatsheet for more details on what exactly those conversions would be about.
Another interesting aspect of this conversion is that, unfortunately, it wouldn’t be as easy as running a “search & replace” operation since in most cases deeper changes would need to be done to make sure that the migration wouldn’t break neither existing tests nor production code. This is the reason why we often had to write bigger refactorings than what one would have anticipated for some of those migrations, or why sometimes some patches took a bit longer to get landed as they would span way too much across multiple directories, making the merging process extra challenging.
Now combine all this with the fact that we were confronted with about 5000 instances of the old types in the Chromium codebase when we started, spanning across nearly every single subdirectory of the project, and you’ll probably understand why this was a massive feat that would took quite some time to tackle.
Turns out, though, that after just 6 months since we started working on this and more than 1100 patches landed upstream, our team managed to have nearly all the existing uses of the old APIs migrated to the new ones, reaching to a point where, by the end of December 2019, we had completed 99.21% of the entire migration! That is, we basically had almost everything migrated back then and the only part we were missing was the migration of //components/arc, as I already announced in this blog back in December and in the chromium-mojo mailing list.

Progress of migrations to the new Mojo syntax by December 2019
This was good news indeed. But the fact that we didn’t manage to reach 100% was still a bit of a pain point because, as Kentaro Hara mentioned in the chromium-mojo mailing list yesterday, “finishing 100% is very important because refactoring projects that started but didn’t finish leave a lot of tech debt in the code base”. And surely we didn’t want to leave the project unfinished, so we kept collaborating with the Chromium community in order to finish the job.
The main problem with //components/arc was that, as explained in the bug where we tracked that particular subtask, we couldn’t migrate it yet because the external libchrome repository was still relying on the old types! Thus, even though almost nothing else in Chromium was using them at that point, migrating those .mojom files under //components/arc to the new types would basically break libchrome, which wouldn’t have a recent enough version of Mojo to understand them (and no, according to the people collaborating with us on this effort at that particular moment, getting Mojo updated to a new version in libchrome was not really a possibility).
So, in order to fix this situation, we collaborated closely with the people maintaining the libchrome repository (external to Chromium’s repository and still relies in the old mojo types) to get the remaining migration, inside //components/arc, unblocked. And after a few months doing some small changes here and there to provide the libchrome folks with the tools they’d need to allow them to proceed with the migration, they could finally integrate the necessary changes that would ultimately allow us to complete the task.
Once this important piece of the puzzle was in place, all that was left was for my colleague Abhijeet to land the CL that would migrate most of //components/arc to the new types (a CL which had been put on hold for about 6 months!), and then to land a few CLs more on top to make sure we did get rid of any trace of old types that might still be in codebase (special kudos to my colleague Gyuyoung, who wrote most of those final CLs).

Progress of migrations to the new Mojo syntax by July 2020
After all this effort, which would sit on top of all the amazing work that my team had already done in the second half of 2019, we finally reached the point where we are today, when we can proudly and loudly announce that the migration of the old C++ Mojo types to the new ones is finally complete! Please feel free to check out the details on the spreadsheet tracking this effort.
So please join me in celebrating this important milestone for the Chromium project and enjoy the new codebase free of the old Mojo types. It’s been difficult but it definitely pays off to see it completed, something which wouldn’t have been possible without all the people who contributed along the way with comments, patches, reviews and any other type of feedback. Thank you all! 

 Last, while the main topic of this post is to celebrate the unblocking of these last migrations we had left since December 2019, I’d like to finish acknowledging the work of all my colleagues from Igalia who worked along with me on this task since we started, one year ago. That is, Abhijeet, Antonio, Gyuyoung, Henrique, Julie and Shin.
Now if you’ll excuse me, we need to get back to working on the Onion Soup 2.0 project because we’re not done yet: at the moment we’re mostly focused on converting remote calls using Chromium’s legacy IPC to Mojo (see the status report by Dave Tapuska) and helping finish Onion Soup’ing the remaining directores under //content/renderer (see the status report by Kentaro Hara), so there’s no time to waste. But those migrations will be material for another post, of course.
por mario el July 08, 2020 08:55 AM
After the latest migration of WebKitGTK test bots to use the new SDK based on Flatpak, the old development environment based on jhbuild became deprecated. It can still be used with export WEBKIT_JHBUILD=1, though, but support for this way of working will gradually fade out.
I used to work on a chroot because I love the advantages of having an isolated and self-contained environment, but an issue in the way bubblewrap manages mountpoints basically made it impossible to use the new SDK from a chroot. It was time for me to update my development environment to the new ages and have it working in my main Kubuntu 18.04 distro.
My mail goal was to have a comfortable IDE that follows standard GUI conventions (that is, no emacs nor vim) and has code indexing features that (more or less) work with the WebKit codebase. Qt Creator was providing all that to me in the old chroot environment thanks to some configuration tricks by Alicia, so it should be good for the new one.
I preferred to use the Qt Creator 4.12.2 offline installer for Linux, so I can download exactly the same version in the future in case I need it, but other platforms and versions are also available.
The WebKit source code can be downloaded as always using git:
git clone git.webkit.org/WebKit.git
It’s useful to add WebKit/Tools/Scripts and WebKit/Tools/gtk to your PATH, as well as any other custom tools you may have. You can customize your $HOME/.bashrc for that, but I prefer to have an env.sh environment script to be sourced from the current shell when I want to enter into my development environment (by running webkit). If you’re going to use it too, remember to adjust to your needs the paths used there.
Even if you have a pretty recent distro, it’s still interesting to have the latests Flatpak tools. Add Alex Larsson’s PPA to your apt sources:
sudo add-apt-repository ppa:alexlarsson/flatpak
In order to ensure that your distro has all the packages that webkit requires and to install the WebKit SDK, you have to run these commands (I omit the full path). Downloading the Flatpak modules will take a while, but at least you won’t need to build everything from scratch. You will need to do this again from time to time, every time the WebKit base dependencies change:
install-dependencies
update-webkitgtk-libs
Now just build WebKit and check that MiniBrowser works:
build-webkit --gtk
run-minibrowser --gtk
I have automated the previous steps as go full-rebuild and runtest.sh.
This build process should have generated a WebKit/WebKitBuild/GTK/Release/compile_commands.json
file with the right parameters and paths used to build each compilation unit in the project. This file can be leveraged by Qt Creator to get the right include paths and build flags after some preprocessing to translate the paths that make sense from inside Flatpak to paths that make sense from the perspective of your main distro. I wrote compile_commands.sh to take care of those transformations. It can be run manually or automatically when calling go full-rebuild or go update.
The WebKit way of managing includes is a bit weird. Most of the cpp files include config.h and, only after that, they include the header file related to the cpp file. Those header files depend on defines declared transitively when including config.h, but that file isn’t directly included by the header file. This breaks the intuitive rule of “headers should include any other header they depend on” and, among other things, completely confuse code indexers. So, in order to give the Qt Creator code indexer a hand, the compile_commands.sh script pre-includes WebKit.config for every file and includes config.h from it.
With all the needed pieces in place, it’s time to import the project into Qt Creator. To do that, click File → Open File or Project, and then select the compile_commands.json file that compile_commands.sh should have generated in the WebKit main directory.
Now make sure that Qt Creator has the right plugins enabled in Help → About Plugins…. Specifically: GenericProjectManager, ClangCodeModel, ClassView, CppEditor, CppTools, ClangTools, TextEditor and LanguageClient (more on that later).
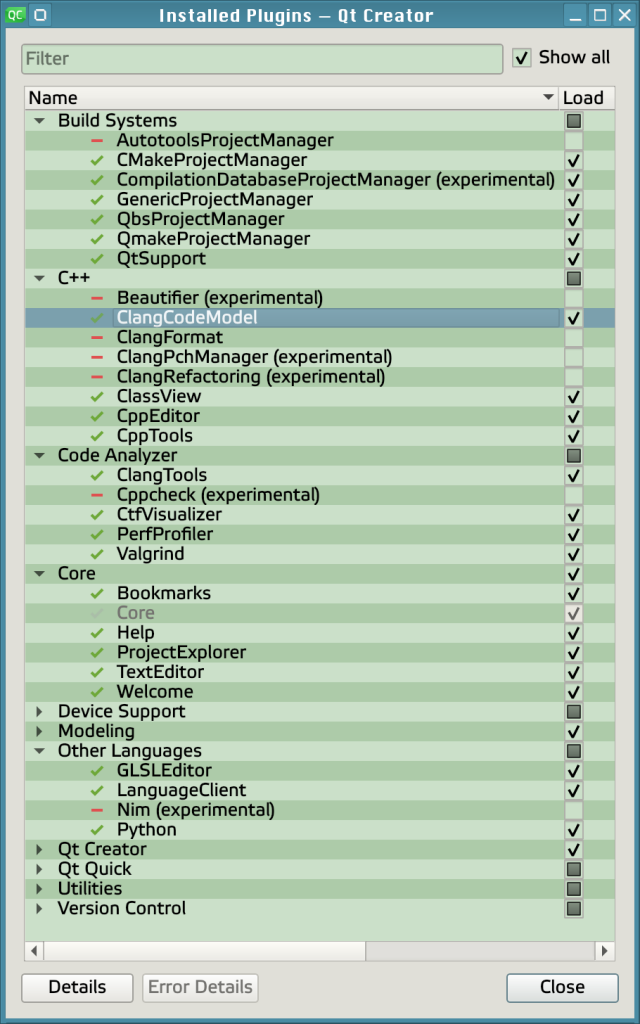
With this setup, after a brief initial indexing time, you will have support for features like Switch header/source (F4), Follow symbol under cursor (F2), shading of disabled if-endif blocks, auto variable type resolving and code outline. There are some oddities of compile_commands.json based projects, though. There are no compilation units in that file for header files, so indexing features for them only work sometimes. For instance, you can switch from a method implementation in the cpp file to its declaration in the header file, but not the opposite. Also, you won’t see all the source files under the Projects view, only the compilation units, which are often just a bunch of UnifiedSource-*.cpp files. That’s why I prefer to use the File System view.
Additional features like Open Type Hierarchy (Ctrl+Shift+T) and Find References to Symbol Under Cursor (Ctrl+Shift+U) are only available when a Language Client for Language Server Protocol is configured. Fortunately, the new WebKit SDK comes with the ccls C/C++/Objective-C language server included. To configure it, open Tools → Options… → Language Client and add a new item with the following properties:
*.c;.cpp;*.h/home/enrique/work/webkit/WebKit/Tools/Scripts/webkit-flatpak--gtk -c ccls --index=/home/enrique/work/webkit/WebKitSome “LanguageClient ccls: Unexpectedly finished. Restarting in 5 seconds.” errors will appear in the General Messages panel after configuring the language client and every time you launch Qt Creator. It’s just ccls taking its time to index the whole source code. It’s “normal”, don’t worry about it. Things will get stable and start to work after some minutes.
Due to the way the Locator file indexer works in Qt Creator, it can become confused, run out of memory and die if it finds cycles in the project file tree. This is common when using Flatpak and running the MiniBrowser or the tests, since /proc and other large filesystems are accessible from inside WebKit/WebKitBuild. To avoid that, open Tools → Options… → Environment → Locator and set Refresh interval to 0 min.
I also prefer to call my own custom build and run scripts (go and runtest.sh) instead of letting Qt Creator build the project with the default builders and mess everything. To do that, from the Projects mode (Ctrl+5), click on Build & Run → Desktop → Build and edit the build configuration to be like this:
/home/enrique/work/webkit/WebKitgo (no absolute route because I have it in my PATH)/home/enrique/work/webkit/WebKitThen, for Build & Run → Desktop → Run, use these options:
With these configuration you can build the project with Ctrl+B and run it with Ctrl+R.
I think I’m not forgetting anything more regarding environment setup. With the instructions in this post you can end up with a pretty complete IDE. Here’s a screenshot of it working in its full glory:
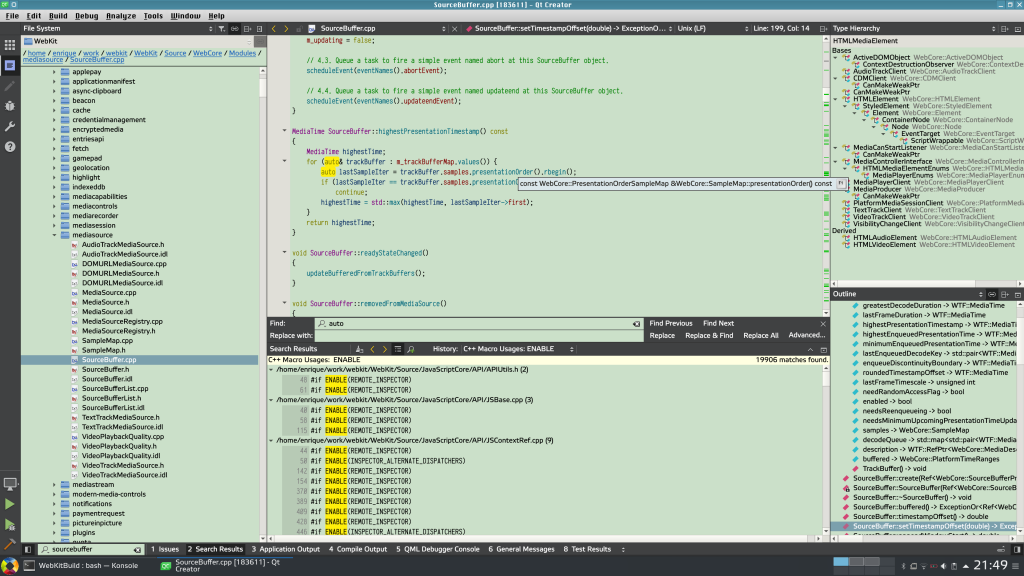
Anyway, to be honest, nothing will ever reach the level of code indexing features I got with Eclipse some years ago. I could find usages of a variable/attribute and know where it was being read, written or read-written. Unfortunately, that environment stopped working for me long ago, so Qt Creator has been the best I’ve managed to get for a while.
Properly configured web based indexers such as the Searchfox instance configured in Igalia can also be useful alternatives to a local setup, although they lack features such as type hierarchy.
I hope you’ve found this post useful in case you try to setup an environment similar to the one described here. Enjoy!
por eocanha el June 30, 2020 02:47 PM
Working on Web browsers development is not an easy feat but if there’s something I’m personally very grateful for when it comes to collaborating with this kind of software projects, it is their testing infrastructure and the peace of mind that it provides me with when making changes on a daily basis.
To help you understand the size of these projects, they involve millions of lines of code (Chromium is ~25 million lines of code, followed closely by Firefox and WebKit) and around 200-300 new patches landing everyday. Try to imagine, for one second, how we could make changes if we didn’t have such testing infrastructure. It would basically be utter and complete chaos and, more especially, it would mean extremely buggy Web browsers, broken implementations of the Web Platform and tens (hundreds?) of new bugs and crashes piling up every day… not a good thing at all for Web browsers, which are these days some of the most widely used applications (and not just ‘the thing you use to browse the Web’).

The Chromium Trybots in action
Now, there are all different types of tests that Web engines run automatically on a regular basis: Unit tests for checking that APIs work as expected, platform-specific tests to make sure that your software runs correctly in different environments, performance tests to help browsers keep being fast and without increasing too much their memory footprint… and then, of course, there are the tests to make sure that the Web engines at the core of these projects implement the Web Platform correctly according to the numerous standards and specifications available.
And it’s here where I would like to bring your attention with this post because, when it comes to these last kind of tests (what we call “Web tests” or “layout tests”), each Web engine used to rely entirely on their own set of Web tests to make sure that they implemented the many different specifications correctly.
Clearly, there was some room for improvement here. It would be wonderful if we could have an engine-independent set of tests to test that a given implementation of the Web Platform works as expected, wouldn’t it? We could use that across different engines to make sure not only that they work as expected, but also that they also behave exactly in the same way, and therefore give Web developers confidence on that they can rely on the different specifications without having to implement engine-specific quirks.
Good news is that just such an ideal thing exists. It’s called the Web Platform Tests project. As it is concisely described in it’s official site:
“The web-platform-tests project is a cross-browser test suite for the Web-platform stack. Writing tests in a way that allows them to be run in all browsers gives browser projects confidence that they are shipping software which is compatible with other implementations, and that later implementations will be compatible with their implementations.”
I’d recommend visiting its website if you’re interested in the topic, watching the “Introduction to the web-platform-tests” video or even glance at the git repository containing all the tests here. Here, you can also find specific information such as how to run WPTs or how to write them. Also, you can have a look as well at the wpt.fyi dashboard to get a sense of what tests exists and how some of the main browsers are doing.
In short: I think it would be safe to say that this project is critical to the health of the whole Web Platform, and ultimately to Web developers. What’s very, very surprising is how long it took to get to where it is, since it came into being only about halfway into the history of the Web (there were earlier testing efforts at the W3C, but none that focused on automated & shared testing). But regardless of that, this is an interesting challenge: Filling in all of the missing unified tests, while new things are being added all the time!
Luckily, this was a challenge that did indeed took off and all the major Web engines can now proudly say that they are regularly running about 36500 of these Web engine-independent tests (providing ~1.7 million sub-tests in total), and all the engines are showing off a pass rate between 91% and 98%. See the numbers below, as extracted from today’s WPT data:
| Chrome 84 | Edge 84 | Firefox 78 | Safari 105 preview | ||||
| Pass | Total | Pass | Total | Pass | Total | Pass | Total |
| 1680105 | 1714711 | 1669977 | 1714195 | 1640985 | 1698418 | 1543625 | 1695743 |
| Pass rate: 97.98% | Pass rate: 97.42% | Pass rate: 96.62% | Pass rate: 91.03% | ||||
And here at Igalia, we’ve recently had the opportunity to work on this for a little while and so I’d like to write a bit about that…
As you all know, we’re in the middle of an unprecedented world-wide crisis that is affecting everyone in one way or another. One particular consequence of it in the context of the Chromium project is that Chromium releases were paused for a while. On top of this, some constraints on what could be landed upstream were put in place to guarantee quality and stability of the Chromium platform during this strange period we’re going through these days.
These particular constraints impacted my team in that we couldn’t really keep working on the tasks we were working on up to that point, in the context of the Chromium project. Our involvement with the Blink Onion Soup 2.0 project usually requires the landing of relatively large refactors, and these kind of changes were forbidden for the time being.
Fortunately, we found an opportunity to collaborate in the meantime with the Web Platform Tests project by analyzing and trying to upstream many of the existing Chromium-specific tests that haven’t yet been unified. This is important because tests exist for widely used specifications, but if they aren’t in Web Platform Tests, their utility and benefits are limited to Chromium. If done well, this would mean that all of the tests that we managed to upstream would be immediately available for everyone else too. Firefox and WebKit-based browsers would not only be able to identify missing features and bugs, but also be provided with an extra set of tests to check that they were implementing these features correctly, and interoperably.

The WPT Dashboard
It was an interesting challenge considering that we had to switch very quickly from writing C++ code around the IPC layers of Chromium to analyzing, migrating and upstreaming Web tests from the huge pool of Chromium tests. We focused mainly on CSS Grid Layout, Flexbox, Masking and Filters related tests… but I think the results were quite good in the end:
As of today, I’m happy to report that, during the ~4 weeks we worked on this my team migrated 240 Chromium-specific Web tests to the Web Platform Tests’ upstream repository, helping increase test coverage in other Web Engines and thus helping towards improving interoperability among browsers:
But there is more to this than just numbers. Ultimately, as I said before, these migrations should help identifying missing features and bugs in other Web engines, and that was precisely the case here. You can easily see this by checking the list of automatically created bugs in Firefox’s bugzilla, as well as some of the bugs filed in WebKit’s bugzilla during the time we worked on this.
…and note that this doesn’t even include the additional 96 Chromium-specific tests that we analyzed but determined were not yet eligible for migrating to WPT (normally because they relied on some internal Chromium API or non-standard behaviour), which would require further work to get them upstreamed. But that was a bit out of scope for those few weeks we could work on this, so we decided to focus on upstreaming the rest of tests instead.
Personally, I think this was a big win for the Web Platform and I’m very proud and happy to have had an opportunity to have contributed to it during these dark times we’re living, as part of my job at Igalia. Now I’m back to working on the Blink Onion Soup 2.0 project, where I think I should write about too, but that’s a topic for a different blog post.
I wouldn’t want to finish off this blog post without acknowledging all the different contributors who tirelessly worked on this effort to help improve the Web Platform by providing the WPT project with these many tests more, so here it is:
From the Igalia side, my whole team was the one which took on this challenge, that is: Abhijeet, Antonio, Gyuyoung, Henrique, Julie, Shin and myself. Kudos everyone!
And from the reviewing side, many people chimed in but I’d like to thank in particular the following persons, who were deeply involved with the whole effort from beginning to end regardless of their affiliation: Christian Biesinger, David Grogan, Robert Ma, Stephen Chenney, Fredrik Söderquist, Manuel Rego Casasnovas and Javier Fernandez. Many thanks to all of you!
Take care and stay safe!
por mario el May 14, 2020 09:07 AM
In most countries, you need to pass an examination to get an amateur radio license. In the US, the question pool is public, so a big part of studying for the license consists of going through the whole question pool and making sure you know the answers to every question. One of them tripped me for a bit:
T8A11
What is the approximate maximum bandwidth required to transmit a CW signal?
    A. 2.4 kHz
    B. 150 Hz
    C. 1000 Hz
    D. 15 kHz
(To normal people, a CW signal is a “beeping Morse code signal”.)
Now, a CW signal is pretty much a sinusoidal wave, and I knew that a pure sinusoidal wave takes a tiny, tiny bandwidth, so I could eliminate answers “A”, “C”, and “D” straight away. That left “B”, but I didn’t know why it would be the right answer, so I had to think about it for a while.
It is true that a sinusoidal signal takes very little bandwidth. If a CW signal consisted just of a steady sinusoidal carrier that never turned off and on, it would indeed have an extremely low bandwidth, only limited by the transmitting oscillator’s stability.
However, a CW signal is not a steady sinusoidal; it is modulated. In particular, it is modulated by turning it off and on according to a message that’s encoded using Morse code. This modulation causes the CW signal to have a bigger bandwidth than a steady carrier.
As an extreme, we can imagine that we want to transmit a series of Morse dots at 30 words per minute. That would be equivalent to switching the carrier on and off 25 times every second. That’s a 12.5-Hz signal that, when modulated, requires a 25-Hz bandwidth at the very minimum (12.5 Hz on each sideband). In practice, the required bandwidth would be higher, depending on how abruptly the carrier was switched on and off.
To demonstrate it, I wrote a widget to simulate a CW signal being received by a CW radio with a filter centered at 600 Hz. It can play the received signal on your speakers and show its frequency spectrum on your screen. The top half displays an instantaneous chart (with horizontal lines every 40 dB), while the bottom displays a waterfall plot. The vertical lines indicate the frequency of the received signal, with dashed lines every 500 Hz and continuous lines every 1000 Hz.
Let’s first look at (and listen to) a transmitter that produces a signal with very abrupt off/on and on/off transitions. Go ahead and press “Play”:
As you can see, when the carrier is steady on, the signal does not use much bandwidth; it is when the signal switches on or off that it uses a lot of bandwidth. This bandwidth usage depends on how sudden the on/off transitions are. Above, the switches were instantaneous, so the signal uses a lot of bandwidth, which is not good.
To avoid using so much bandwidth, many radio transmitters ramp the signal up and down over 5 milliseconds instead of cutting it on and off. This lowers the bandwidth usage without really affecting the sound. You can check it out by pressing “Play” on the widget below:
That’s not the whole story, however. The widgets above simulate a radio with a receive filter, so they don’t show the whole bandwidth that’s used by the signals. The widgets below had their filters removed, so they can show how much bandwidth is really used in each case. The one on the left is the original signal that switches on and off suddenly, while the one on the right is the modified signal with 5-millisecond transitions:
The difference is undeniable. On the left, the on/off transitions appear as broadband energy spikes that are almost as powerful as the signal itself across the whole band. On the right, the spikes still produce quite a bit of power, but it occupies a smaller bandwidth and their power goes down faster as they get further from the central frequency.
The huge amount of power produced by sudden on/off switches causes an annoying effect, called “key clicks”. Press “Play” on the widget below to hear it:
In this widget, there is a signal being transmitted 2800 Hz above where we are listening, so it’s outside of what the filter will let through and we can’t hear it. However, the filter lets through some of the energy that comes from the carrier being switched on and off, and it can be heard as clicks.
These “key clicks” are very annoying since they could even drown out real signals and they can often be heard quite far away from the signal’s frequency, so if your transmitter produces clicks, other amateur radio operators will be quick to find you to tell you what they think of your radio transmitter.
On a transmitter with a 5-millisecond ramp time there isn’t so much power outside of the signal, so the filter doesn’t let so much energy through and there are no clicks. Press “Play” on the widget below to hear the result:
This is the part where you can do your own experiments with key clicks. Here are two widgets you can try: the left one is clicky, while the right one is not clicky. Both have a slider you can use to modify the signal’s frequency and see where the clicks are present, or where the signal is louder than the clicks.
Found anything interesting? Let me know what you think!
el May 13, 2020 12:00 AM
Este mes se cumplen diez años de aquella vez en que mi equipo y yo pensamos por un rato que nos íbamos a ver envueltos en un incidente diplomático internacional.
Era mayo de 2010, y hacía unos meses que me había incorporado al equipo del servidor de gadgets de Google en Mountain View (California), procedente de la oficina de Google en Dublín (Irlanda).
Si os acordáis de iGoogle, seguro que también recordaréis los gadgets. iGoogle era el portal personalizable de Google y tenía unas ventanitas, llamadas “gadgets”, que los usuarios podían seleccionar y poner en su página de iGoogle según su antojo. Había gadgets para ver el email, las noticias o el pronóstico del tiempo, e incluso había uno que hacía conversiones de unidades de medida (de metros a pies, de pintas a litros, etc.). Nuestro equipo se encargaba del sistema que mostraba los gadgets a los usuarios.
Un día nos llegó un aviso que decía que, en Taiwán, el gadget de conversión de unidades no aparecía en caracteres chinos tradicionales, que son los que se utilizan en Taiwán, sino en caracteres chinos simplificados, que son los que se utilizan en la China continental.
En aquellas fechas, Google y China no estaban atravesando el mejor momento de su relación: unos meses antes, Google había descubierto una serie de ataques por parte de hackers procedentes de China y anunció que cerraba el buscador especial para China que censuraba ciertos resultados. A partir de entonces, los usuarios chinos usarían el buscador normal sin censura. A China no le gustó esta reacción, ni a Google le había gustado la acción original.
Con tanta tensión entre Google y China, la noticia de que los usuarios en Taiwán veían un gadget como si estuviesen en China tampoco fue del agrado del equipo del servidor de gadgets. ¿Tal vez había alguien en China interceptando el tráfico de Google para Taiwán? Deseábamos de todo corazón que no fuera cierto, y aunque no pensábamos de verdad verdadera que eso era lo que estaba pasando, necesitábamos llegar al fondo del asunto.
El primer paso cuando se recibe un aviso de error es intentar reproducirlo: no es posible investigar un error que no se puede ver. Sin embargo, por más que lo intentaba, yo no era capaz de reproducir el error. Enviaba peticiones para ver el gadget como si fuera un usuario de Taiwán, pero siempre lo veía en chino tradicional, como si no hubiera ningún error. Lo intenté de una y otra manera, pero sin ningún resultado.
Después se me ocurrió enviar la misma petición a todos los servidores al mismo tiempo y ver si había diferencias entre ellos. Nuestro servicio recibía peticiones de todo el mundo, así que también teníamos servidores repartidos por todo el planeta y las peticiones llegaban automáticamente al servidor más cercano. Cuando yo hacía mis pruebas, mis peticiones iban a un servidor situado en los EEUU, pero las peticiones procedentes de Taiwán iban a un servidor ubicado en Asia. En teoría, todos los servidores eran idénticos, pero ¿y si no lo fueran?
Preparé una página web que enviaba peticiones directamente a todos los servidores, la cargué en mi navegador, y entonces vi que algunos servidores daban respuestas diferentes. La mayoría de los servidores en Europa y América respondían con el gadget en chino tradicional, que era el resultado correcto; sin embargo, la mayoría de los servidores en Asia respondían en chino simplificado.
Para hacerlo más misterioso, no todos los servidores en cada lugar me daban el mismo resultado: algunos daban la respuesta correcta y otros la respuesta incorrecta, pero la proporción entre uno y otro era distinta dependiendo de la ubicación.
Después de hacer muchas pruebas, me di cuenta de que había una especie de efecto memoria. Durante varios minutos después de enviar una petición para ver el gadget en chino simplificado, los servidores respondían en chino simplificado a todas las peticiones en chino tradicional. También ocurría al contrario: tras una petición en chino tradicional, los servidores respondían en chino tradicional a las peticiones en chino simplificado.
Esto explicaba por qué la mayor parte de los servidores en Asia respondían en chino simplificado: la mayoría de los usuarios hablantes de chino viven en China, por lo que usan caracteres simplificados. La mayoría de las peticiones procedentes de China iba a servidores en Asia, por lo que éstos recibían peticiones en chino simplificado. Entonces estos servidores se quedaban “atascados” en chino simplificado y, cuando recibían una petición en chino tradicional, daban una respuesta en chino simplificado.
Sentí un gran alivio cuando di con esta explicación, ya que significaba que el problema no había sido causado por una acción de interceptación de tráfico al nivel de una nación-estado, sino que era un error de programación normal y corriente. No obstante, todavía necesitábamos arreglarlo, y los síntomas sugerían que estaba causado por un problema con una caché.
Los gadgets estaban definidos en un fichero XML. Los gadgets también podían estar traducidos a varios idiomas, así que el texto del gadget en cada idioma estaba guardado en otro fichero XML, y el fichero de definición del gadget contenía una lista que indicaba qué idioma aparecía en qué fichero de traducción.
Cada vez que alguien quería ver un gadget, el servidor tenía que descargar el fichero XML de definición, interpretarlo, determinar qué fichero de traducción tenía que usar, descargar el fichero XML de traducción e interpretarlo también. Algunos gadgets tenían millones de usuarios, por lo que el servidor tendría que descargar e interpretar los mismos ficheros una y otra vez. Para evitarlo, el servidor de gadgets tenía una “caché”.
Una caché es una estructura de datos que almacena el resultado de una operación para evitar tener que realizar esa operación repetidamente. En el servidor de gadgets, la caché almacenaba ficheros XML que había descargado e interpretado anteriormente. Cuando el servidor necesitaba un fichero, primero miraba si ya estaba en la caché; si lo estaba, podía utilizarlo directamente sin necesidad de descargarlo e interpretarlo. Si no, el servidor descargaba el fichero, lo interpretaba y almacenaba el resultado en la caché para poder utilizarlo en el futuro.
Mi teoría inicial era que, de alguna manera, la caché podría estar confundiendo los ficheros de traducción al chino simplificado y chino tradicional. Me pasé varios días inspeccionando el código y el contenido de la caché, pero no pude ver ningún problema. Hasta donde yo podía ver, la caché de ficheros XML estaba implementada correctamente y funcionaba perfectamente. Si no fuera porque podía verlo con mis propios ojos, habría jurado que era imposible que el gadget mostrara el idioma incorrecto.
Durante el tiempo que invertí en inspeccionar el código, también estuve intentando reproducir el problema en mi ordenador. Los servidores de producción se quedaban “atascados” durante unos minutos en chino simplificado o chino tradicional, pero esto no sucedía nunca cuando ejecutaba el servidor en mi ordenador: si enviaba peticiones mezcladas, también recibía respuestas mezcladas. Por lo tanto, una vez más, no podía reproducir el problema de forma controlada.
Por este motivo tomé una decisión drástica: iba a conectar un depurador a un servidor en la red de producción y reproducir el error allí.
A buen seguro, no iba a hacer eso con un servidor de producción. En aquel momento teníamos varios tipos de servidores: no sólo servidores de producción, que recibían las peticiones procedentes de usuarios normales; también teníamos servidores “sandbox”, que no tenían usuarios externos, sino que los usábamos para que iGoogle y otros servicios que usaban gadgets pudiesen hacer pruebas sin afectar a los usuarios. Yo no iba, ni de lejos, a conectar un depurador a un servidor de producción y arriesgarme a afectar a usuarios externos; lo haría todo en un servidor “sandbox”.
Así pues, elegí uno de los servidores “sandbox”, lo preparé, le conecté un depurador, reproduje el error, lo investigué y, finalmente, dejé todo como estaba antes. Tras mi investigación confirmé que, como yo pensaba, era un problema de caché, pero no el problema de caché que yo me esperaba.
Según mi teoría, el programa acudiría a la caché para obtener el fichero con la traducción al chino tradicional pero la caché respondería con el fichero incorrecto. Mi intención era interrumpir el programa justo antes de que solicitara el fichero XML y ver qué ocurría. Para mi sorpresa, la caché funcionó correctamente: el programa solicitó el fichero con la traducción al chino tradicional y la caché proporcionó la traducción al chino tradicional, tal como debía ser. Obviamente, el problema tenía que estar en otro sitio.
Después de obtener la traducción, el programa la aplicó al gadget. En los gadgets con traducciones, el fichero de definición no incluía ningún texto en ningún idioma; en su lugar, incluía unas marcas que el servidor sustituía por el texto que aparecía en el fichero de traducción. Y, en efecto, eso es lo que hizo el servidor: tomó el fichero XML de definición del gadget, buscó las marcas y, dondequiera que hubiese una marca, la sustituyó por el correspondiente texto en chino tradicional.
El siguiente paso era interpretar el fichero XML resultante.
Había muchísima gente que utilizaba el gadget de conversión de unidades traducido a caracteres chinos tradicionales. Esto significa que, después de sustituir las marcas por texto en chino, el servidor tendría que interpretar el mismo código XML resultante una y otra vez. Ya que el servidor tenía que interpretar el mismo código varias veces al día, éste utilizaba una caché para ahorrarse todo ese trabajo redundante, y hasta ese momento yo no tenía ni idea de que esa caché existía.
Ésta era la caché que daba el resultado incorrecto: la caché recibía el fichero XML con textos en chino tradicional y devolvía el resultado de interpretar el mismo fichero XML con textos en chino simplificado.
Lo que necesitaba determinar era por qué sucedía eso.
Las cachés funcionan asociando una clave a un valor. Por ejemplo, la primera caché de la que hablé en este artículo, que evitaba tener que descargar e interpretar ficheros XML repetidamente, usaba el URL del fichero como clave y el fichero interpretado como valor.
La nueva caché, que se utilizaba para evitar tener que interpretar
repetidamente ficheros de definición con una traducción aplicada, usaba
de clave el fichero XML representado como un array de bytes. Para obtener
la clave, el servidor llamaba a la función
String.getBytes(),
que convierte una cadena a un array de bytes utilizando la codificación
predeterminada.
En mi ordenador, la codificación predeterminada era UTF-8. Esta codificación
representa cada carácter chino en dos o tres bytes. Por ejemplo, UTF-8
representa el texto “你好” como los bytes
{0xe4, 0xbd, 0xa0, 0xe5, 0xa5, 0xbd}.
En los servidores, sin embargo, la codificación predeterminada era US-ASCII.
Esta codificación es muy antigua (1963) y sólo contempla el alfabeto latino
utilizado en el idioma inglés, por lo que no puede codificar los caracteres
chinos. Cuando getBytes() encuentra un carácter que no puede codificar,
lo sustituye por un signo de interrogación. Por lo tanto, el texto “你好”
queda convertido en “??”.
Y aquí estaba el problema: cuando el servidor, que utilizaba US-ASCII, generaba una clave, ésta consistía en un fichero XML con cada carácter chino sustituido por un signo de interrogación. Como las traducciones al chino simplificado y chino tradicional usaban el mismo número de caracteres, aunque éstos fuesen distintos, las claves resultaban ser idénticas, por lo que el servidor respondía con el valor que había en la caché aunque fuese en la variante de chino incorrecta.
En cambio, este problema no era reproducible en mi ordenador, ya que usaba UTF-8, que sí contempla los caracteres chinos. Por lo tanto, las claves eran diferentes y la caché respondía con el valor correcto.
Después de varias semanas probando esto y aquello, inspeccionando el
código, batiéndome en vano con la caché y, finalmente, tomando medidas
desesperadas, la solución a este error consistió en sustituir todas
las llamadas a getBytes() para usar la codificación UTF-8 de forma
explícita.
Esta historia comenzó como una intriga de espionaje a nivel internacional y terminó cambiando una función para especificar la codificación. Supongo que es un final un poco anticlimático, pero al menos todos los miembros del equipo estábamos contentos de no tener que acudir a testificar al Congreso de los EEUU ni nada parecido.
Aún así, este episodio grabó a fuego en mi mente la importancia de especificar siempre todos los parámetros de los que depende el programa y no dejar nada implícito o dependiente del entorno. Nuestro servidor falló porque dependía de un parámetro de configuración que era diferente en nuestros ordenadores y en producción; si hubiésemos especificado la codificación UTF-8 de forma explícita desde el principio, esto nunca nos habría pasado.
Y yo no tendría una historia tan chula para contar.
No se puede tener todo.
el May 02, 2020 12:00 AM
Un día, en el verano de 2002, estaba navegando por Internet y caí en una página web en la que un radioaficionado describía sus experimentos haciendo rebotar ondas de radio en la Luna. Esa página me tuvo cautivo durante varias horas viendo fotos de sus gigantescas antenas, vídeos en los que enviaban código Morse y recibían el eco dos segundos y medio después, e informes sobre cómo dos radioaficionados en extremos opuestos del mundo se comunicaban usando la Luna como reflector.
Como soy un pedazo de friki, durante los siguientes días pensé en lo interesante que sería sacarme la licencia de radioaficionado e instalar una pequeña estación de radio en casa (no tan potente como para hacer rebotar señales en la Luna, pero sí para comunicarme con otros países). Sin embargo, aquél no era el mejor momento para esas ideas: estaba intentando terminar la carrera y tenía varias asignaturas pendientes para setiembre, por lo que mis padres no verían con buenos ojos esa nueva distracción. Además, entonces era necesario aprender código Morse para obtener la licencia. Por no hablar de la antena; seguro que necesitaría una antena muy grande. Quita, quita…
 Una torre de antenas de radioaficionado construida sobre una casa en Palo
Alto (California). En lo más alto tiene una antena omnidireccional para VHF
y UHF; debajo, un dipolo, posiblemente para 20 metros; debajo del dipolo,
una antena direccional tipo Yagi, probablemente para 10 metros. El dipolo y
la antena Yagi se pueden girar con un motor para orientarlas hacia otras
antenas distantes.
Una torre de antenas de radioaficionado construida sobre una casa en Palo
Alto (California). En lo más alto tiene una antena omnidireccional para VHF
y UHF; debajo, un dipolo, posiblemente para 20 metros; debajo del dipolo,
una antena direccional tipo Yagi, probablemente para 10 metros. El dipolo y
la antena Yagi se pueden girar con un motor para orientarlas hacia otras
antenas distantes.
Varios años después, en 2013 y 2014, se popularizó el uso de descodificadores de TDT como receptores de radio definidos por software (SDR). Estos descodificadores tienen un modo especial en el que pueden recibir ondas de radio, digitalizarlas y pasarlas al ordenador para que éste las procese. Con este sistema es muy fácil experimentar con radio y, en muy poco tiempo, mucha gente hizo programas para escuchar la radio, recibir transmisiones ADS-B procedentes de aviones, recibir fotos meteorológicas directamente del satélite, etc.
Pronto cayó en mis manos uno de estos descodificadores e hice una app de Chrome para escuchar la radio. No tardé mucho tiempo en añadirle la capacidad de escuchar transmisiones de radioaficionados y, poco tiempo después, se me ocurrió otra vez la idea de sacarme la licencia. Me compré los libros, estudié (ya no era necesario aprender Morse) y en 2015 obtuve licencias en los EEUU y en España. Ahora realizo contactos por onda corta con un montón de radioaficionados, y, para mi alivio, no he tenido que instalar una antena gigantesca.
La mayoría de los radioaficionados no nos podemos permitir tener una torre como la de la foto de arriba (¡ojalá!). Muchos vivimos en pisos de alquiler, o los códigos urbanísticos no permiten este tipo de estructuras, o no tenemos espacio, o… miles de razones. Por este motivo, la historia de la radioafición es también la historia de la búsqueda de antenas compactas que se puedan utilizar en espacios limitados.
Durante estos años he probado a construir y utilizar varias antenas. Cuando vivía en California vivía en un bajo con un balcón cubierto, así que construí una antena de bucle magnético. Estas antenas son muy compactas pero también son engorrosas; tienen muy poco ancho de banda, así que es necesario reajustarlas cada vez que uno cambia de frecuencia.
Después de mudarme a Nueva York tuve un patio de 6 por 6 metros con un árbol, así que me construí una antena vertical hecha con cables eléctricos. Esta antena es multibanda, portátil y fácil de utilizar, y es la que os voy a describir en este artículo.
Mi antena vertical consta de varios elementos: un radiador, seis radiales, un acoplador, un unun y, por supuesto, un cable coaxial que la conecta al transmisor de radio.

El radiador es el componente que asciende verticalmente y da el nombre de “vertical” a la antena. Está formado por un cable eléctrico de unos 15 metros de largo. Cualquier cable eléctrico sirve, pero es conveniente elegir uno que sea ligero y resistente, ya que va a estar colgado de un árbol y va a sufrir la acción del viento y del sol.
Los radiales son seis cables eléctricos de cinco metros de largo que forman el “plano de tierra” de la antena. Todos ellos reposan directamente en el suelo, están conectados en un solo punto y luego salen en línea recta en todas las direcciones, como los radios de una rueda de bicicleta. Igual que para el radiador, cualquier cable sirve.
El acoplador hace ajustes para que la diferencia de impedancia entre la antena y la línea de transmisión no afecte negativamente a la radio. El acoplador es opcional, pero entonces tendréis que cortar el radiador a una longitud específica para que funcione en una banda. El acoplador os permite utilizar la antena en las bandas de 20, 40 y 60 metros, entre otras.
Finalmente, el unun se encarga de eliminar interferencias de la línea de transmisión. Al transmitir, la antena induce corrientes en el cable coaxial que viene de la radio y el acoplador detecta esas corrientes, piensa que son debidas a un desajuste en la antena, e intenta arreglarlo, con lo que se desajusta por completo. El unun elimina esas corrientes antes de que lleguen al acoplador, por lo que éste funciona correctamente.
 Primera foto: el cable que utilizo para el radiador. Es un cable trenzado
de acero revestido de cobre diseñado específicamente para antenas portátiles,
pero sirve cualquier tipo de cable que sea lo suficientemente ligero y
resistente.
Primera foto: el cable que utilizo para el radiador. Es un cable trenzado
de acero revestido de cobre diseñado específicamente para antenas portátiles,
pero sirve cualquier tipo de cable que sea lo suficientemente ligero y
resistente.
Segunda foto: detalle de la conexión del radiador y los radiales al
acoplador. Utilizo un adaptador de bornes para conectar la antena; el
radiador está conectado al borne rojo y los radiales al borne negro.
El adaptador de bornes es opcional: podría haber enchufado el radiador
directamente al centro del conector “Ant” y los radiales al tornillo “Gnd”.
Tercera foto: el acoplador
(LDG Z11 Pro II,
caja negra con botones grises) y el unun
(LDG RU-1:1,
caja azul) después de haber hecho todas las conexiones. Los radiales están
extendidos en todas las direcciones. La caja negra con la etiqueta blanca
contiene 8 pilas tipo AA para proporcionar 12 voltios al acoplador.
Para usar esta antena es necesario colgar el radiador de un árbol, un poste o una estructura similar. Preferiblemente, esa estructura debería estar hecha de un material no conductor. Por ejemplo, una caña de pescar hecha de fibra de vidrio serviría, pero no una caña de pescar hecha de fibra de carbono.
Para colgar la antena yo utilizo un sedal y un peso de plomo. Primero ato el plomo al sedal, lo voleo como si fuera una honda y lo arrojo por encima de la copa del árbol. Con un poco de suerte, el plomo irá suficientemente alto, no chocará con ninguna rama y aterrizará al otro lado del árbol.
Hay algo de peligro de que el sedal se enrede en las ramas del árbol. En mi experiencia, esto ocurre principalmente si interfiero con el vuelo del plomo. Si lo lanzo y luego no toco el sedal hasta que el plomo llegue al suelo, casi siempre irá todo bien. Si lo lanzo y luego agarro el sedal para intentar controlar el vuelo del plomo, hay mucho peligro de que el plomo haga un extraño alrededor de una rama y se quede atascado.
Después de haber arrojado el sedal por encima del árbol puedo ir al plomo, desatarlo del sedal, atar la punta del radiador al sedal y luego izar el radiador. Después de esto sólo queda conectar el radiador y los radiales al acoplador, éste al unun y finalmente conectarlo al transmisor con un cable coaxial.
Los dibujos de debajo muestran distintas posibles configuraciones de la antena que podéis usar dependiendo de cuánto espacio tengáis, dónde estén vuestros árboles, etc. Fijaos en que un extremo del sedal está atado al radiador pero el otro extremo no está atado a ningún punto fijo, sino a un peso que lo mantiene tenso pero lo permite oscilar. Esto es importante porque el árbol y el radiador van a sufrir los embates del viento y se menearán en todas direcciones. Si atáis el sedal, es posible que, al moverse, tire del radiador demasiado fuerte y lo rompa. Al usar un peso que oscila libremente, no hay peligro de que esto ocurra.
Si vuestro radiador es más pesado que el mío, es muy probable que un sedal no sea lo suficientemente fuerte para izarlo. En ese caso deberíais usar un cordel más resistente; por ejemplo, una línea de arborista con su correspondiente peso.


 En condiciones ideales, con un árbol suficientemente alto y suficientemente
cerca, el radiador colgará verticalmente o casi verticalmente (primera figura).
No siempre tenemos condiciones ideales, así que a veces hay que hacer
adaptaciones. Por ejemplo, si el árbol está un poco lejos, podemos inclinar
el radiador (segunda figura). Si el árbol no es lo bastante alto, tal vez
tengamos que pasar parte del radiador por encima de la rama y dejarlo
colgando de ésta (tercera figura). En ciertos casos, tal vez tengamos que
dejar que el radiador zigzaguee por todo el sitio (cuarta figura).
En condiciones ideales, con un árbol suficientemente alto y suficientemente
cerca, el radiador colgará verticalmente o casi verticalmente (primera figura).
No siempre tenemos condiciones ideales, así que a veces hay que hacer
adaptaciones. Por ejemplo, si el árbol está un poco lejos, podemos inclinar
el radiador (segunda figura). Si el árbol no es lo bastante alto, tal vez
tengamos que pasar parte del radiador por encima de la rama y dejarlo
colgando de ésta (tercera figura). En ciertos casos, tal vez tengamos que
dejar que el radiador zigzaguee por todo el sitio (cuarta figura).
Los radiales deberían salir de debajo del radiador y extenderse en línea recta y en todas direcciones. Si no tenéis espacio, tal vez necesitéis apañároslas de una u otra manera. Al final, lo más importante es que el plano de tierra sea lo más tupido, simétrico y uniforme posible, añadiendo radiales y alargándolos donde podáis o acortándolos donde no os quede más remedio.


 Lo ideal sería distribuir los radiales de una forma simétrica y uniforme
(primera figura). Si el espacio es limitado, siempre podéis doblar y plegar
los radiales un poco para adaptarlos al sitio, aunque es conveniente que
vayan lo más rectos posible (segunda figura). Ante la duda, lo mejor es
poner muchos radiales para llenar el espacio disponible (tercera figura).
Lo ideal sería distribuir los radiales de una forma simétrica y uniforme
(primera figura). Si el espacio es limitado, siempre podéis doblar y plegar
los radiales un poco para adaptarlos al sitio, aunque es conveniente que
vayan lo más rectos posible (segunda figura). Ante la duda, lo mejor es
poner muchos radiales para llenar el espacio disponible (tercera figura).
Dependiendo de la configuración del radiador y de los radiales, el patrón de radiación de la antena tendrá una u otra forma, así que sería inútil tratar de caracterizarlo en esta página web, pero en general, la máxima ganancia tiende a ser perpendicular al radiador y, si los radiales no son simétricos, habrá menos ganancia en la dirección en la que haya menos radiales o éstos sean menos densos.
Por lo tanto, si queréis una antena omnidireccional con buen DX, tratad de colgar el radiador más vertical que podáis y colocad los radiales lo más simétricos que podáis.
He estado utilizando y mejorando poco a poco esta antena desde que me mudé a Nueva York. Como está hecha con cables eléctricos, es muy portátil, así que he podido utilizarla en mi patio en Brooklyn (6 por 6 metros con un árbol de unos 8 metros) y también en la casa de mis suegros en Connecticut (muchísimo espacio y un árbol de unos 12 metros). Gracias al acoplador, puedo utilizarla en las bandas de 20, 40 y 60 metros, así como otras bandas a las que no presto mucha atención.
En Nueva York casi siempre hago un zig-zag con el radiador y tengo que doblar los radiales un poco. Hay edificios justo al norte de la antena, así que no puedo recibir en esa dirección. Además, siendo Nueva York, hay un montón de ruido eléctrico. Aún así, he podido comunicarme con Brasil y con Polonia usando 50 vatios.
En Connecticut el radiador va completamente extendido pero inclinado hacia el norte, y el suelo también hace una ligera pendiente ascendente hacia el noroeste, por lo que también me es difícil hacer contactos en esas direcciones. Sin embargo, consigo muchos contactos con las islas del Caribe y con Europa. Mis contactos más lejanos son Serbia y Argentina, también con 50 vatios, aunque he podido, en ocasiones, oir estaciones australianas.
 Contactos realizados con mi antena vertical. Los puntos azules son contactos
realizados desde Brooklyn; los puntos marrones son contactos realizados desde
Connecticut. También podéis ver el
mapa actualizado con los últimos datos.
(Mapa proporcionado por Google).
Contactos realizados con mi antena vertical. Los puntos azules son contactos
realizados desde Brooklyn; los puntos marrones son contactos realizados desde
Connecticut. También podéis ver el
mapa actualizado con los últimos datos.
(Mapa proporcionado por Google).
En el futuro cercano tengo pensado duplicar el número de radiales, de seis a doce. Esto debería mejorar el rendimiento de mi antena en 1 o 2 decibelios. También tengo interés en probar un poste extensible de fibra de vidrio (una “caña de pescar”) que me permita extender el radiador verticalmente sin necesidad de un árbol.
¡No dudéis en poneros en contacto conmigo si tenéis preguntas o sugerencias, o si queréis planear un contacto por radio!
el April 29, 2020 12:00 AM
Todo el mundo piensa que escribir una aplicación CRUD es la tarea de programación más fácil del mundo, pero muchísima gente lo hace mal.
Una aplicación CRUD es la típica que trata con datos en forma de registros. El nombre CRUD está formado por las iniciales de “Create, Read, Update, Delete”, que son las cuatro operaciones que se pueden realizar sobre un registro: crearlo, leerlo, modificarlo y borrarlo.
Todos los programadores hemos escrito aplicaciones de este tipo. Llevamos décadas haciéndolas e, incluso hoy en día, muchas de las aplicaciones modernas son aplicaciones CRUD encubiertas. ¿Un blog? CRUD. ¿Una consola para contenedores Docker? Si te permite crearlos y gestionarlos, CRUD. ¿Facebook? Otro CRUD.
Uno podría pensar que, si las aplicaciones CRUD son tan normales y tanto tiempo llevamos haciéndolas, a estas alturas sabríamos escribir una con los ojos cerrados, ¿no? Y, sin embargo, hay varios errores que casi todo el mundo comete cuando escribe sus aplicaciones CRUD. El artículo de hoy es sobre uno de esos errores: no implementamos la operación de modificación de registros correctamente.
Id a buscar tutoriales de creación de aplicaciones CRUD en Internet. Puede ser un tutorial de Ruby on Rails o un tutorial de Hibernate o lo que queráis. En algún punto del tutorial dirán algo parecido a esto:
Como la creación y modificación de un registro son operaciones tan parecidas, escribiremos una sola función, llamada
insertOrUpdate, para ambas. Esta función recibe un registro. Si éste no tiene un identificador, la función realizará una operaciónINSERTen la base de datos. Si, en cambio, el registro tiene un identificador, la función realizará una operaciónUPDATE.
Estaría dispuesto a apostar que el 99% de todos los tutoriales de aplicaciones CRUD en Internet tiene algo parecido, y todos ellos están equivocados. El problema es que crear y modificar un registro no son operaciones parecidas. La operación de modificación tiene una particularidad que la hace mucho más compleja que la operación de creación de un registro: dos usuarios pueden intentar modificar el mismo registro al mismo tiempo.
Imaginad una pastelería con una página web en la que la gente puede realizar pedidos y modificarlos después. Juan y Ana han encargado una tarta de nata con glaseado de chocolate y el texto “feliz cumpleaños”, pero ahora quieren cambiarla por una tarta de vainilla con glaseado de fresa y el texto “por muchos años”. Como no se coordinan bien, los dos se ponen a hacer el cambio. Aún peor: además de descoordinados, son olvidadizos, y mientras Juan se olvida de cambiar el texto, Ana se olvida de cambiar el sabor.
Juan y Ana se conectan al mismo tiempo desde sus respectivos teléfonos móviles, pulsan el botón “modificar” y ven el formulario con el pedido actual.
sabor= “nata”, glaseado= “chocolate”, texto= “feliz cumpleaños”
Ahora hacen sus cambios y pulsan el botón “submit”. ¿Cuál es el resultado?
¿Cómo es su pedido ahora? Dependiendo de quién haya sido el último en enviar
sus cambios podrían tener una tarta con el sabor correcto pero el texto
equivocado (sabor= “vainilla”, glaseado= “fresa”, texto= “feliz cumpleaños”)
o una tarta con la inscripción correcta pero el sabor incorrecto
(sabor= “nata”, glaseado= “fresa”, texto= “por muchos años”).
Uno de ellos habrá pisado los cambios del otro sin darse cuenta, y cuando
por fin reciban la tarta se llevarán una sorpresa desagradable.
Si el código de modificación de registros de nuestra aplicación CRUD consiste, como en tantas aplicaciones, en leer el registro, ponerlo en el formulario, recibir el nuevo valor del formulario y sobreescribir el registro con el nuevo valor, esto mismo es lo que nos va a ocurrir cuando dos usuarios quieran modificar el registro al mismo tiempo. Tenemos que escribir nuestro código de modificación de registros de manera que pueda, al menos, detectar este tipo de situaciones para no perder o corromper datos. El resto de este artículo detalla dos estrategias para conseguirlo.
La primera estrategia consiste en añadir un nuevo campo al registro. Este campo contiene un “identificador de versión” cuyo valor debe cambiar cada vez que haya una modificación en el registro. Puede ser un contador, un número aleatorio o cualquier otra cosa, siempre y cuando, cada vez que se modifique el registro, también se cambie el valor de este campo a un valor nuevo.
Cuando el usuario pulsa “submit” para grabar los cambios, el servidor sólo tiene que comparar el número de versión del formulario con el número de versión del registro en la base de datos. Si coinciden, todo está bien y se pueden grabar los datos. Si no coinciden, eso indica que alguien modificó el registro en algún momento entre que se abrió el formulario de edición y se pulsó “submit”, así que el usuario debería recibir un mensaje de error avisando de la circunstancia.
Ni que decir tiene que todo el código que lee el registro actual, compara el identificador de versión y graba el nuevo registro debe ejecutarse en una transacción de la base de datos para asegurarnos de que todas las operaciones son atómicas.
En pseudocódigo, esto sería así:
form_id := POSTDATA["id"]
form_version := POSTDATA["version"]
form_pedido := POSTDATA["pedido"]

# Abrir una transacción.
transacción := base_datos.ComenzarTransacción()
# Obtener el identificador de versión del registro.
current_version := SELECT version FROM pedidos WHERE id = form_id
if current_version == form_version
  # Si coincide con el recibido, actualizar el registro.
  UPDATE pedidos SET version = version + 1, sabor = form_pedido.sabor, etc
  resultado := transacción.Commit()
  return resultado
else
  # Si no, indicar que hubo un problema.
  transacción.Cancel()
  return fail
Cuando Juan y Ana abren el formulario de modificación, el identificador de versión tiene el valor 1, por lo que éste será el identificador de versión que enviarán al pulsar “submit” en sus formularios.
versión= 1, sabor= “nata”, glaseado= “chocolate”, texto= “feliz cumpleaños”
A continuación, Juan envía su cambio y el servidor compara el identificador de versión enviado por Juan con el identificador de versión del pedido; ambos valen 1, por lo que el servidor acepta el cambio y actualiza el registro, con lo que el número de versión cambia.
versión= 2, sabor= “vainilla”, glaseado= “fresa”, texto= “feliz cumpleaños”
Ahora Ana envía su cambio y el servidor compara los identificadores de versión. El enviado por Ana vale 1 pero el pedido tiene el identificador de versión 2, por lo que el servidor rechaza el cambio y le muestra un mensaje de error a Ana.
Esta estrategia funciona bien para detectar cambios simultáneos, pero le falta sutileza. Los cambios que Juan y Ana quieren hacer son compatibles (ambos quieren poner el mismo glaseado y, aparte de eso, modifican distintos elementos del pedido) pero el servidor no toma nada de esto en cuenta, así que Ana recibe un mensaje de error. Es posible darle un poco más de inteligencia al servidor usando una estrategia distinta.
Para aplicar esta estrategia no es necesario modificar el registro de ninguna manera. Lo que tenemos que cambiar es el formulario de edición para que cuando el usuario pulse “submit” le envíe al servidor tanto el valor modificado del registro como el valor original que recibió al abrir el formulario.
El servidor recibe ambos registros (original y modificado) y los compara campo a campo para elaborar una lista de cambios. Después lee el valor actual del registro y, por cada cambio, comprueba si ese cambio se puede hacer en ese registro. Si todos los cambios son factibles, se aplican; si hay algún cambio que no se pueda hacer, el usuario recibe un mensaje de error.
En pseudocódigo, esta estrategia tiene un aspecto similar a este:
form_id := POSTDATA["id"]
form_original := POSTDATA["original"]
form_nuevo := POSTDATA["nuevo"]

# Crear una lista de cambios.
cambios := comparar(form_original, form_nuevo)
if len(cambios) == 0
  # No hay cambios, así que no hace falta hacer nada más.
  return ok

# Abrir una transacción y obtener el registro actual.
transacción := base_datos.ComenzarTransacción()
pedido_actual := SELECT * FROM pedidos WHERE id = form_id
for cambio in cambios
  # Comprobar si cada cambio es compatible con el registro actual.
  valor_actual := cambio.valor(pedido_actual)
  valor_original := cambio.original
  valor_nuevo := cambio.nuevo
  if valor_actual != valor_original and valor_actual != valor_nuevo
    # Si no lo es, cancelar e indicar que hubo un problema.
    transacción.Cancel()
    return fail
# Aplicar los cambios al registro.
UPDATE pedidos SET cambios
resultado := transacción.Commit()
return resultado
Volvamos al pedido de la tarta de Juan y Ana. Originalmente era un pedido de una tarta de nata con glaseado de chocolate y “feliz cumpleaños” escrito. En la base de datos, el registro tendría el siguiente valor:
sabor= “nata”, glaseado= “chocolate”, texto= “feliz cumpleaños”
Juan y Ana abren el editor del pedido al mismo tiempo y Juan envía sus cambios primero. El servidor recibe la siguiente información:
sabor= “nata”, glaseado= “chocolate”, texto= “feliz cumpleaños”sabor= “vainilla”, glaseado= “fresa”, texto= “feliz cumpleaños”El servidor compara ambos registros y crea la siguiente lista de cambios:
sabor: “nata” → “vainilla”glaseado: “chocolate” → “fresa”El servidor lee el registro actual y comprueba si se pueden aplicar los cambios:
sabor: “nata” → “vainilla”; actual= “nata”glaseado: “chocolate” → “fresa”; actual= “chocolate”Como los valores actuales coinciden con los valores originales, el servidor aplica esos cambios al registro, con lo que adquiere el valor:
sabor= “vainilla”, glaseado= “fresa”, texto= “feliz cumpleaños”
Ahora Ana envía sus cambios y el servidor recibe esta información:
sabor= “nata”, glaseado= “chocolate”, texto= “feliz cumpleaños”sabor= “nata”, glaseado= “fresa”, texto= “por muchos años”El servidor compara los registros y crea la lista de cambios:
glaseado: “chocolate” → “fresa”texto: “feliz cumpleaños” → “por muchos años”Después de crear la lista, el servidor lee el registro actual y comprueba si se pueden aplicar los cambios:
glaseado: “chocolate” → “fresa”; actual= “fresa”texto: “feliz cumpleaños” → “por muchos años”; actual= “feliz cumpleaños”Ambos cambios son compatibles con el registro actual. Para el texto, el valor original coincide con el valor actual, con lo que se puede realizar el cambio. Para el glaseado, el valor modificado coincide con el valor actual, por lo que el cambio no tiene efecto. Como ambos cambios son compatibles, el servidor actualiza el registro, que, finalmente, se queda en:
sabor= “vainilla”, glaseado= “fresa”, texto= “por muchos años”
¡Albricias! A pesar de que Juan y Ana estén tan descoordinados y sean tan olvidadizos, al final han conseguido cambiar el pedido de la forma que querían.
Para ver qué ocurre si los cambios no son compatibles, imaginad por un segundo que Ana quería cambiar el glaseado a pistacho en lugar de fresa. Después de generar la lista de cambios y leer el registro actual, el servidor tendría lo siguiente:
glaseado: “chocolate” → “pistacho”; actual= “fresa”texto: “feliz cumpleaños” → “por muchos años”; actual= “feliz cumpleaños”Como, en el glaseado, ni el valor original ni el modificado coinciden con el valor actual, este cambio no es compatible, por lo que Ana debería recibir un mensaje de error.
Si el valor actual de un campo no coincide con el valor original o modificado, no está todo perdido necesariamente. Dependiendo del contenido del campo, podemos añadir código para combinar los cambios automáticamente y no tener que rechazarlos tan a menudo.
Por ejemplo, si el campo contiene un texto largo, podemos utilizar un algoritmo de “three way merge". Este algoritmo detecta los cambios entre el texto original y el texto modificado y luego los aplica sobre el texto actual. Wikipedia hace esto, igual que la mayoría de los sistemas de control de versiones.
Si el campo contiene una lista de elementos, podemos hacer algo parecido: extraer una lista de adiciones y eliminaciones entre la lista original y modificada, y aplicarla sobre la lista actual.
La creación y modificación de un registro no son dos casos de la misma operación, sino dos operaciones separadas y, a la hora de escribir una aplicación CRUD, hay que darle a la operación de modificación el respeto que se merece.
Es importante recordar que dos o más usuarios podrían intentar modificar el mismo registro al mismo tiempo y nuestra aplicación tiene que ser capaz de, como mínimo, detectar esta situación y mostrarle un mensaje de error a uno de los usuarios. Si no lo hacemos, podríamos perder datos o tener datos inconsistentes sin darnos cuenta.
Es fácil añadir código para detectar cambios simultáneos. Si tenemos muchos usuarios o los usuarios tienden a modificar los mismos registros muy a menudo, esto podría no ser suficiente. Los usuarios estarían pisándose los unos a los otros todo el tiempo, intentando modificar el mismo registro una y otra vez hasta que, por fin, consigan ser los primeros en enviar sus cambios.
Para solucionarlo, podemos tener estrategias más complejas para detectar e integrar cambios en un registro, ya sea campo a campo o incluso con granularidad más fina. De esta manera, incluso si hay varios usuarios haciendo cambios en el mismo registro, podríamos acomodarlos a todos si sus cambios no se solapan demasiado.
¿Qué os ha parecido este artículo? ¿Os gustaría que explorara más este tema? ¿Tenéis preguntas, comentarios, opiniones, sugerencias? Escribidme a mi nombre arroba mi apellido punto org.
el April 18, 2020 12:00 AM
Uno de mis proyectos COVID-19 fue aprender a programar en Go, un lenguaje de programación desarrollado en Google por Rob Pike y Ken Thompson, famosos por Plan 9 y Unix, respectivamente. Go es un lenguaje de sistemas como C, pero con varias características que lo hacen más seguro que programar en C. También tiene un buen soporte para concurrencia y paso de mensajes. Y como viene de Google, también tiene un soporte excelente para crear aplicaciones web.
Mucha gente que antes hacía aplicaciones web en Python se ha pasado a Go porque escribir en Go es casi igual de agradecido que escribir en Python, comparado con C++ o Java, pero el programa es compilado (es decir, es mucho más rápido que un programa en Python) y tiene tipado fuerte, con lo que se evitan muchos errores. Además, hay ya un montón de bibliotecas para hacer todo tipo de cosas en Go.
La mejor manera de aprender a usar un lenguaje de programación es tener un proyecto. Mi proyecto era escribir un servicio web para generar mapas azimutales equidistantes que un radioaficionado podría usar para apuntar una antena direccional hacia países lejanos.
Como sabéis, la Tierra es esférica pero los mapas son planos, así que, si queremos representar la superficie de la Tierra en un mapa, tenemos que hacer algún tipo de adaptación para decidir en qué punto del mapa dibujamos cada punto de la Tierra. Los geógrafos usan operaciones matemáticas llamadas “proyecciones” para hacer esa adaptación, y existen decenas de proyecciones; la más famosa es, seguramente, la de Mercator.
 Proyección de Mercator.
Es muy importante elegir bien la proyección para un mapa. Cada proyección tiene puntos a su favor y puntos en contra. Por ejemplo, la proyección de Mercator suele recibir críticas porque exagera el tamaño de los países situados más lejos del ecuador. Sin embargo, es útil para ver la forma de los países o para trazar líneas de rumbo.
La proyección que quiero usar en mis mapas es la azimutal equidistante. Esta proyección muestra en qué dirección y a qué distancia está cada punto de la Tierra con respecto de un punto central predeterminado.
Por ejemplo, debajo hay un mapa azimutal equidistante centrado en Madrid. Los círculos concéntricos indican la distancia desde Madrid (cada círculo son 500 millas náuticas). Podéis ver la dirección en que queda cualquier otro punto del mapa trazando una línea desde el centro hasta ese punto y luego continuándola hasta el borde del mapa, que está graduado de 0 a 360 grados.
En este mapa, Nueva York aparece a un poco más de 3000 millas náuticas de Madrid, en dirección 295 grados. Y, en efecto, si os plantáis en Madrid y apuntáis el dedo en dirección 295 grados, estaréis señalando a Nueva York.
 Mapa azimutal equidistante centrado en Madrid. Creado por la CIA en 1969,
descargado de la Biblioteca del Congreso de los EEUU.
Mapa azimutal equidistante centrado en Madrid. Creado por la CIA en 1969,
descargado de la Biblioteca del Congreso de los EEUU.
Estos mapas azimutales equidistantes son útiles para los radioaficionados que trabajan en onda corta. En esas longitudes de onda, es posible establecer comunicaciones por radio entre dos países distantes gracias a la ionosfera, que es una capa de la atmósfera que es capaz de reflejar ondas de radio. Algunos radioaficionados tienen mucho interés en esa actividad, y algunos de ellos tienen antenas direccionales que se pueden hacer girar para orientarlas hacia un país distante. En el pasado, los radioaficionados tenían que consultar un mapa azimutal equidistante para saber en qué dirección tenían que girar la antena. Hoy en día, casi todos usan un ordenador.
Los mapas azimutales también son útiles para los radioaficionados que no tenemos una antena direccional. Puedo ver en qué direcciones tengo más o menos contactos para determinar el patrón de radiación de mi antena, y viceversa. Por ejemplo, el edificio en el que vivo en Nueva York bloquea mi antena hacia el norte. Consultando el mapa de debajo (en el que podéis pinchar para hacerlo más grande) veo que casi toda Asia está en dirección norte y, por lo tanto, bloqueada por mi edificio, por lo que me va a ser difícil hacer contactos por radio allí.
 Mapa azimutal equidistante centrado en Nueva York.
Fijaos también en lo distorsionada que aparece Australia en este mapa (la mancha marrón que aparece a la derecha y hacia arriba). Esto es debido a que Australia está a más de catorce mil kilómetros de Nueva York, casi en el lado opuesto del Mundo.
Al final conseguí hacer mi generador de mapas azimutales equidistantes. Me llevó unos cuantos días acostumbrarme a la sintaxis de Go, pero después fue muy fácil escribir código para leer y generar imágenes. Hay algunos aspectos de Go que no me convencen al 100%, pero ésa es una conversación que tendremos que dejar para otro día.
Mi generador de mapas es una aplicación web que toma un par de coordenadas geográficas y genera un mapa en PDF centrado en ese punto, que luego podéis imprimir a todo color para tener un mapa azimutal equidistante tan chulo como el que podéis ver debajo.

¡Probadlo sin miedo! Y si encontráis algún problema, hacédmelo saber.
el April 14, 2020 12:00 AM
¡Hola! Os doy la bienvenida a una nueva iteración de mi página web.
Hacía tiempo que tenía ganas de escribir nuevos artículos – mi cuenta de Twitter así lo atestigua. El último era de agosto de 2015, que en términos de Internet es una eternidad. Sin embargo, mi gestor de contenidos era del año catapún y dejaba de funcionar cada vez que actualizaba mi servidor, así que necesitaba cambiarlo. Además, hacía tiempo que tenía la ambición de rescatar el contenido de todas las anteriores iteraciones de mi página web personal y mi blog. Para terminar, ya que estábamos, a mi web le hacía falta un rediseño.
Como podéis imaginar, para poner en marcha todos esos planes me hacían falta dos cosas: tiempo y ganas. Desafortunadamente, ya sabéis cómo son las cosas: cuando tenía una, me faltaba la otra. Esto cambió el mes pasado, con la pandemia del COVID-19. Tenía unas vacaciones ya programadas desde hacía tiempo. En marzo iría a visitar Israel y Jordania. A primeros de abril, España. Después de eso, ¿quién sabe? Bucear en Indonesia, ir a una isla caribeña para hacer radioafición, visitar China… ¡Cuántas cosas podría hacer!
Como sabéis de sobra, en marzo cerramos el mundo a cal y canto por culpa del COVID-19, pero yo me tomé igual las vacaciones, que necesitaba descansar. En lugar de viajar por el mundo me dediqué a hacer todas esas otras cosas que tenía pendientes desde hace mucho tiempo: limpiar el apartamento, practicar idiomas, aprender nuevos lenguajes de programación y rehacer mi página web.
Una de las ideas que tenía para esta página web era republicar los contenidos más interesantes que escribí en el pasado. He conservado en mi servidor todas las páginas y blogs que tuve desde 2000, así que ha sido fácil rescatar esas páginas. También he incorporado contenido más antiguo – para éste he tenido que ir al Wayback Machine, pero seguramente pueda encontrar más cosas según busque en mis copias de seguridad.
Una tarea importante en este proceso ha sido la selección de artículos. Algunas de las cosas que escribí en el pasado ya no son relevantes; otras tratan temas personales que no vale la pena airear otra vez años después. A pesar de esto, todavía queda suficiente material frívolo como para entretener al más pintado.
Es una experiencia increíble leer las cosas que uno escribió hace cinco, diez, quince, o veintidós años. Casi no recuerdo escribir algunos de esos textos, y me maravilla ver el vocabulario y giros lingüísticos que empleaba entonces. ¿De verdad conocía esa palabra? ¿De dónde salió esa expresión?
Mi esperanza es que, si vuelvo a hacer este ejercicio en el futuro, el Jacobo de 2020 y los años posteriores sea capaz de resistir la comparación.
He tenido muchas páginas web y blogs desde 1998. Comencé con una página web personal hospedada en mi proveedor de Internet (CTV), y cuando me cambié de proveedor creé una nueva página web en lugar de trasladar la página que tenía.
En 2002, inspirado por Blogalia, escribí un pequeño gestor de contenidos y publiqué mi propio blog, que llamé “Tirando Líneas”. Este blog duró hasta 2004.
En 2004 experimenté con mi página web. Primero la pasé a Drupal, pero después hice una nueva con MediaWiki (el software de Wikipedia). Al año siguiente abrí un nuevo blog, que también llamé “Tirando Líneas”, aunque no importé nada del contenido del anterior blog.
En 2008 decidí que no necesitaba tener una página personal y un blog separados, así que los sustituí por una sola página unificada, que estaba implementada con Drupal. En 2012 y 2013 tuvo poca actividad, aunque repuntó en 2014 y la primera mitad de 2015. Sin embargo, no tuvo más actualizaciones desde entonces.
Hoy la he sustituído por esta nueva web, que incluye gran parte del contenido de las anteriores páginas web y blogs. Además, espero añadir nuevo contenido poco a poco. ¡Por muchos años!
el April 13, 2020 12:00 AM
It’s the end of December and it seems that yet another year has gone by, so I figured that I’d write an EOY update to summarize my main work at Igalia as part of our Chromium team, as my humble attempt to make up for the lack of posts in this blog during this year.
I did quit a few things this year, but for the purpose of this blog post I’ll focus on what I consider the most relevant ones: work on the Servicification and the Blink Onion Soup projects, the migration to the new Mojo APIs and the BrowserInterfaceBroker, as well as a summary of the conferences I attended, both as a regular attendee and a speaker.
But enough of an introduction, let’s dive now into the gory details…
 As explained in my previous post from January, I’ve started this year working on the Chromium Servicification (s13n) Project. More specifically, I joined my team mates in helping with the migration to the Identity service by updating consumers of several classes from the sign-in component to ensure they now use the new IdentityManager API instead of directly accessing those other lower level APIs.
This was important because at some point the Identity Service will run in a separate process, and a precondition for that to happen is that all access to sign-in related functionality would have to go through the IdentityManager, so that other process can communicate with it directly via Mojo interfaces exposed by the Identity service.
I’ve already talked long enough in my previous post, so please take a look in there if you want to know more details on what that work was exactly about.
Interestingly enough, a bit after finishing up working on the Identity service, our team dived deep into helping with another Chromium project that shared at least one of the goals of the s13n project: to improve the health of Chromium’s massive codebase. The project is code-named Blink Onion Soup and its main goal is, as described in the original design document from 2015, to “simplify the codebase, empower developers to implement features that run faster, and remove hurdles for developers interfacing with the rest of the Chromium”. There’s also a nice slide deck from 2016’s BlinkOn 6 that explains the idea in a more visual way, if you’re interested.

“Layers”, by Robert Couse-Baker (CC BY 2.0)
In a nutshell, the main idea is to simplify the codebase by removing/reducing the several layers of located between Chromium and Blink that were necessary back in the day, before Blink was forked out of WebKit, to support different embedders with their particular needs (e.g. Epiphany, Chromium, Safari…). Those layers made sense back then but these days Blink’s only embedder is Chromium’s content module, which is the module that Chrome and other Chromium-based browsers embed to leverage Chromium’s implementation of the Web Platform, and also where the multi-process and sandboxing architecture is implemented.
And in order to implement the multi-process model, the content module is split in two main parts running in separate processes, which communicate among each other over IPC mechanisms: //content/browser, which represents the “browser process” that you embed in your application via the Content API, and //content/renderer, which represents the “renderer process” that internally runs the web engine’s logic, that is, Blink.
With this in mind, the initial version of the Blink Onion Soup project (aka “Onion Soup 1.0”) project was born about 4 years ago and the folks spearheading this proposal started working on a 3-way plan to implement their vision, which can be summarized as follows:
//content/renderer down into Blink itself.Three clear steps, but definitely not easy ones as you can imagine. First of all, if we were to remove levels of indirection between //content/renderer and Blink as well as to slim down Blink’s public APIs as much as possible, a precondition for that would be to allow direct communication between the browser process and Blink itself, right?
In other words, if you need your browser process to communicate with Blink for some specific purpose (e.g. reacting in a visual way to a Push Notification), it would certainly be sub-optimal to have something like this:

…and yet that is what would happen if we kept using Chromium’s legacy IPC which, unlike Mojo, doesn’t allow us to communicate with Blink directly from //content/browser, meaning that we’d need to go first through //content/renderer and then navigate through different layers to move between there and Blink itself.
In contrast, using Mojo would allow us to have Blink implement those remote services internally and then publicly declare the relevant Mojo interfaces so that other processes can interact with them without going through extra layers. Thus, doing that kind of migration would ultimately allow us to end up with something like this:
…which looks nicer indeed, since now it is possible to communicate directly with Blink, where the remote service would be implemented (either in its core or in a module). Besides, it would no longer be necessary to consume Blink’s public API from //content/renderer, nor the other way around, enabling us to remove some code.
However, we can’t simply ignore some stuff that lives in //content/renderer implementing part of the original logic so, before we can get to the lovely simplification shown above, we would likely need to move some logic from //content/renderer right into Blink, which is what the second bullet point of the list above is about. Unfortunately, this is not always possible but, whenever it is an option, the job here would be to figure out what of that logic in //content/renderer is really needed and then figure out how to move it into Blink, likely removing some code along the way.
This particular step is what we commonly call “Onion Soup’ing //content/renderer/<feature>” (not entirely sure “Onion Soup” is a verb in English, though…) and this is for instance how things looked before (left) and after (right) Onion Souping a feature I worked on myself: Chromium’s implementation of the Push API:

Onion Soup’ing //content/renderer/push_messaging
Note how the whole design got quite simplified moving from the left to the right side? Well, that’s because some abstract classes declared in Blink’s public API and implemented in //content/renderer (e.g. WebPushProvider, WebPushMessagingClient) are no longer needed now that those implementations got moved into Blink (i.e. PushProvider and PushMessagingClient), meaning that we can now finally remove them.
Of course, there were also cases where we found some public APIs in Blink that were not used anywhere, as well as cases where they were only being used inside of Blink itself, perhaps because nobody noticed when that happened at some point in the past due to some other refactoring. In those cases the task was easier, as we would just remove them from the public API, if completely unused, or move them into Blink if still needed there, so that they are no longer exposed to a content module that no longer cares about that.
Now, trying to provide a high-level overview of what our team “Onion Soup’ed” this year, I think I can say with confidence that we migrated (or helped migrate) more than 10 different modules like the one I mentioned above, such as android/, appcache/, media/stream/, media/webrtc, push_messaging/ and webdatabase/, among others. You can see the full list with all the modules migrated during the lifetime of this project in the spreadsheet tracking the Onion Soup efforts.
In my particular case, I “Onion Soup’ed” the PushMessaging, WebDatabase and SurroundingText features, which was a fairly complete exercise as it involved working on all the 3 bullet points: migrating to Mojo, moving logic from //content/renderer to Blink and removing unused classes from Blink’s public API.
And as for slimming down Blink’s public API, I can tell that we helped get to a point where more than 125 classes/enums were removed from that Blink’s public APIs, simplifying and reducing the Chromium code- base along the way, as you can check in this other spreadsheet that tracked that particular piece of work.
But we’re not done yet! While overall progress for the Onion Soup 1.0 project is around 90% right now, there are still a few more modules that require “Onion Soup’ing”, among which we’ll be tackling media/ (already WIP) and accessibility/ (starting in 2020), so there’s quite some more work to be done on that regard.
Also, there is a newer design document for the so-called Onion Soup 2.0 project that contains some tasks that we have been already working on for a while, such as “Finish Onion Soup 1.0”, “Slim down Blink public APIs”, “Switch Mojo to new syntax” and “Convert legacy IPC in //content to Mojo”, so definitely not done yet. Good news here, though: some of those tasks are already quite advanced already, and in the particular case of the migration to the new Mojo syntax it’s nearly done by now, which is precisely what I’m talking about next…
Along with working on “Onion Soup’ing” some features, a big chunk of my time this year went also into this other task from the Onion Soup 2.0 project, where I was lucky enough again not to be alone, but accompanied by several of my team mates from Igalia‘s Chromium team.
This was a massive task where we worked hard to migrate all of Chromium’s codebase to the new Mojo APIs that were introduced a few months back, with the idea of getting Blink updated first and then having everything else migrated by the end of the year.
Progress of migrations to the new Mojo syntax: June 1st – Dec 23rd, 2019
But first things first: you might be wondering what was wrong with the “old” Mojo APIs since, after all, Mojo is the new thing we were migrating to from Chromium’s legacy API, right?
Well, as it turns out, the previous APIs had a few problems that were causing some confusion due to not providing the most intuitive type names (e.g. what is an InterfacePtrInfo anyway?), as well as being quite error-prone since the old types were not as strict as the new ones enforcing certain conditions that should not happen (e.g. trying to bind an already-bound endpoint shouldn’t be allowed). In the Mojo Bindings Conversion Cheatsheet you can find an exhaustive list of cases that needed to be considered, in case you want to know more details about these type of migrations.
Now, as a consequence of this additional complexity, the task wouldn’t be as simple as a “search & replace” operation because, while moving from old to new code, it would often be necessary to fix situations where the old code was working fine just because it was relying on some constraints not being checked. And if you top that up with the fact that there were, literally, thousands of lines in the Chromium codebase using the old types, then you’ll see why this was a massive task to take on.
Fortunately, after a few months of hard work done by our Chromium team, we can proudly say that we have nearly finished this task, which involved more than 1100 patches landed upstream after combining the patches that migrated the types inside Blink (see bug 978694) with those that tackled the rest of the Chromium repository (see bug 955171).
And by “nearly finished” I mean an overall progress of 99.21% according to the Migration to new mojo types spreadsheet where we track this effort, where Blink and //content have been fully migrated, and all the other directories, aggregated together, are at 98.64%, not bad!
On this regard, I’ve been also sending a bi-weekly status report mail to the chromium-mojo and platform-architecture-dev mailing lists for a while (see the latest report here), so make sure to subscribe there if you’re interested, even though those reports might not last much longer!
Now, back with our feet on the ground, the main roadblock at the moment preventing us from reaching 100% is //components/arc, whose migration needs to be agreed with the folks maintaining a copy of Chromium’s ARC mojo files for Android and ChromeOS. This is currently under discussion (see chromium-mojo ML and bug 1035484) and so I’m confident it will be something we’ll hopefully be able to achieve early next year.
Finally, and still related to this Mojo migrations, my colleague Shin and I took a “little detour” while working on this migration and focused for a while in the more specific task of migrating uses of Chromium’s InterfaceProvider to the new BrowserInterfaceBroker class. And while this was not a task as massive as the other migration, it was also very important because, besides fixing some problems inherent to the old InterfaceProvider API, it also blocked the migration to the new mojo types as InterfaceProvider did usually rely on the old types!

Architecture of the BrowserInterfaceBroker
Good news here as well, though: after having the two of us working on this task for a few weeks, we can proudly say that, today, we have finished all the 132 migrations that were needed and are now in the process of doing some after-the-job cleanup operations that will remove even more code from the repository! \o/
This year was particularly busy for me in terms of conferences, as I did travel to a few events both as an attendee and a speaker. So, here’s a summary about that as well:
 As usual, I started the year attending one of my favourite conferences of the year by going to FOSDEM 2019 in Brussels. And even though I didn’t have any talk to present in there, I did enjoy my visit like every year I go there. Being able to meet so many people and being able to attend such an impressive amount of interesting talks over the weekend while having some beers and chocolate is always great!
Next stop was Toronto, Canada, where I attended BlinkOn 10 on April 9th & 10th. I was honoured to have a chance to present a summary of the contributions that Igalia made to the Chromium Open Source project in the 12 months before the event, which was a rewarding experience but also quite an intense one, because it was a lightning talk and I had to go through all the ~10 slides in a bit under 3 minutes! Slides are here and there is also a video of the talk, in case you want to check how crazy that was.
Took a bit of a rest from conferences over the summer and then attended, also as usual, the Web Engines Hackfest that we at Igalia have been organising every single year since 2009. Didn’t have a presentation this time, but still it was a blast to attend it once again as an Igalian and celebrate the hackfest’s 10th anniversary sharing knowledge and experiences with the people who attended this year’s edition.
![]() Finally, I attended two conferences in the Bay Area by mid November: first one was the Chrome Dev Summit 2019 in San Francisco on Nov 11-12, and the second one was BlinkOn 11 in Sunnyvale on Nov 14-15. It was my first time at the Chrome Dev Summit and I have to say I was fairly impressed by the event, how it was organised and the quality of the talks in there. It was also great for me, as a browsers developer, to see first hand what are the things web developers are more & less excited about, what’s coming next… and to get to meet people I would have never had a chance to meet in other events.
Finally, I attended two conferences in the Bay Area by mid November: first one was the Chrome Dev Summit 2019 in San Francisco on Nov 11-12, and the second one was BlinkOn 11 in Sunnyvale on Nov 14-15. It was my first time at the Chrome Dev Summit and I have to say I was fairly impressed by the event, how it was organised and the quality of the talks in there. It was also great for me, as a browsers developer, to see first hand what are the things web developers are more & less excited about, what’s coming next… and to get to meet people I would have never had a chance to meet in other events.
As for BlinkOn 11, I presented a 30 min talk about our work on the Onion Soup project, the Mojo migrations and improving Chromium’s code health in general, along with my colleague Antonio Gomes. It was basically a “extended” version of this post where we went not only through the tasks I was personally involved with, but also talked about other tasks that other members of our team worked on during this year, which include way many other things! Feel free to check out the slides here, as well as the video of the talk.
As you might have guessed, 2019 has been a pretty exciting and busy year for me work-wise, but the most interesting bit in my opinion is that what I mentioned here was just the tip of the iceberg… many other things happened in the personal side of things, starting with the fact that this was the year that we consolidated our return to Spain after 6 years living abroad, for instance.
Also, and getting back to work-related stuff here again, this year I also became accepted back at Igalia‘s Assembly after having re-joined this amazing company back in September 2018 after a 6-year “gap” living and working in the UK which, besides being something I was very excited and happy about, also brought some more responsibilities onto my plate, as it’s natural.
Last, I can’t finish this post without being explicitly grateful for all the people I got to interact with during this year, both at work and outside, which made my life easier and nicer at so many different levels. To all of you, cheers!
And to everyone else reading this… happy holidays and happy new year in advance!
por mario el December 23, 2019 11:13 PM
Like all other major browser engines, WebKit is a project that evolves very fast with releases every few weeks containing new features and security fixes.
WebKitGTK is available in Debian under the webkit2gtk name, and we are doing our best to provide the most up-to-date packages for as many users as possible.
I would like to give a quick summary of the status of WebKitGTK in Debian: what you can expect and where you can find the packages.
In addition to that, the most recent stable versions are also available as backports.
You can also find a table with an overview of all available packages here.
One last thing: as explained on the release notes, users of i386 CPUs without SSE2 support will have problems with the packages available in Debian buster (webkit2gtk 2.24.2-1). This problem has already been corrected in the packages available in buster-backports or in the upcoming point release.
por berto el August 26, 2019 01:13 PM
 It’s been a few months already since I (re)joined Igalia as part of its Chromium team and I couldn’t be happier about it: right since the very first day, I felt perfectly integrated as part of the team that I’d be part of and quickly started making my way through the -fully upstream- project that would keep me busy during the following months: the Chromium Servicification Project.
But what is this “Chromium servicification project“? Well, according to the Wiktionary the word “servicification” means, applied to computing, “the migration from monolithic legacy applications to service-based components and solutions”, which is exactly what this project is about: as described in the Chromium servicification project’s website, the whole purpose behind this idea is “to migrate the code base to a more modular, service-oriented architecture”, in order to “produce reusable and decoupled components while also reducing duplication”.
Doing so would not only make Chromium a more manageable project from a source code-related point of view and create better and more stable interfaces to embed chromium from different projects, but should also enable teams to experiment with new features by combining these services in different ways, as well as to ship different products based in Chromium without having to bundle the whole world just to provide a particular set of features.
For instance, as Camille Lamy put it in the talk delivered (slides here) during the latest Web Engines Hackfest, “it might be interesting long term that the user only downloads the bits of the app they need so, for instance, if you have a very low-end phone, support for VR is probably not very useful for you”. This is of course not the current status of things yet (right now everything is bundled into a big executable), but it’s still a good way to visualise where this idea of moving to a services-oriented architecture should take us in the long run.
With this in mind, the idea behind this project would be to work on the migration of the different parts of Chromium depending on those components that are being converted into services, which would be part of a “foundation” base layer providing the core services that any application, framework or runtime build on top of chromium would need.
As you can imagine, the whole idea of refactoring such an enormous code base like Chromium’s is daunting and a lot of work, especially considering that currently ongoing efforts can’t simply be stopped just to perform this migration, and that is where our focus is currently aimed at: we integrate with different teams from the Chromium project working on the migration of those components into services, and we make sure that the clients of their old APIs move away from them and use the new services’ APIs instead, while keeping everything running normally in the meantime.
At the beginning, we started working on the migration to the Network Service (which allows to run Chromium’s network stack even without a browser) and managed to get it shipped in Chromium Beta by early October already, which was a pretty big deal as far as I understand. In my particular case, that stage was a very short ride since such migration was nearly done by the time I joined Igalia, but still something worth mentioning due to the impact it had in the project, for extra context.
After that, our team started working on the migration of the Identity service, where the main idea is to encapsulate the functionality of accessing the user’s identities right through this service, so that one day this logic can be run outside of the browser process. One interesting bit about this migration is that this particular functionality (largely implemented inside the sign-in component) has historically been located quite high up in the stack, and yet it’s now being pushed all the way down into that “foundation” base layer, as a core service. That’s probably one of the factors contributing to making this migration quite complicated, but everyone involved is being very dedicated and has been very helpful so far, so I’m confident we’ll get there in a reasonable time frame.
If you’re curious enough, though, you can check this status report for the Identity service, where you can see the evolution of this particular migration, along with the impact our team had since we started working on this part, back on early October. There are more reports and more information in the mailing list for the Identity service, so feel free to check it out and/or subscribe there if you like.
One clarification is needed, tough: for now, the scope of this migrations is focused on using the public C++ APIs that such services expose (see //services/<service_name>/public/cpp), but in the long run the idea is that those services will also provide Mojo interfaces. That will enable using their functionality regardless of whether you’re running those services as part of the browser’s process, or inside their own & separate processes, which will then allow the flexibility that chromium will need to run smoothly and safely in different kind of environments, from the least constrained ones to others with a less favourable set of resources at their disposal.
And this is it for now, I think. I was really looking forward to writing a status update about what I’ve been up to in the past months and here it is, even though it’s not the shortest of all reports.

One last thing, though: as usual, I’m going to FOSDEM this year as well, along with a bunch of colleagues & friends from Igalia, so please feel free to drop me/us a line if you want to chat and/or hangout, either to talk about work-related matters or anything else really.
And, of course, I’d be also more than happy to talk about any of the open job positions at Igalia, should you consider applying. There are quite a few of them available at the moment for all kind of things (most of them available for remote work): from more technical roles such as graphics, compilers, multimedia, JavaScript engines, browsers (WebKit, Chromium, Web Platform) or systems administration (this one not available for remotes, though), to other less “hands-on” types of roles like developer advocate, sales engineer or project manager, so it’s possible there’s something interesting for you if you’re considering to join such an special company like this one.
See you in FOSDEM!
por mario el January 29, 2019 06:35 PM
It’s almost one year later and, despite the acquisition by SmugMug a few months ago and the predictions from some people that it would mean me stopping from using Flickr & maintaining Frogr, here comes the new release of frogr 1.5.
Not many changes this time, but some of them hopefully still useful for some people, such as the empty initial state that is now shown when you don’t have any pictures, as requested a while ago already by Nick Richards (thanks Nick!), or the removal of the applications menu from the shell’s top panel (now integrated in the hamburger menu), in line with the “App Menu Retirement” initiative.
Then there were some fixes here and there as usual, and quite so many updates to the translations this time, including a brand new translation to Icelandic! (thanks Sveinn).
So this is it this time, I’m afraid. Sorry there’s not much to report and sorry as well for the long time that took me to do this release, but this past year has been pretty busy between hectic work at Endless the first time of the year, a whole international relocation with my family to move back to Spain during the summer and me getting back to work at Igalia as part of the Chromium team, where I’m currently pretty busy working on the Chromium Servicification project (which is material for a completely different blog post of course).
Anyway, last but not least, feel free to grab frogr from the usual places as outlined in its main website, among which I’d recommend the Flatpak method, either via GNOME Software or from the command line by just doing this:
flatpak install --from \
    https://flathub.org/repo/appstream/org.gnome.frogr.flatpakref
For more information just check the main website, which I also updated to this latest release, and don’t hesitate to reach out if you have any questions or comments.
Hope you enjoy it. Thanks!
por mario el November 25, 2018 12:02 AM
Winds of Change. One of my favourite songs ever and one that comes to my mind now that me and my family are going through quite some important changes, once again. But let’s start from the beginning…
A few years ago, back in January 2013, my family and me moved to the UK as the result of my decision to leave Igalia after almost 7 years in the company to embark ourselves in the “adventure” or living abroad. This was an idea we had been thinking about for a while already at that time, and our current situation back then suggested that it could be the right moment to try it out… so we did.
It was kind of a long process though: I first arrived alone in January to make sure I would have time to figure things out and find a permanent place for us to live in, and then my family joined me later in May, once everything was ready. Not great, if you ask me, to be living separated from your loved ones for 4 full months, not to mention the juggling my wife had to do during that time to combine her job with looking after the kids mostly on her own… but we managed to see each other every 2-3 weekends thanks to the London – Coruña direct flights in the meantime, so at least it was bearable from that point of view.
But despite of those not so great (yet expected) beginnings, I have to say that this past 5+ years have been an incredible experience overall, and we don’t have a single regret about making the decision to move, maybe just a few minor and punctual things only if I’m completely honest, but that’s about it. For instance, it’s been just beyond incredible and satisfying to see my kids develop their English skills “from zero to hero”, settle at their school, make new friends and, in one word, evolve during these past years. And that alone would have been a good reason to justify the move already, but it turns out we also have plenty of other reasons as we all have evolved and enjoyed the ride quite a lot as well, made many new friends, knew many new places, worked on different things… a truly enriching experience indeed!
In a way, I confess that this could easily be one of those things we’d probably have never done if we knew in advance of all the things we’d have to do and go through along the way, so I’m very grateful for that naive ignorance, since that’s probably how we found the courage, energy and time to do it. And looking backwards, it seems clear to me that it was the right time to do it.
But now it’s 2018 and, even though we had such a great time here both from personal and work-related perspectives, we have decided that it’s time for us to come back to Galicia (Spain), and try to continue our vital journey right from there, in our homeland.
And before you ask… no, this is not because of Brexit. I recognize that the result of the referendum has been a “contributing factor” (we surely didn’t think as much about returning to Spain before that 23 of June, that’s true), but there were more factors contributing to that decision, which somehow have aligned all together to tell us, very clearly, that Now It’s The Time…
For instance, we always knew that we would eventually move back for my wife to take over the family business, and also that we’d rather make the move in a way that it would be not too bad for our kids when it happened. And having a 6yo and a 9yo already it feels to us like now it’s the perfect time, since they’re already native English speakers (achievement unlocked!) and we believe that staying any longer would only make it harder for them, especially for my 9yo, because it’s never easy to leave your school, friends and place you call home behind when you’re a kid (and I know that very well, as I went through that painful experience precisely when I was 9).
Besides that, I’ve also recently decided to leave Endless after 4 years in the company and so it looks like, once again, moving back home would fit nicely with that work-related change, for several reasons. Now, I don’t want to enter into much detail on why exactly I decided to leave Endless, so I think I’ll summarize it as me needing a change and a rest after these past years working on Endless OS, which has been an equally awesome and intense experience as you can imagine. If anything, I’d just want to be clear on that contributing to such a meaningful project surrounded by such a team of great human beings, was an experience I couldn’t be happier and prouder about, so you can be certain it was not an easy decision to make.
Actually, quite the opposite: a pretty hard one I’d say… but a nice “side effect” of that decision, though, is that leaving at this precise moment would allow me to focus on the relocation in a more organized way as well as to spend some quality time with my family before leaving the UK. Besides, it will hopefully be also useful for us to have enough time, once in Spain, to re-organize our lives there, settle properly and even have some extra weeks of true holidays before the kids start school and we start working again in September.
Now, taking a few weeks off and moving back home is very nice and all that, but we still need to have jobs, and this is where our relocation gets extra interesting as it seems that we’re moving home in multiple ways at once…
For once, my wife will start taking over the family business with the help of her dad in her home town of Lalín (Pontevedra), where we plan to be living for the foreseeable future. This is the place where she grew up and where her family and many friends live in, but also a place she hasn’t lived in for the last 15 years, so the fact that we’ll be relocating there is already quite a thing in the “moving back home” department for her…
Second, for my kids this will mean going back to having their relatives nearby once again as well as friends they only could see and play with during holidays until now, which I think it’s a very good thing for them. Of course, this doesn’t feel as much moving home for them as it does for us, since they obviously consider the UK their home for now, but our hope is that it will be ok in the medium-long term, even though it will likely be a bit challenging for them at the beginning.
Last, I’ll be moving back to work at Igalia after almost 6 years since I left which, as you might imagine, feels to me very much like “moving back home” too: I’ll be going back to working in a place I’ve always loved so much for multiple reasons, surrounded by people I know and who I consider friends already (I even would call some of them “best friends”) and with its foundations set on important principles and values that still matter very much to me, both from technical (e.g. Open Source, Free Software) and not so technical (e.g. flat structure, independence) points of view.
Those who know me better might very well think that I’ve never really moved on as I hinted in the title of the blog post I wrote years ago, and in some way that’s perhaps not entirely wrong, since it’s no secret I always kept in touch throughout these past years at many levels and that I always felt enormously proud of my time as an Igalian. Emmanuele even told me that I sometimes enter what he seems to call an “Igalia mode” when I speak of my past time in there, as if I was still there… Of course, I haven’t seen any formal evidence of such thing happening yet, but it certainly does sound like a possibility as it’s true I easily get carried away when Igalia comes to my mind, maybe as a mix of nostalgia, pride, good memories… those sort of things. I suppose he’s got a point after all…
So, I guess it’s only natural that I finally decided to apply again since, even though both the company and me have evolved quite a bit during these years, the core foundations and principles it’s based upon remain the same, and I still very much align with them. But applying was only one part, so I couldn’t finish this blog post without stating how grateful I am for having been granted this second opportunity to join Igalia once again because, being honest, more often than less I was worried on whether I would be “good enough” for the Igalia of 2018. And the truth is that I won’t know for real until I actually start working and stay in the company for a while, but knowing that both my former colleagues and newer Igalians who joined since I left trust me enough to join is all I need for now, and I couldn’t be more excited nor happier about it.
Anyway, this post is already too long and I think I’ve covered everything I wanted to mention On Moving (pun intended with my post from 2012, thanks Will Thompson for the idea!), so I think I’ll stop right here and re-focus on the latest bits related to the relocation before we effectively leave the UK for good, now that we finally left our rented house and put all our stuff in a removals van. After that, I expect a few days of crazy unpacking and bureaucracy to properly settle in Galicia and then hopefully a few weeks to rest and get our batteries recharged for our new adventure, starting soon in September (yet not too soon!).
As usual, we have no clue of how future will be, but we have a good feeling about this thing of moving back home in multiple ways, so I believe we’ll be fine as long as we stick together as a family as we always did so far.
But in any case, please wish us good luck.That’s always welcome! :-)
por mario el August 03, 2018 05:36 PM
It’s been a pretty hectic time during the past months for me here at Endless, busy with updating our desktop to the latest stable version of GNOME Shell (3.26, at the time the process started), among other things. And in all this excitement, it seems like I forgot to blog so I think this time I’ll keep it short for once, and simply link to a video I made a couple of months ago, right when I was about to finish the first phase of the process (which ended up taking a bit longer than expected).
Note that the production of this video is far from high quality (unsurprisingly), but the feedback I got so far is that it has been apparently very useful to explain to less technically inclined people what doing a rebase of this characteristics means, and with that in mind I woke up this morning realizing that it might be good to give it its own entry in my personal blog, so here it is.
(Pro-tip: Enable video subtitles to see contextual info)
Granted, this hasn’t been a task as daunting as The Great Rebase I was working on one year ago, but still pretty challenging for a different set of reasons that I might leave for a future, and more detailed, post.
Hope you enjoy watching the video as much as I did making it.
por mario el May 06, 2018 06:54 AM
Another year goes by and, again, I feel the call to make one more release just before 2017 over, so here we are: frogr 1.4 is out!

Yes, I know what you’re thinking: “Who uses Flickr in 2017 anyway?”. Well, as shocking as this might seem to you, it is apparently not just me who is using this small app, but also another 8,935 users out there issuing an average of 0.22 Queries Per Second every day (19008 queries a day) for the past year, according to the stats provided by Flickr for the API key.
Granted, it may be not a huge number compared to what other online services might be experiencing these days, but for me this is enough motivation to keep the little green frog working and running, thus worth updating it one more time. Also, I’d argue that these numbers for a niche app like this one (aimed at users of the Linux desktop that still use Flickr to upload pictures in 2017) do not even look too bad, although without more specific data backing this comment this is, of course, just my personal and highly-biased opinion.
So, what’s new? Some small changes and fixes, along with other less visible modifications, but still relevant and necessary IMHO:
Also, this is the first release that happens after having a fully operational centralized place for Flatpak applications (aka Flathub), so I’ve updated the manifest and I’m happy to say that frogr 1.4 is already available for i386, arm, aarch64 and x86_64. You can install it either from GNOME Software (details on how to do it at https://flathub.org), or from the command line by just doing this:
flatpak install --from https://flathub.org/repo/appstream/org.gnome.frogr.flatpakref
Also worth mentioning that, starting with Frogr 1.4, I will no longer be updating my PPA at Launchpad. I did that in the past to make it possible for Ubuntu users to have access to the latest release ASAP, but now we have Flatpak that’s a much better way to install and run the latest stable release in any supported distro (not just Ubuntu). Thus, I’m dropping the extra work required to deal with the PPA and flat-out recommending users to use Flatpak or wait until their distro of choice packages the latest release.
And I think this is everything. As usual, feel free to check the main website for extra information on how to get frogr and/or how to contribute to it. Feedback and/or help is more than welcome.
Happy new year everyone!
por mario el December 28, 2017 02:45 AM
I was in Prague last month for the 2017 edition of the KVM Forum. There I gave a talk about some of the work that I’ve been doing this year to improve the qcow2 file format used by QEMU for storing disk images. The focus of my work is to make qcow2 faster and to reduce its memory requirements.
The video of the talk is now available and you can get the slides here.
The KVM Forum was co-located with the Open Source Summit and the Embedded Linux Conference Europe. Igalia was sponsoring both events one more year and I was also there together with some of my colleages. Juanjo Sánchez gave a talk about WPE, the WebKit port for embedded platforms that we released.
The video of his talk is also available.
por berto el November 16, 2017 10:16 AM
This weekend I’ll be in Node5 (Prague) presenting our Media Source Extensions platform implementation work in WebKit using GStreamer.
The Media Source Extensions HTML5 specification allows JavaScript to generate media streams for playback and lets the web page have more control on complex use cases such as adaptive streaming.
My plan for the talk is to start with a brief introduction about the motivation and basic usage of MSE. Next I’ll show a design overview of the WebKit implementation of the spec. Then we’ll go through the iterative evolution of the GStreamer platform-specific parts, as well as its implementation quirks and challenges faced during the development. The talk continues with a demo, some clues about the future work and a final round of questions.
Our recent MSE work has been on desktop WebKitGTK+ (the WebKit version powering the Epiphany, aka: GNOME Web), but we also have MSE working on WPE and optimized for a Raspberry Pi 2. We will be showing it in the Igalia booth, in case you want to see it working live.
I’ll be also attending the GStreamer Hackfest the days before. There I plan to work on webm support in MSE, focusing on any issue in the Matroska demuxer or the vp9/opus/vorbis decoders breaking our use cases.
See you there!
UPDATE 2017-10-22:
The talk slides are available at https://eocanha.org/talks/gstconf2017/gstconf-2017-mse.pdf and the video is available at https://gstconf.ubicast.tv/videos/media-source-extension-on-webkit (the rest of the talks here).
por eocanha el October 17, 2017 10:48 AM
Éste es uno de esos artículos que escribes para acordarte de cómo has hecho algo.
Hace unos meses me quedé sin conexión IPv6 en casa, porque SixXs cerró su broker IPv6 y no hay otro proveedor que ofrezca túneles que se puedan usar con NAT. Aparte de SixXs, el otro gran broker de IPv6 es Hurricane Electric (de ahora en adelante, "HE"). Pero no es posible establecer un túnel con HE desde un equipo que sale a Internet por NAT sin tocar la configuración del router (lo que no puedo ni quiero hacer); y si no tienes IP fija, también hay que hacer un par de apaños.
Por suerte tengo un pequeño VPS por ahí adelante, y se me ocurrió usarlo como mi broker personal. El plan es conectarme a él con OpenVPN, que estará configurado para usar un rango IPv6 público con sus clientes, y luego rutar el tráfico desde ellos hacia Internet.
He hecho un esquema algo cutre pero que debería ayudar a hacerse una idea:

DEVICE=sit1Donde:
BOOTPROTO=none
ONBOOT=no
IPV6INIT=yes
IPV6TUNNELIPV4=114.86.64.216
IPV6TUNNELIPV4LOCAL=65.183.45.17
IPV6ADDR=2001:948:cd:84::2/64
100 he-ipv6Si quieres comprobar que lo has hecho bien, puedes usar este comando:
ip route show table he-ipv6Que, como de momento no hemos puesto ninguna ruta ahí, no devolverá ningún resultado, pero dará error si la tabla con ese nombre no está dada de alta. Podrías no hacer esto y usar "100" en lugar de "he-ipv6" en todos los comandos a continuación, pero así es más fácil.
from 2001:948:cd:84::/64 table he-ipv6La primera red es la que estamos usando en la configuración del túnel. Siempre será la misma que la IPv6 pública de IPV6ADDR menos el último dígito, como en el ejemplo de ahí arriba. La segunda es la de la red que usarán tus dispositivos. De momento no te preocupes, lo veremos en la parte de OpenVPN.
from 2001:fa57:33:44::/64 table he-ipv6
default table he-ipv6 via 2001:948:cd:84::1La IPv6 del extremo de HE es lo que aparece como Server IPv6 Address en la página de configuración del túnel. Esta vez, no debe llevar la máscara de red, y salvo excepción, será la dirección "1" de la red que has usado en el fichero rule6-sit1.
ping6 2001:948:cd:84::1Si funciona, ¡felicidades! Ya tienes acceso a IPv6 a través de HE.
port 1194Asusta un poco, pero es una configuración bastante sencilla. Lo más destacable es:
proto udp
dev tun
topology subnet
ca /etc/easy-rsa-openvpn-2.0/keys/ca.crt
cert /etc/easy-rsa-openvpn-2.0/keys/server.crt
key /etc/easy-rsa-openvpn-2.0/keys/server.key
dh /etc/openvpn/dh1024.pem
tls-server
server 192.168.235.128 255.255.255.224
server-ipv6 2001:fa57:33:44::/64
ifconfig-pool-persist ipp.txt
client-to-client
user nobody
group nobody
persist-key
persist-tun
server-ipv6 2001:fa57:33:44::/64OpenVPN se configurará en la primera IP de esta red y usará IPs de toda la red para los clientes. Puedes modificar la asignación cambiando las entradas del fichero ipp.txt. Así sabrás a qué IP corresponde cada dispositivo.
clientCon todo esto funcionando vamos a conseguir que el cliente se conecte al servidor y éste le asigne una IPv6 en la red 2001:fa57:33:44::/64. Desde ese momento, el cliente estará casi conectado a Internet por IPv6.
dev tun
proto udp
remote mivps.en.internet 1194
resolv-retry infinite
nobind
user nobody
group nogroup
persist-key
persist-tun
sysctl -w net.ipv6.conf.all.forwarding=1
net.ipv6.conf.all.forwarding=1
ip6tables -P FORWARD DROP
ip6tables -I FORWARD -i tun0 -o sit1 -j ACCEPT
service ip6tables saveQue guardará todas las reglas actuales en ese fichero, por si tuvieras alguna más. Para que se carguen durante el arranque, ejecuta este comando:
chkconfig ip6tables onEl servicio ip6tables (que no es lo mismo que el comando ip6tables; es un tanto confuso, lo siento) se encarga de cargar las reglas de ip6tables (ahora sí, el comando), pero también puedes ejecutarlo con otros argumentos:
service ip6tables status # Muestra un volcado de las reglas actualesCon esto ya debería estar todo. Si conectas un cliente OpenVPN y haces un ping a Google, por ejemplo (ping6 ipv6.google.com), debería funcionar. Hay varias razones por las que podría fallar. Pongo las más sencillas a continuación.
service ip6tables stop # Pone todas las políticas a ACCEPT y elimina todas las reglas
service ip6tables start # Carga las reglas definidas en /etc/sysconfig/ip6tables
push "route-ipv6 2000::/3"
por Roberto (noreply@blogger.com) el September 24, 2017 04:17 PM
After spending a few days in Manchester with other fellow GNOME hackers and colleagues from Endless, I’m finally back at my place in the sunny land of Surrey (England) and I thought it would be nice to write some sort of recap, so here it is:
 I arrived in Manchester on Thursday the 27th just on time to go to the pre-registration event where I met the rest of the gang and had some dinner, and that was already a great start. Let’s forget about the fact that I lost my badge even before leaving the place, which has to be some type of record (losing the badge before the conference starts, really?), but all in all it was great to meet old friends, as well as some new faces, that evening already.
Then the 3 core days of GUADEC started. My first impression was that everything (including the accommodation at the university, which was awesome) was very well organized in general, and the venue make it for a perfect place to organize this type of event, so I was already impressed even before things started.
I attended many talks and all of them were great, but if I had to pick my 5 favourite ones I think those would be the following ones, in no particular order:
As I said, I attended other talks too and all were great too, so I’d encourage you to check the schedule and watch the recordings once they are available online, you won’t regret it.

And the next GUADEC will be in… Almería!
One thing that surprised me this time was that I didn’t do as much hacking during the conference as in other occasions. Rather than seeing it as a bad thing, I believe that’s a clear indicator of how interesting and engaging the talks were this year, which made it for a perfect return after missing 3 edition (yes, my last GUADEC was in 2013).
All in all it was a wonderful experience, and I can thank and congratulate the local team and the volunteers who run the conference this year well enough, so here’s is a picture I took where you can see all the people standing up and clapping during the closing ceremony.
Many thanks and congratulations for all the work done. Seriously.
After 3 days of conference, the second part started: “2 days and a bit” (I was leaving on Wednesday morning) of meeting people and hacking in a different venue, where we gathered to work on different topics, plus the occasional high-bandwith meeting in person.
 As you might expect, my main interest this time was around GNOME Shell, which is my main duty in Endless right now. This means that, besides trying to be present in the relevant BoFs, I’ve spent quite some time participating of discussions that gathered both upstream contributors and people from different companies (e.g. Endless, Red Hat, Canonical).
This was extremely helpful and useful for me since, now we have rebased our fork of GNOME Shell 3.22, we’re in a much better position to converge and contribute back to upstream in a more reasonable fashion, as well as to collaborate implementing new features that we already have in Endless but that didn’t make it to upstream yet.
And talking about those features, I’d like to highlight two things:
First, the discussion we held with both developers and designers to talk about the new improvements that are being considered for both the window picker and the apps view, where one of the ideas is to improve the apps view by (maybe) adding a new grid of favourite applications that the users could customize, change the order… and so forth.
According to the designers this proposal was partially inspired by what we have in Endless, so you can imagine I would be quite happy to see such a plan move forward, as we could help with the coding side of things upstream while reducing our diff for future rebases. Thing is, this is a proposal for now so nothing is set in stone yet, but I will definitely be interested in following and participating of the relevant discussions regarding to this.
Second, as my colleague Georges already vaguely mentioned in his blog post, we had an improvised meeting on Wednesday with one of the designers from Red Hat (Jakub Steiner), where we discussed about a very particular feature upstream has wanted to have for a while and which Endless implemented downstream: management of folders using DnD, right from the apps view.
This is something that Endless has had in its desktop since the beginning of times, but the implementation relied in a downstream-specific version of folders that Endless OS implemented even before folders were available in the upstream GNOME Shell, so contributing that back would have been… “interesting”. But fortunately, we have now dropped that custom implementation of folders and embraced the upstream solution during the last rebase to 3.22, and we’re in a much better position now to contribute our solution upstream. Once this lands, you should be able to create, modify, remove and use folders without having to open GNOME Software at all, just by dragging and dropping apps on top of other apps and folders, pretty much in a similat fashion compared to how you would do it in a mobile OS these days.
We’re still in an early stage for this, though. Our current solution in Endless is based on some assumptions and tools that will simply not be the case upstream, so we will have to work with both the designers and the upstream maintainers to make this happen over the next months. Thus, don’t expect anything to land for the next stable release yet, but simply know we’ll be working on it and that should hopefully make it not too far in the future.
This GUADEC has been a blast for me, and probably the best and my most favourite edition ever among all those I’ve attended since 2008. Reasons for such a strong statement are diverse, but I think I can mention a few that are clear to me:
From a personal point of view, I never felt so engaged and part of the community as this time. I don’t know if that has something to do with my recent duties in Endless (e.g. flatpak, GNOME Shell) or with something less “tangible” but that’s the truth. Can’t state it well enough.
From the perspective of Endless, the fact that 17 of us were there is something to be very excited and happy about, specially considering that I work remotely and only see 4 of my colleagues from the London area on a regular basis (i.e. one day a week). Being able to meet people I don’t regularly see as well as some new faces in person is always great, but having them all together “under the same ceilings” for 6 days was simply outstanding.

GNOME 20th anniversary dinner
Also, as it happened, this year was the celebration of the 20th anniversary of the GNOME project and so the whole thing was quite emotional too. Not to mention that Federico’s birthday happened during GUADEC, which was a more than nice… coincidence? :-) Ah! And we also had an incredible dinner on Saturday to celebrate that, couldn’t certainly be a better opportunity for me to attend this conference!
Last, a nearly impossible thing happened: despite of the demanding schedule that an event like this imposes (and I’m including our daily visit to the pubs here too), I managed to go running every single day between 5km and 10km, which I believe is the first time it happened in my life. I definitely took my running gear with me to other conferences but this time was the only one I took it that seriously, and also the first time that I joined other fellow GNOME runners in the process, which was quite fun as well.
I couldn’t finish this extremely long post without a brief note to acknowledge and thank all the many people who made this possible this year: the GNOME Foundation and the amazing group of volunteers who helped organize it, the local team who did an outstanding job at all levels (venue, accomodation, events…), my employer Endless for sponsoring my attendance and, of course, all the people who attended the event and made it such an special GUADEC this year.
Thank you all, and see you next year in Almería!

Credit to Georges Stavracas
por mario el August 04, 2017 06:02 PM
We just released Endless OS 3.2 to the world after a lot of really hard work from everyone here at Endless, including many important changes and fixes that spread pretty much across the whole OS: from the guts and less visible parts of the core system (e.g. a newer Linux kernel, OSTree and Flatpak improvements, updated libraries…) to other more visible parts including a whole rebase of the GNOME components and applications (e.g. mutter, gnome-settings-daemon, nautilus…), newer and improved “Endless apps” and a completely revamped desktop environment.
By the way, before I dive deeper into the rest of this post, I’d like to remind you thatEndless OS is a Operating System that you can download for free from our website, so please don’t hesitate to check it out if you want to try it by yourself. But now, even though I’d love to talk in detail about ALL the changes in this release, I’d like to talk specifically about what has kept me busy most of the time since around March: the full revamp of our desktop environment, that is, our particular version of GNOME Shell.

Endless OS 3.2 as it looks in my laptop right now
If you’re already familiar with what Endless OS is and/or with the GNOME project, you might already know that Endless’s desktop is a forked and heavily modified version of GNOME Shell, but what you might not know is that it was specifically based on GNOME Shell 3.8.
Yes, you read that right, no kidding: a now 4 years old version of GNOME Shell was alive and kicking underneath the thousands of downstream changes that we added on top of it during all that time to implement the desired user experience for our target users, as we iterated based on tons of user testing sessions, research, design visions… that this company has been working on right since its inception. That includes porting very visible things such as the “Endless button”, the user menu, the apps grid right on top of the desktop, the ability to drag’n’drop icons around to re-organize that grid and easily manage folders (by just dragging apps into/out-of folders), the integrated desktop search (+ additional search providers), the window picker mode… and many other things that are not visible at all, but that are required to deliver a tight and consistent experience to our users.
Endless button showcasing the new “show desktop” functionality

Aggregated system indicators and the user menu
Of course, this situation was not optimal and finally we decided we had found the right moment to tackle this situation in line with the 3.2 release, so I was tasked with leading the mission of “rebasing” our downstream changes on top of a newer shell (more specifically on top of GNOME Shell 3.22), which looked to me like a “hell of a task” when I started, but still I didn’t really hesitate much and gladly picked it up right away because I really did want to make our desktop experience even better, and this looked to me like a pretty good opportunity to do so.
By the way, note that I say “rebasing” between quotes, and the reason is because the usual approach of taking your downstream patches on top of a certain version of an Open Source project and apply them on top of whatever newer version you want to update to didn’t really work here: the vast amount of changes combined with the fact that the code base has changed quite a bit between 3.8 and 3.22 made that strategy fairly complicated, so in the end we had to opt for a combination of rebasing some patches (when they were clean enough and still made sense) and a re-implementation of the desired functionality on top of the newer base.

The integrated desktop search in action

New implementation for folders in Endless OS (based on upstream’s)
As you can imagine, and especially considering my fairly limited previous experience with things like mutter, clutter and the shell’s code, this proved to be a pretty difficult thing for me to take on if I’m truly honest. However, maybe it’s precisely because of all those things that, now that it’s released, I look at the result of all these months of hard work and I can’t help but feel very proud of what we achieved in this, pretty tight, time frame: we have a refreshed Endless OS desktop now with new functionality, better animations, better panels, better notifications, better folders (we ditched our own in favour of upstream’s), better infrastructure… better everything!.
Sure, it’s not perfect yet (no such a thing as “finished software”, right?) and we will keep working hard for the next releases to fix known issues and make it even better, but what we have released today is IMHO a pretty solid 3.2 release that I feel very proud of, and one that is out there now already for everyone to see, use and enjoy, and that is quite an achievement.

Removing and app by dragging and dropping it into the trash bin
Now, you might have noticed I used “we” most of the time in this post when referring to the hard work that we did, and that’s because this was not something I did myself alone, not at all. While it’s still true I started working on this mostly on my own and that I probably took on most of the biggest tasks myself, the truth is that several other people jumped in to help with this monumental task tackling a fair amount of important tasks in parallel, and I’m pretty sure we couldn’t have released this by now if not because of the team effort we managed to pull here.
I’m a bit afraid of forgetting to mention some people, but I’ll try anyway: many thanks to Cosimo Cecchi, Joaquim Rocha, Roddy Shuler, Georges Stavracas, Sam Spilsbury, Will Thomson, Simon Schampijer, Michael Catanzaro and of course the entire design team, who all joined me in this massive quest by taking some time alongside with their other responsibilities to help by tackling several tasks each, resulting on the shell being released on time.

The window picker as activated from the hot corner (bottom – right)
Last, before I finish this post, I’d just like to pre-answer a couple of questions that I guess some of you might have already:
Will you be proposing some of this changes upstream?
Our intention is to reduce the diff with upstream as much as possible, which is the reason we have left many things from upstream untouched in Endless OS 3.2 (e.g. the date/menu panel) and the reason why we already did some fairly big changes for 3.2 to get closer in other places we previously had our very own thing (e.g. folders), so be sure we will upstream everything we can as far as it’s possible and makes sense for upstream.
Actually, we have already pushed many patches to the shell and related projects since Endless moved to GNOME Shell a few years ago, and I don’t see any reason why that would change.
When will Endless OS desktop be rebased again on top of a newer GNOME Shell?
If anything we learned from this “rebasing” experience is that we don’t want to go through it ever again, seriously :-). It made sense to be based on an old shell for some time while we were prototyping and developing our desktop based on our research, user testing sessions and so on, but we now have a fairly mature system and the current plan is to move on from this situation where we had changes on top of a 4 years old codebase, to a point where we’ll keep closer to upstream, with more frequent rebases from now on.
Thus, the short answer to that question is that we plan to rebase the shell more frequently after this release, ideally two times a year so that we are never too far away from the latest GNOME Shell codebase.
And I think that’s all. I’ve already written too much, so if you excuse me I’ll get back to my Emacs (yes, I’m still using Emacs!) and let you enjoy this video of a recent development snapshot of Endless OS 3.2, as created by my colleague Michael Hall a few days ago:
(Feel free to visit our YouTube channel to check out for more videos like this one)
Also, quick shameless plug just to remind you that we have an Endless Community website which you can join and use to provide feedback, ask questions or simply to keep informed about Endless. And if real time communication is your thing, we’re also on IRC (#endless on Freenode) and Slack, so I very much encourage you to join us via any of these channels as well if you want.
![]() Ah! And before I forget, just a quick note to mention that this year I’m going to GUADEC again after a big break (my last one was in Brno, in 2013) thanks to my company, which is sponsoring my attendance in several ways, so feel free to say “hi!” if you want to talk to me about Endless, the shell, life or anything else.
Ah! And before I forget, just a quick note to mention that this year I’m going to GUADEC again after a big break (my last one was in Brno, in 2013) thanks to my company, which is sponsoring my attendance in several ways, so feel free to say “hi!” if you want to talk to me about Endless, the shell, life or anything else.
por mario el July 04, 2017 11:15 AM
Quick post to let you know that I just released frogr 1.3.
This is mostly a small update to incorporate a bunch of updates in translations, a few changes aimed at improving the flatpak version of it (the desktop icon has been broken for a while until a few weeks ago) and to remove some deprecated calls in recent versions of GTK+.
Ah! I’ve also officially dropped support for OS X via gtk-osx, as I was systematically failing to update and use (I only use frogr from GNOME these days) since a loooong time ago, and so it did not make sense for me to keep pretending that the mac version is something that is usable and maintained anymore.
As usual, you can go to the main website for extra information on how to get frogr and/or how to contribute to it. Any feedback or help is more than welcome!
por mario el May 20, 2017 11:58 PM
Harry Dresden es el único mago que puedes encontrar en la guía telefónica. Vas a la sección “Wizards” de la guía de Chicago y no aparece ninguno más. Sus especialidades son las investigaciones paranormales y encontrar objetos perdidos. No hace trucos, no actúa en fiestas ni hace pociones de amor. Es un mago serio. Un profesional.
“What’s the sign on the door say?”
“It says Harry Dresden. Wizard.’ “
“That’s me,” I confirmed.
(Storm Front)
Su nombre completo es Harry Blackstone Copperfield Dresden, pero mejor que no lo uses en vano. Los nombres son poderosos, y si supieras cómo pronunciarlo correctamente tendrías poder sobre él.
Dresden tiene una oficina en el midtown de Chicago. Le cuesta llegar a final de mes, porque los trabajos legales para un mago son limitados. Vive en el sótano de una vieja casa, lleno de libros y cubierto por alfombras y muebles de segunda mano. Nada de electrónica: ni TV, ni ordenador, ni Internet. La magia y la electrónica se llevan mal: un mal gesto, un pensamiento distraído, y algo podría hacer “puf” y empezar a arder. Un gato enorme, Mister, honra a Harry viviendo con él y dejándole que le alimente. Los gatos son así, y Mister es todo un señor gato.
El otro compañero de piso de Harry Dresden es Bob. A Bob le encantan las novelas eróticas. Tiene un montón de ellas en su estantería, gastadas de tanto uso. Están al lado de su casa, una calavera humana de varios cientos de años. Bob es un espíritu del conocimiento, un tanto impertinente, lascivo y listillo, pero que sabe todo o casi todo lo que hay que saber sobre la magia y el mundo mágico.
Otra constante de la vida reciente de Harry Dresden es Karrin Murphy, directora del departamento de Investigaciones Especiales de la policía de Chicago. “Investigaciones Especiales” significa que IS se encarga de todo lo que es … raro. Dresden es el consultor de temas sobrenaturales del IS, lo que le viene muy bien para pagar el alquiler.
Vampire attacks, troll mauraudings, and faery abductions of children didn’t fit in very neatly on a police report—but at the same time, people got attacked, infants got stolen, property was damaged or destroyed. And someone had to look into it.
(Storm Front)
Aparte de estar sin blanca y sufrir el desdén de los muggles (perdón por usar una palabra de la saga de otro mago llamado Harry), hubo un incidente mortal en el que Harry estuvo involucrado cuando era un chaval. Nada fuera de lo común: su mentor intentó asesinarlo, y Harry usó sus poderes para matarlo, prendiéndole fuego a la casa en la que estaban. Harry tiene un don para la magia elemental de fuego; y aunque otros magos pueden manejarla de forma sutil, ése no es uno de los fuertes de Harry Dresden.
That plan did have a lot of words like assault and smash and blast in it, which I had to admit was way more my style.
(Ghost Story)
Desde aquel momento, el Concilio Blanco (el consejo de magos que vigila que ninguno se salga de madre, y castiga a los que lo hacen) le vigila de cerca. En el mundo de los magos, eso es como tener antecedentes criminales; con la salvedad de que, si hubiera otra ofensa, no habría juicio: el ofensor sería ejecutado. Y Morgan, que es uno de los ejecutores del Concilio y parece Sean Connery en “Los Inmortales” (espada terriblemente afilada incluida), está deseando que eso ocurra.
Ah, y además, la madrina de Harry es una de las más poderosas de la aristocracia de las hadas, y quiere convertirlo en uno de sus sabuesos. Pero por lo demás, su vida es más o menos normal y corriente.
El creador de Harry Dresden es Jim Butcher. Había escrito tres novelas desde que, con sólo diecinueve años, decidió ser escritor profesional; pero ninguna de ellas fue publicada. Se matriculó en un curso de escritura en 1996, y uno de sus “deberes” fue el escribir algo parecido a Anita Blake: Vampire Hunter. Butcher lo hizo, siguiendo las instrucciones de su profesora Deborah Chester, pero sin mucha convicción.
When I finally got tired of arguing with her and decided to write a novel as if I was some kind of formulaic, genre writing drone, just to prove to her how awful it would be, I wrote the first book of the Dresden Files.
Aún hubo de esperar más de dos años antes de que lo que había nacido como Semiautomagic y ahora se llamaría Storm Front, la primera novela de Harry Dresden, fuera publicada. Durante ese tiempo escribió la segunda novela, Fool Moon, y empezó la tercera, Grave Peril.
Desde el 2000, año de debut de Harry Dresden, Butcher ha publicado otros 14 volúmenes con sus aventuras. Para no hacer spoilers, sólo diré que lo que empezó siendo una serie de aventuras independientes empezó a complicarse tras los primeros libros, y ahora Harry Dresden tiene mucho más por lo que luchar, y mucho más que perder.
El estilo de los libros de Harry Dresden recuerda a la novela negra y detectives hardboiled creados por autores como Dashiell Hammet o Raymond Chandler: están contados en primera persona y el protagonista es un cínico anti-héroe (alguien mal visto en la sociedad tradicional) que está de vuelta de todo.
Pero, a diferencia de Sam Spade y sus parientes, Harry Dresden te hace reir. No sólo le ocurren cosas graciosas, sino que su sarcasmo es ocurrente y divertido. En uno de los libros, uno de sus enemigos le hace prisionero y le subasta por eBay. Harry le sugiere que ponga en la descripción del artículo “un Harry Dresden, seminuevo”.
Los libros son cortos, llenos de acción. Recuerdan a las novelas pulp, en las que no hay más de cinco páginas seguidas sin que pase algo: un disparo, una sorpresa, un ataque de vampiros (es Harry Dresden, al fin y al cabo). En todos los libros se siembran pistas que acaban floreciendo al final, cuando todo se revela y el Bien triunfa … casi siempre.
Harry Dresden es como su homónimo británico, pero con más chispa, más mala leche y más chicas guapas. Los buenos no son buenos del todo, y los malos a veces hacen cosas buenas. Hay magos, hadas y monstruos. ¿Qué puede no gustar de todo esto?
por xouba el March 25, 2017 10:59 AM
A lot of good things have happened to the Media Source Extensions support since my last post, almost a year ago.
The most important piece of news is that the code upstreaming has kept going forward at a slow, but steady pace. The amount of code Igalia had to port was pretty big. Calvaris (my favourite reviewer) and I considered that the regular review tools in WebKit bugzilla were not going to be enough for a good exhaustive review. Instead, we did a pre-review in GitHub using a pull request on my own repository. It was an interesting experience, because the change set was so large that it had to be (artificially) divided in smaller commits just to avoid reaching GitHub diff display limits.
394 GitHub comments later, the patches were mature enough to be submitted to bugzilla as child bugs of Bug 157314 – [GStreamer][MSE] Complete backend rework. After some comments more in bugzilla, they were finally committed during Web Engines Hackfest 2016:
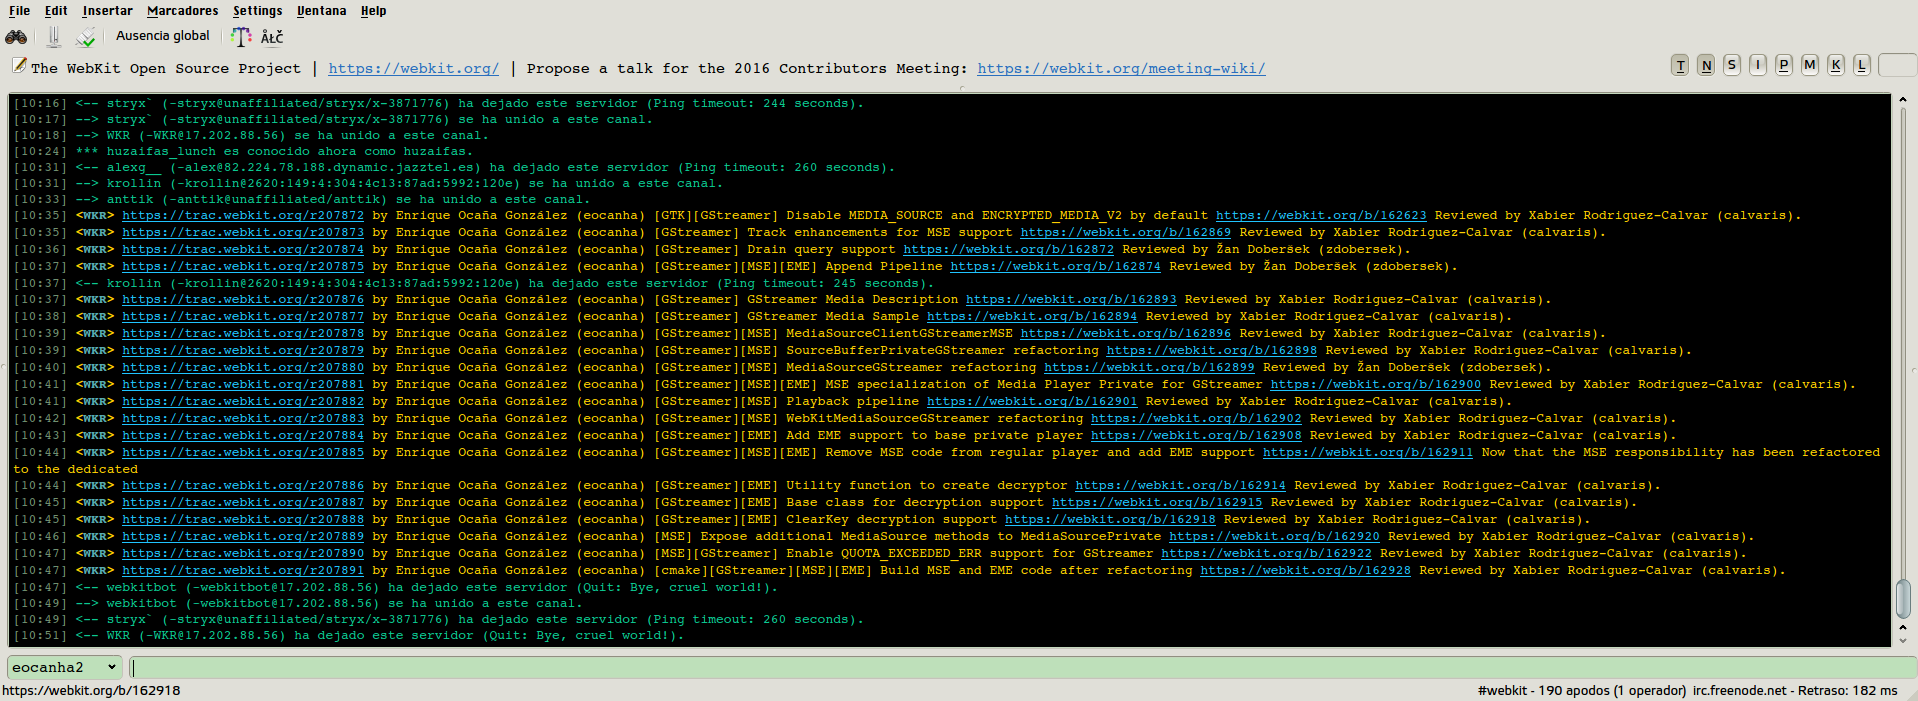
Some unforeseen regressions in the layout tests appeared, but after a couple of commits more, all the mediasource WebKit tests were passing. There are also some other tests imported from W3C, but I kept them still skipped because webm support was needed for many of them. I’ll focus again on that set of tests at its due time.
Igalia is proud of having brought the MSE support up to date to WebKitGTK+. Eventually, this will improve the browser video experience for a lot of users using Epiphany and other web browsers based on that library. Here’s how it enables the usage of YouTube TV at 1080p@30fps on desktop Linux:
Our future roadmap includes bugfixing and webm/vp9+opus support. This support is important for users from countries enforcing patents on H.264. The current implementation can’t be included in distros such as Fedora for that reason.
As mentioned before, part of this upstreaming work happened during Web Engines Hackfest 2016. I’d like to thank our sponsors for having made this hackfest possible, as well as Metrological for giving upstreaming the importance it deserves.
Thank you for reading.
por eocanha el March 20, 2017 11:55 AM
When choosing a disk image format for your virtual machine one of the factors to take into considerations is its I/O performance. In this post I’ll talk a bit about the internals of qcow2 and about one of the aspects that can affect its performance under QEMU: its consistency checks.
As you probably know, qcow2 is QEMU’s native file format. The first thing that I’d like to highlight is that this format is perfectly fine in most cases and its I/O performance is comparable to that of a raw file. When it isn’t, chances are that this is due to an insufficiently large L2 cache. In one of my previous blog posts I wrote about the qcow2 L2 cache and how to tune it, so if your virtual disk is too slow, you should go there first.
I also recommend Max Reitz and Kevin Wolf’s qcow2: why (not)? talk from KVM Forum 2015, where they talk about a lot of internal details and show some performance tests.
A qcow2 file is organized into units of constant size called clusters. The cluster size defaults to 64KB, but a different value can be set when creating a new image:
qemu-img create -f qcow2 -o cluster_size=128K hd.qcow2 4G
Clusters can contain either data or metadata. A qcow2 file grows dynamically and only allocates space when it is actually needed, so apart from the header there’s no fixed location for any of the data and metadata clusters: they can appear mixed anywhere in the file.
Here’s an example of what it looks like internally:
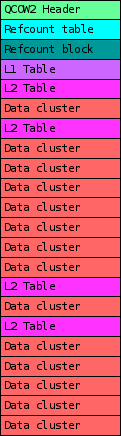 |
In this example we can see the most important types of clusters that a qcow2 file can have:
In order to detect corruption when writing to qcow2 images QEMU (since v1.7) performs several sanity checks. They verify that QEMU does not try to overwrite sections of the file that are already being used for metadata. If this happens, the image is marked as corrupted and further access is prevented.
Although in most cases these checks are innocuous, under certain scenarios they can have a negative impact on disk write performance. This depends a lot on the case, and I want to insist that in most scenarios it doesn’t have any effect. When it does, the general rule is that you’ll have more chances of noticing it if the storage backend is very fast or if the qcow2 image is very large.
In these cases, and if I/O performance is critical for you, you might want to consider tweaking the images a bit or disabling some of these checks, so let’s take a look at them. There are currently eight different checks. They’re named after the metadata sections that they check, and can be divided into the following categories:
By default all tests are enabled except for the last one (inactive-l2), because it needs to read data from disk.
Tests can be disabled or enabled from the command line using the following syntax:
-drive file=hd.qcow2,overlap-check.inactive-l2=on
-drive file=hd.qcow2,overlap-check.snapshot-table=off
It’s also possible to select the group of checks that you want to enable using the following syntax:
-drive file=hd.qcow2,overlap-check.template=none
-drive file=hd.qcow2,overlap-check.template=constant
-drive file=hd.qcow2,overlap-check.template=cached
-drive file=hd.qcow2,overlap-check.template=all
Here, none means that no tests are enabled, constant enables all tests from group 1, cached enables all tests from groups 1 and 2, and all enables all of them.
As I explained in the previous section, if you’re worried about I/O performance then the checks that are probably worth evaluating are refcount-block, active-l2 and inactive-l1. I’m not counting inactive-l2 because it’s off by default. Let’s look at the other three:
The qcow2 consistency checks are useful to detect data corruption, but they can affect write performance.
If you’re unsure and you want to check it quickly, open an image with overlap-check.template=none and see for yourself, but remember again that this will only affect write operations. To obtain more reliable results you should also open the image with cache=none in order to perform direct I/O and bypass the page cache. I’ve seen performance increases of 50% and more, but whether you’ll see them depends a lot on your setup. In many cases you won’t notice any difference.
I hope this post was useful to learn a bit more about the qcow2 format. There are other things that can help QEMU perform better, and I’ll probably come back to them in future posts, so stay tuned!
My work in QEMU is sponsored by Outscale and has been made possible by Igalia and the help of the rest of the QEMU development team.
 |
por berto el February 08, 2017 08:52 AM
It’s been two years since the last time I went to FOSDEM, but it seems that this year I’m going to be there again and, after having traveled to Brussels a few times already by plane and train, this year I’m going by car!: from home to the Euro tunnel and then all the way up to Brussels. Let’s see how it goes.

As for the conference, I don’t have any particular plan other than going to some keynotes and probably spending most of my time in the Distributions and the Desktops devrooms. Well, and of course joining other GNOME people at A La Bécasse, on Saturday night.
As you might expect, I will have my Endless laptop with me while in the conference, so feel free to come and say “hi” in case you’re curious or want to talk about that if you see me around.
At the moment, I’m mainly focused on developing and improving our flatpak story, how we deliver apps to our users via this wonderful piece of technology and how the overall user experience ends up being, so I’d be more than happy to chat/hack around this topic and/or about how we integrate flatpak in EndlessOS, the challenges we found, the solutions we implemented… and so forth.
That said, flatpak is one of my many development hats in Endless, so be sure I’m open to talk about many other things, including not work-related ones, of course.
Now, if you excuse me, I have a bag to prepare, an English car to “adapt” for the journey ahead and, more importantly, quite some hours to sleep. Tomorrow it will be a long day, but it will be worth it.
See you at FOSDEM!
por mario el February 02, 2017 10:05 PM
En un arrebato, estas navidades me he comprado un teclado Magicforce de 68 teclas.
 |
| Mi |
 |
| Fuente: wooting.nl |
Dicen que tienes veneno en la piel
y es que estás hecha de plástico fino.
Dicen que tienes un tacto divino
y quien te toca se queda con él.
por Roberto (noreply@blogger.com) el December 31, 2016 07:23 PM
Of course, just a few hours after releasing frogr 1.1, I’ve noticed that there was actually no good reason to depend on gettext 0.19.8 for the purposes of removing the intltool dependency only, since 0.19.7 would be enough.
So, as raising that requirement up to 0.19.8 was causing trouble to package frogr for some distros still in 0.19.7 (e.g. Ubuntu 16.04 LTS), I’ve decided to do a quick new release and frogr 1.2 is now out with that only change.
One direct consequence is that you can now install the packages for Ubuntu from my PPA if you have Ubuntu Xenial 16.04 LTS or newer, instead of having to wait for Ubuntu Yakkety Yak (yet to be released). Other than that 1.2 is exactly the same than 1.1, so you probably don’t want to package it for your distro if you already did it for 1.1 without trouble. Sorry for the noise.
por mario el October 05, 2016 01:46 PM
After almost one year, I’ve finally released another small iteration of frogr with a few updates and improvements.

Not many things, to be honest, bust just a few as I said:
Besides, another significant difference compared to previous releases is related to the way I’m distributing it: in the past, if you used Ubuntu, you could configure my PPA and install it from there even in fairly old versions of the distro. However, this time that’s only possible if you have Ubuntu 16.10 “Yakkety Yak”, as that’s the one that ships gettext >= 0.19.8, which is required now that I removed all trace of intltool (more info in this post).
However, this is also the first time I’m using flatpak to distribute frogr so, regardless of which distribution you have, you can now install and run it as long as you have the org.gnome.Platform/x86_64/3.22 stable runtime installed locally. Not too bad! :-). See more detailed instructions in its web site.
That said, it’s interesting that you also have the portal frontend service and a backend implementation, so that you can authorize your flickr account using the browser outside the sandbox, via the OpenURI portal. If you don’t have that at hand, you can still used the sandboxed version of frogr, but you’d need to copy your configuration files from a non-sandboxed frogr (under ~/.config/frogr) first, right into ~/.var/app/org.gnome.Frogr/config, and then it should be usable again (opening files in external viewers would not work yet, though!).
So this is all, hope it works well and it’s helpful to you. I’ve just finished uploading a few hundreds of pictures a couple of days ago and it seemed to work fine, but you never know… devil is in the detail!
por mario el October 05, 2016 01:24 AM
I haven’t blogged in a while -mostly due to lack of time, as usual- but I thought I’d write something today to let the world know about one of the things I’ve worked on a bit during this week, while remotely attending the Web Engines Hackfest from home:
Setting up an environment for cross-compiling WebKit2GTK+ for ARM
I know this is not new, nor ground-breaking news, but the truth is that I could not find any up-to-date documentation on the topic in a any public forum (the only one I found was this pretty old post from the time WebKitGTK+ used autotools), so I thought I would devote some time to it now, so that I could save more in the future.
Of course, I know for a fact that many people use local recipes to cross-compile WebKit2GTK+ for ARM (or simply build in the target machine, which usually takes a looong time), but those are usually ad-hoc things and hard to reproduce environments locally (or at least hard for me) and, even worse, often bound to downstream projects, so I thought it would be nice to try to have something tested with upstream WebKit2GTK+ and publish it on trac.webkit.org,
So I spent some time working on this with the idea of producing some step-by-step instructions including how to create a reproducible environment from scratch and, after some inefficient flirting with a VM-based approach (which turned out to be insanely slow), I finally settled on creating a chroot + provisioning it with a simple bootstrap script + using a simple CMake Toolchain file, and that worked quite well for me.
In my fast desktop machine I can now get a full build of WebKit2GTK+ 2.14 (or trunk) in less than 1 hour, which is pretty much a productivity bump if you compare it to the approximately 18h that takes if I build it natively in the target ARM device I have 
Of course, I’ve referenced this documentation in trac.webkit.org, but if you want to skip that and go directly to it, I’m hosting it in a git repository here: github.com/mariospr/webkit2gtk-ARM.
Note that I’m not a CMake expert (nor even close) so the toolchain file is far from perfect, but it definitely does the job with both the 2.12.x and 2.14.x releases as well as with the trunk, so hopefully it will be useful as well for someone else out there.
Last, I want to thanks the organizers of this event for making it possible once again (and congrats to Igalia, which just turned 15 years old!) as well as to my employer for supporting me attending the hackfest, even if I could not make it in person this time.

por mario el September 30, 2016 07:10 PM
QEMU 2.6 was released a few days ago. One new feature that I have been working on is the new way to configure I/O limits in disk drives to allow bursts and increase the responsiveness of the virtual machine. In this post I’ll try to explain how it works.
First I will summarize the basic settings that were already available in earlier versions of QEMU.
Two aspects of the disk I/O can be limited: the number of bytes per second and the number of operations per second (IOPS). For each one of them the user can set a global limit or separate limits for read and write operations. This gives us a total of six different parameters.
I/O limits can be set using the throttling.* parameters of -drive, or using the QMP block_set_io_throttle command. These are the names of the parameters for both cases:
| -drive | block_set_io_throttle |
|---|---|
| throttling.iops-total | iops |
| throttling.iops-read | iops_rd |
| throttling.iops-write | iops_wr |
| throttling.bps-total | bps |
| throttling.bps-read | bps_rd |
| throttling.bps-write | bps_wr |
It is possible to set limits for both IOPS and bps at the same time, and for each case we can decide whether to have separate read and write limits or not, but if iops-total is set then neither iops-read nor iops-write can be set. The same applies to bps-total and bps-read/write.
The default value of these parameters is 0, and it means unlimited.
In its most basic usage, the user can add a drive to QEMU with a limit of, say, 100 IOPS with the following -drive line:
-drive file=hd0.qcow2,throttling.iops-total=100
We can do the same using QMP. In this case all these parameters are mandatory, so we must set to 0 the ones that we don’t want to limit:
   { "execute": "block_set_io_throttle",
     "arguments": {
        "device": "virtio0",
        "iops": 100,
        "iops_rd": 0,
        "iops_wr": 0,
        "bps": 0,
        "bps_rd": 0,
        "bps_wr": 0
     }
   }
While the settings that we have just seen are enough to prevent the virtual machine from performing too much I/O, it can be useful to allow the user to exceed those limits occasionally. This way we can have a more responsive VM that is able to cope better with peaks of activity while keeping the average limits lower the rest of the time.
Starting from QEMU 2.6, it is possible to allow the user to do bursts of I/O for a configurable amount of time. A burst is an amount of I/O that can exceed the basic limit, and there are two parameters that control them: their length and the maximum amount of I/O they allow. These two can be configured separately for each one of the six basic parameters described in the previous section, but here we’ll use ‘iops-total’ as an example.
The I/O limit during bursts is set using ‘iops-total-max’, and the maximum length (in seconds) is set with ‘iops-total-max-length’. So if we want to configure a drive with a basic limit of 100 IOPS and allow bursts of 2000 IOPS for 60 seconds, we would do it like this (the line is split for clarity):
   -drive file=hd0.qcow2,
          throttling.iops-total=100,
          throttling.iops-total-max=2000,
          throttling.iops-total-max-length=60
Or with QMP:
   { "execute": "block_set_io_throttle",
     "arguments": {
        "device": "virtio0",
        "iops": 100,
        "iops_rd": 0,
        "iops_wr": 0,
        "bps": 0,
        "bps_rd": 0,
        "bps_wr": 0,
        "iops_max": 2000,
        "iops_max_length": 60,
     }
   }
With this, the user can perform I/O on hd0.qcow2 at a rate of 2000 IOPS for 1 minute before it’s throttled down to 100 IOPS.
The user will be able to do bursts again if there’s a sufficiently long period of time with unused I/O (see below for details).
The default value for ‘iops-total-max’ is 0 and it means that bursts are not allowed. ‘iops-total-max-length’ can only be set if ‘iops-total-max’ is set as well, and its default value is 1 second.
When applying IOPS limits all I/O operations are treated equally regardless of their size. This means that the user can take advantage of this in order to circumvent the limits and submit one huge I/O request instead of several smaller ones.
QEMU provides a setting called throttling.iops-size to prevent this from happening. This setting specifies the size (in bytes) of an I/O request for accounting purposes. Larger requests will be counted proportionally to this size.
For example, if iops-size is set to 4096 then an 8KB request will be counted as two, and a 6KB request will be counted as one and a half. This only applies to requests larger than iops-size: smaller requests will be always counted as one, no matter their size.
The default value of iops-size is 0 and it means that the size of the requests is never taken into account when applying IOPS limits.
In all the examples so far we have seen how to apply limits to the I/O performed on individual drives, but QEMU allows grouping drives so they all share the same limits.
This feature is available since QEMU 2.4. Please refer to the post I wrote when it was published for more details.
I/O limits in QEMU are implemented using the leaky bucket algorithm (specifically the “Leaky bucket as a meter” variant).
This algorithm uses the analogy of a bucket that leaks water constantly. The water that gets into the bucket represents the I/O that has been performed, and no more I/O is allowed once the bucket is full.
To see the way this corresponds to the throttling parameters in QEMU, consider the following values:
  iops-total=100
  iops-total-max=2000
  iops-total-max-length=60

The bucket is initially empty, therefore water can be added until it’s full at a rate of 2000 IOPS (the burst rate). Once the bucket is full we can only add as much water as it leaks, therefore the I/O rate is reduced to 100 IOPS. If we add less water than it leaks then the bucket will start to empty, allowing for bursts again.
Note that since water is leaking from the bucket even during bursts, it will take a bit more than 60 seconds at 2000 IOPS to fill it up. After those 60 seconds the bucket will have leaked 60 x 100 = 6000, allowing for 3 more seconds of I/O at 2000 IOPS.
Also, due to the way the algorithm works, longer burst can be done at a lower I/O rate, e.g. 1000 IOPS during 120 seconds.
As usual, my work in QEMU is sponsored by Outscale and has been made possible by Igalia and the help of the QEMU development team.

Enjoy QEMU 2.6!
por berto el May 24, 2016 11:47 AM
Last week I had the chance to attend for 3 days the GNOME Software Hackfest, organized by Richard Hughes and hosted at the brand new Red Hat’s London office.
And besides meeting new people and some old friends (which I admit to be one of my favourite aspects about attending these kind of events), and discovering what it’s now my new favourite place for fast-food near London bridge, I happened to learn quite a few new things while working on my particular personal quest: getting Chromium browser to run as an xdg-app.
While this might not seem to be an immediate need for Endless right now (we currently ship a Chromium-based browser as part of our OSTree based system), this was definitely something worth exploring as we are now implementing the next version of our App Center (which will be based on GNOME Software and xdg-app). Chromium updates very frequently with fixes and new features, and so being able to update it separately and more quickly than the OS is very valuable.

Screenshot of Endless OS’s current App Center
So, while Joaquim and Rob were working on the GNOME Software related bits and discussing aspects related to Continuous Integration with the rest of the crowd, I spent some time learning about xdg-app and trying to get Chromium to build that way which, unsurprisingly, was not an easy task.
Fortunately, the base documentation about xdg-app together with Alex Larsson’s blog post series about this topic (which I wholeheartedly recommend reading) and some experimentation from my side was enough to get started with the whole thing, and I was quickly on my way to fixing build issues, adding missing deps and the like.
Note that my goal at this time was not to get a fully featured Chromium browser running, but to get something running based on the version that we use use in Endless (Chromium 48.0.2564.82), with a couple of things disabled for now (e.g. chromium’s own sandbox, udev integration…) and putting, of course, some holes in the xdg-app configuration so that Chromium can access the system’s parts that are needed for it to function (e.g. network, X11, shared memory, pulseaudio…).
Of course, the long term goal is to close as many of those holes as possible using Portals instead, as well as not giving up on Chromium’s own sandbox right away (some work will be needed here, since `setuid` binaries are a no-go in xdg-app’s world), but for the time being I’m pretty satisfied (and kind of surprised, even) that I managed to get the whole beast built and running after 4 days of work since I started :-).
But, as Alberto usually says… “screencast or it didn’t happen!”, so I recorded a video yesterday to properly share my excitement with the world. Here you have it:
[VIDEO: Chromium Browser running as an xdg-app]
As mentioned above, this is work-in-progress stuff, so please hold your horses and manage your expectations wisely. It’s not quite there yet in terms of what I’d like to see, but definitely a step forward in the right direction, and something I hope will be useful not only for us, but for the entire Linux community as a whole. Should you were curious about the current status of the whole thing, feel free to check the relevant files at its git repository here.
Last, I would like to finish this blog post saying thanks specially to Richard Hughes for organizing this event, as well as the GNOME Foundation and Red Hat for their support in the development of GNOME Software and xdg-app. Finally, I’d also like to thank my employer Endless for supporting me to attend this hackfest. It’s been a terrific week indeed… thank you all!

Credit to Georges Stavracas
por mario el April 13, 2016 11:17 AM
During 2014 I started to become interested on how GStreamer was used in WebKit to play media content and how it was related to Media Source Extensions (MSE). Along 2015, my company Igalia strenghtened its cooperation with Metrological to enhance the multimedia support in their customized version of WebKitForWayland, the web platform they use for their products for the set-top box market. This was an opportunity to do really interesting things in the multimedia field on a really nice hardware platform: Raspberry Pi.
Normal URL playback in the <video> tag works by configuring the platform player (GStreamer in our case) with a source HTTP URL, so it behaves much like any other external player, downloading the content and showing it in a window. Special cases such as Dynamic Adaptive Streaming over HTTP (DASH) are automatically handled by the player, which becomes more complex. At the same time, the JavaScript code in the webpage has no way to know what’s happening with the quality changes in the stream.
The MSE specification lets the authors move the responsibility to the JavaScript side in that kind of scenarios. A Blob object (Blob URL) can be configured to get its data from a MediaSource object. The MediaSource object can instantiate SourceBuffer objects. Video and Audio elements in the webpage can be configured with those Blob URLs. With this setup, JavaScript can manually feed binary data to the player by appending it to the SourceBuffer objects. The data is buffered and the playback time ranges generated by the data are accessible to JavaScript. The web page (and not the player) has now the control on the data being buffered, its quality, codec and procedence. Now it’s even possible to synthesize the media data programmatically if needed, opening the door to media editors and media effects coded in JavaScript.
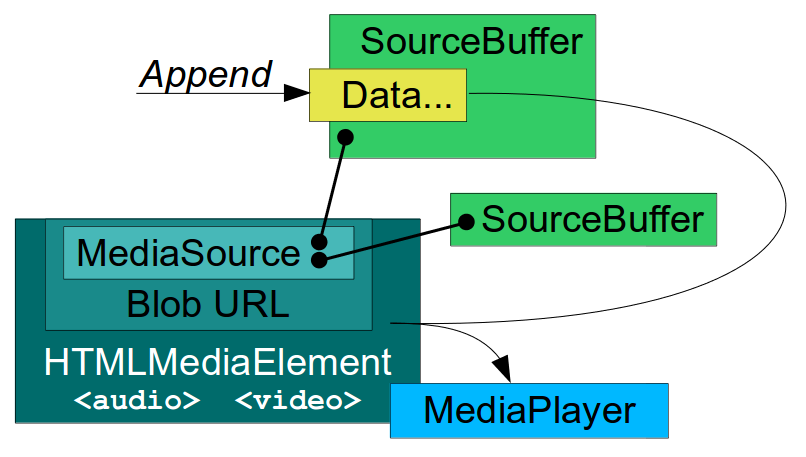
MSE is being adopted by the main content broadcasters on the Internet. It’s required by YouTube for its dedicated interface for TV-like devices and they even have an MSE conformance test suite that hardware manufacturers wanting to get certified for that platform must pass.
WebKit is a multiplatform framework with an end user API layer (WebKit2), an internal layer common to all platforms (WebCore) and particular implementations for each platform (GObject + GStreamer, in our case). Google and Apple have done a great work bringing MSE to WebKit. They have led the effort to implement the common WebCore abstractions needed to support MSE, such as MediaSource, SourceBuffer, MediaPlayer and the integration with HTMLMediaElement (video tag). They have also provided generic platform interfaces (MediaPlayerPrivateInterface, MediaSourcePrivate, SourceBufferPrivate) a working platform implementation for Mac OS X and a mock platform for testing.
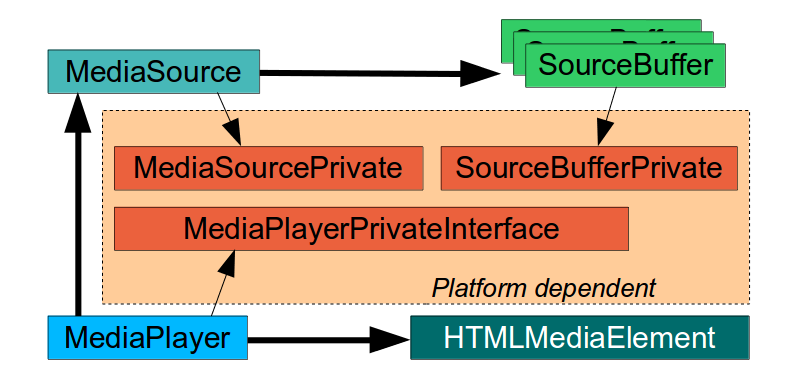
The main contributions to the platform implementation for ports using GStreamer for media playback were done by Stephane Jadaud and Sebastian Dröge on bugs #99065 (initial implementation with hardcoded SourceBuffers for audio and video), #139441 (multiple SourceBuffers) and #140078 (support for tracks, more containers and encoding formats). This last patch hasn’t still been merged in trunk, but I used it as the starting point of the work to be done.
GStreamer, unlike other media frameworks, is strongly based on the concept of pipeline: the data traverses a series of linked elements (sources, demuxers, decoders, sinks) which process it in stages. At a given point in time, different pieces of data are in the pipeline at the same time in varying degrees of processing stages. In the case of MSE, a special WebKitMediaSrc GStreamer element is used as the data source in the pipeline and also serves as interface with the upper MSE layer, acting as client of MediaSource and SourceBuffer. WebKitMediaSrc is spawned by GstPlayBin (a container which manages everything automatically inside) when an MSE SourceBuffer is added to the MediaSource. The MediaSource is linked with the MediaPlayer, which has MediaPlayerPrivateGStreamer as private platform implementation. In the design we were using at that time, WebKitMediaSrc was responsible for demuxing the data appended on each SourceBuffer into several streams (I’ve never seen more than one stream per SourceBuffer, though) and for reporting the statistics and the samples themselves to the upper layer according to the MSE specs. To do that, the WebKitMediaSrc encapsulated an appsrc, a demuxer and a parser per source. The remaining pipeline elements after WebKitMediaSrc were in charge of decoding and playback.
The MSE implementation in Chromium uses a chunk demuxer to parse (demux) the data appended to the SourceBuffers. It keeps the parsing state and provides a self-contained way to perform the demuxing. Reusing that Chromium code would have been the easiest solution. However, GStreamer is a powerful media framework and we strongly believe that the demuxing stage can be done using GStreamer as part of the pipeline.
Because of the way GStreamer works, it’s easy to know when an element outputs new data but there’s no easy way to know when it has finished processing its input without discontinuing the flow with with End Of Stream (EOS) and effectively resetting the element. One simple approach that works is to use timeouts. If the demuxer doesn’t produce any output after a given time, we consider that the append has produced all the MediaSamples it could and therefore has finished. Two different timeouts were used: one to detect when appends that produce no samples have finished (noDataToDecodeTimeout) and another to detect when no more samples are coming (lastSampleToDecodeTimeout). The former needs to be longer than the latter.
Another technical challenge was to perform append processing when the pipeline isn’t playing. While playback doesn’t start, the pipeline just prerolls (is filled with the available data until the first frame can be rendered on the screen) and then pauses there until the continuous playback can start. However, the MSE spec expects the appended data to be completely processed and delivered to the upper MSE layer first, and then it’s up to JavaScript to decide if the playback on screen must start or not. The solution was to add intermediate queue elements with a very big capacity to force a preroll stage long enough for the probes in the demuxer source (output) pads to “see” all the samples pass beyond the demuxer. This was how the pipeline looked like at that time (see also the full dump):
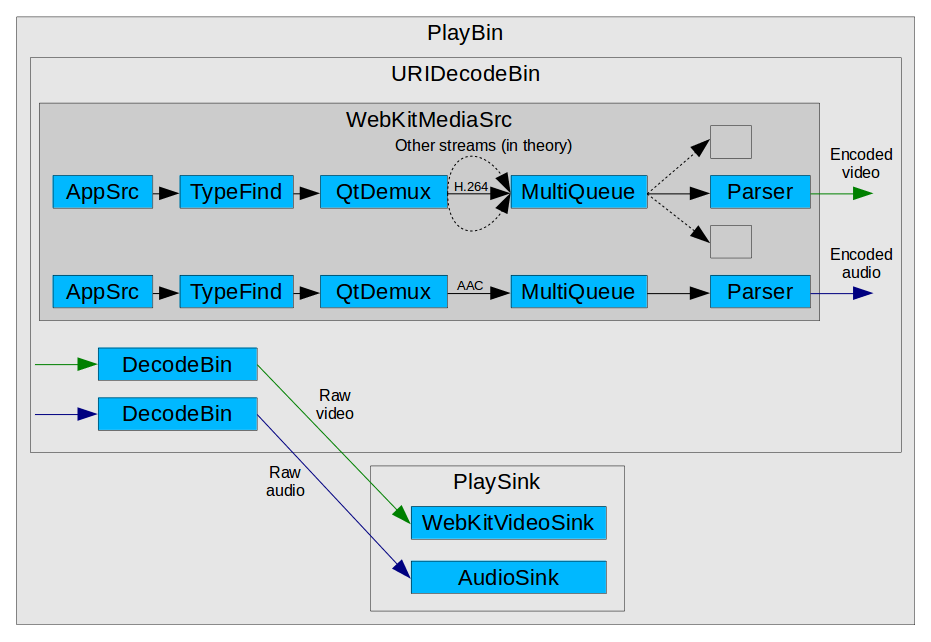
While focusing on making the YouTube 2015 tests pass on our Raspberry Pi 1, we realized that the generated buffered ranges had strange micro-holes (eg: [0, 4.9998]; [5.0003, 10.0]) and that was confusing the tests. Definitely, there were differences of interpretation between ChunkDemuxer and qtdemux, but this is a minor problem which can be solved by adding some extra time ranges that fill the holes. All these changes got the append feature in good shape and the we could start watching videos more or less reliably on YouTube TV for the first time.
Let’s focus on some real use case for a moment. The JavaScript code can be appending video data in the [20, 25] range, audio data in the [30, 35] range (because the [20, 30] range was appended before) and we’re still playing the [0, 5] range. Our previous design let the media buffers leave the demuxer and enter in the decoder without control. This worked nice for sequential playback, but was not compatible with non-linear playback (seeks). Feeding the decoder with video data for [0, 5] plus [20, 25] causes a big pause (while the timeline traverses [5, 20]) followed by a bunch of decoding errors (the decoder needs sequential data to work).
One possible improvement to support non-linear playback is to implement buffer stealing and buffer reinjecting at the demuxer output, so the buffers never go past that point without control. A probe steals the buffers, encapsulates them inside MediaSamples, pumps them to the upper MSE layer for storage and range reporting, and finally drops them at the GStreamer level. The buffers can be later reinjected by the enqueueSample() method when JavaScript decides to start the playback in the target position. The flushAndEnqueueNonDisplayingSamples() method reinjects auxiliary samples from before the target position just to help keeping the decoder sane and with the right internal state when the useful samples are inserted. You can see the dropping and reinjection points in the updated diagram:
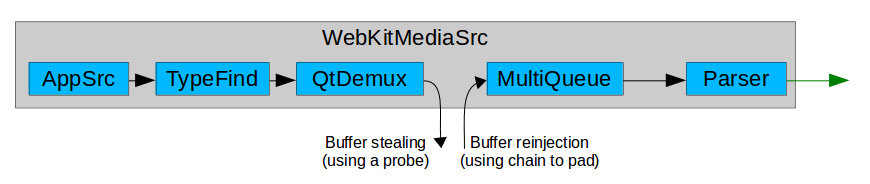
The synchronization issues of managing several independent timelines at once must also be had into account. Each of the ongoing append and playback operations happen in their own timeline, but the pipeline is designed to be configured for a common playback segment. The playback state (READY, PAUSED, PLAYING), the flushes needed by the seek operation and the prerolls also affect all the pipeline elements. This problem can be minimized by manipulating the segments by hand to accomodate the different timings and by getting the help of very large queues to sustain the processing in the demuxer, even when the pipeline is still in pause. These changes can solve the issues and get the “47. Seek” test working, but YouTube TV is more demanding and requires a more structured design.
At this point we decided to simplify MediaPlayerPrivateGStreamer and refactor all the MSE logic into a new subclass called MediaPlayerPrivateGStreamerMSE. After that, the unified pipeline was split into N append pipelines (one per SourceBuffer) and one playback pipeline. This change solved the synchronization issues and splitted a complex problem into two simpler ones. The AppendPipeline class, visible only to the MSE private player, is in charge of managing all the append logic. There’s one instance for each of the N append pipelines.
Each append pipeline is created by hand. It contains an appsrc (to feed data into it), a typefinder, a qtdemuxer, optionally a decoder (in case we want to suport Encrypted Media Extensions too), and an appsink (to pick parsed data). In my willing to simplify, I removed the support for all formats except ISO MP4, the only one really needed for YouTube. The other containers could be reintroduced in the future.
![]()
The playback pipeline is what remains of the old unified pipeline, but simpler. It’s still based on playbin, and the main difference is that the WebKitMediaSrc is now simpler. It consists of N sources (one per SourceBuffer) composed by an appsrc (to feed buffered samples), a parser block and the src pads. Uridecodebin is in charge of instantiating it, like before. The PlaybackPipeline class was created to take care of some of the management logic.
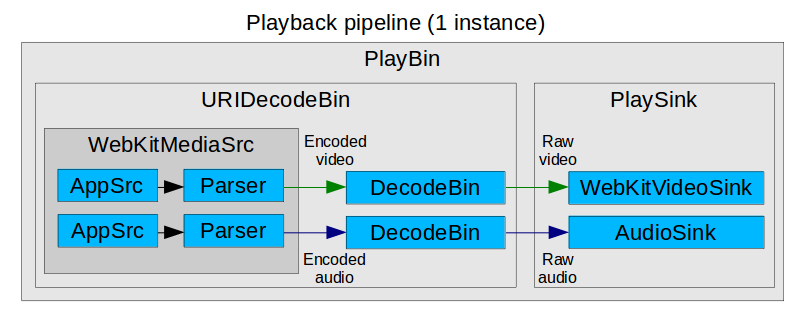
The AppendPipeline class manages the callback forwarding between threads, using asserts to strongly enforce the access to WebCore MSE classes from the main thread. AtomicString and all the classes inheriting from RefCounted (instead of ThreadSafeRefCounted) can’t be safely managed from different threads. This includes most of the classes used in the MSE implementation. However, the demuxer probes and other callbacks sometimes happen in the streaming thread of the corresponding element, not in the main thread, so that’s why call forwarding must be done.
AppendPipeline also uses an internal state machine to manage the different stages of the append operation and all the actions relevant for each stage (starting/stopping the timeouts, process the samples, finish the appends and manage SourceBuffer aborts).
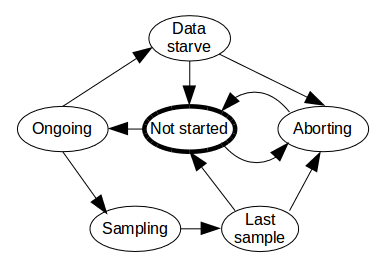
With this new design, the use case of a typical seek works like this (very simplified):
That was just the typical case, but more complex scenarios are also supported. This includes multiple seeks (pressing the forward/backward button several times), seeks to buffered areas (the easiest ones) and to unbuffered areas (where the seek sequence needs to wait until the data for the target area is appended and buffered).
Close cooperation from qtdemux is also required in order to get accurate presentation timestamps (PTS) for the processed media. We detected a special case when appending data much forward in the media stream during a seek. Qtdemux kept generating sequential presentation timestamps, completely ignoring the TFDT atom, which tells where the timestamps of the new data block must start. I had to add a new “always-honor-tfdt” attribute to qtdemux to solve that problem.
With all these changes the YouTube 2015 and 2016 tests are green for us and YouTube TV is completely functional on a Raspberry Pi 2.
All this work is currently in the Metrological WebKitForWayland repository, but it could be a great upstream contribution. Last December I was invited to the Web Engines Hackfest 2015, an event hosted in Igalia premises in A Coruña (Spain). I attended with the intention of starting the upstreaming process of our MSE implementation for GStreamer, so other ports such as WebKitGTK+ and WebKitEFL could also benefit from it. Thanks a lot to our sponsors for making it possible.
At the end of the hackfest I managed to have something that builds in a private branch. I’m currently devoting some time to work on the regressions in the YouTube 2016 tests, clean unrelated EME stuff and adapt the code to the style guidelines. Eventually, I’m going to submit the patch for review on bugzilla. There are some topics that I’d like to discuss with other engineers as part of this process, such as the interpretation of the spec regarding how the ReadyState is computed.
In parallel to the upstreaming process, our plans for the future include getting rid of the append timeouts by finding a better alternative, improving append performance and testing seek even more thoroughly with other real use cases. In the long term we should add support for appendStream() and increase the set of supported media containers and codecs at least to webm and vp8.
Let’s keep hacking!
por eocanha el February 18, 2016 08:10 PM
I’ve just released frogr 1.0. I can’t believe it took me 6 years to move from the 0.x series to the 1.0 release, but here it is finally. For good or bad.
 This release is again a small increment on top of the previous one that fixes a few bugs, should make the UI look a bit more consistent and “modern”, and includes some cleanups at the code level that I’ve been wanting to do for some time, like using G_DECLARE_FINAL_TYPE, which helped me get rid of ~1.7K LoC.
Last, I’ve created a few packages for Ubuntu in my PPA that you can use now already if you’re in Vivid or later while it does not get packaged by the distro itself, although I’d expect it to be eventually available via the usual means in different distros, hopefully soon. For extra information, just take a look to frogr’s website at live.gnome.org.
Now remember to take lots of pictures so that you can upload them with frogr
Happy new year!
por mario el December 30, 2015 04:04 AM
QEMU 2.5 has just been released, with a lot of new features. As with the previous release, we have also created a video changelog.
I plan to write a few blog posts explaining some of the things I have been working on. In this one I’m going to talk about how to control the size of the qcow2 L2 cache. But first, let’s see why that cache is useful.
qcow2 is the main format for disk images used by QEMU. One of the features of this format is that its size grows on demand, and the disk space is only allocated when it is actually needed by the virtual machine.
A qcow2 file is organized in units of constant size called clusters. The virtual disk seen by the guest is also divided into guest clusters of the same size. QEMU defaults to 64KB clusters, but a different value can be specified when creating a new image:
qemu-img create -f qcow2 -o cluster_size=128K hd.qcow2 4G
In order to map the virtual disk as seen by the guest to the qcow2 image in the host, the qcow2 image contains a set of tables organized in a two-level structure. These are called the L1 and L2 tables.
There is one single L1 table per disk image. This table is small and is always kept in memory.
There can be many L2 tables, depending on how much space has been allocated in the image. Each table is one cluster in size. In order to read or write data to the virtual disk, QEMU needs to read its corresponding L2 table to find out where that data is located. Since reading the table for each I/O operation can be expensive, QEMU keeps a cache of L2 tables in memory to speed up disk access.
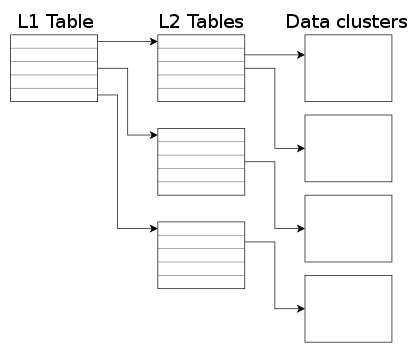 |
The L2 cache can have a dramatic impact on performance. As an example, here’s the number of I/O operations per second that I get with random read requests in a fully populated 20GB disk image:
| L2 cache size | Average IOPS |
|---|---|
| 1 MB | 5100 |
| 1,5 MB | 7300 |
| 2 MB | 12700 |
| 2,5 MB | 63600 |
If you’re using an older version of QEMU you might have trouble getting the most out of the qcow2 cache because of this bug, so either upgrade to at least QEMU 2.3 or apply this patch.
(in addition to the L2 cache, QEMU also keeps a refcount cache. This is used for cluster allocation and internal snapshots, but I’m not covering it in this post. Please refer to the qcow2 documentation if you want to know more about refcount tables)
In order to choose the cache size we need to know how it relates to the amount of allocated space.
The amount of virtual disk that can be mapped by the L2 cache (in bytes) is:
disk_size = l2_cache_size * cluster_size / 8
With the default values for cluster_size (64KB) that is
disk_size = l2_cache_size * 8192
So in order to have a cache that can cover n GB of disk space with the default cluster size we need
l2_cache_size = disk_size_GB * 131072
QEMU has a default L2 cache of 1MB (1048576 bytes)[*] so using the formulas we’ve just seen we have 1048576 / 131072 = 8 GB of virtual disk covered by that cache. This means that if the size of your virtual disk is larger than 8 GB you can speed up disk access by increasing the size of the L2 cache. Otherwise you’ll be fine with the defaults.
Cache sizes can be configured using the -drive option in the command-line, or the ‘blockdev-add‘ QMP command.
There are three options available, and all of them take bytes:
There are two things that need to be taken into account:
This means that these three options are equivalent:
-drive file=hd.qcow2,l2-cache-size=2097152
-drive file=hd.qcow2,refcount-cache-size=524288
-drive file=hd.qcow2,cache-size=2621440
Although I’m not covering the refcount cache here, it’s worth noting that it’s used much less often than the L2 cache, so it’s perfectly reasonable to keep it small:
-drive file=hd.qcow2,l2-cache-size=4194304,refcount-cache-size=262144
The problem with a large cache size is that it obviously needs more memory. QEMU has a separate L2 cache for each qcow2 file, so if you’re using many big images you might need a considerable amount of memory if you want to have a reasonably sized cache for each one. The problem gets worse if you add backing files and snapshots to the mix.
Consider this scenario:
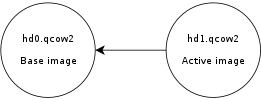 |
Here, hd0 is a fully populated disk image, and hd1 a freshly created image as a result of a snapshot operation. Reading data from this virtual disk will fill up the L2 cache of hd0, because that’s where the actual data is read from. However hd0 itself is read-only, and if you write data to the virtual disk it will go to the active image, hd1, filling up its L2 cache as a result. At some point you’ll have in memory cache entries from hd0 that you won’t need anymore because all the data from those clusters is now retrieved from hd1.
Let’s now create a new live snapshot:
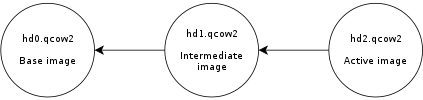 |
Now we have the same problem again. If we write data to the virtual disk it will go to hd2 and its L2 cache will start to fill up. At some point a significant amount of the data from the virtual disk will be in hd2, however the L2 caches of hd0 and hd1 will be full as a result of the previous operations, even if they’re no longer needed.
Imagine now a scenario with several virtual disks and a long chain of qcow2 images for each one of them. See the problem?
I wanted to improve this a bit so I was working on a new setting that allows the user to reduce the memory usage by cleaning unused cache entries when they are not being used.
This new setting is available in QEMU 2.5, and is called ‘cache-clean-interval‘. It defines an interval (in seconds) after which all cache entries that haven’t been accessed are removed from memory.
This example removes all unused cache entries every 15 minutes:
-drive file=hd.qcow2,cache-clean-interval=900
If unset, the default value for this parameter is 0 and it disables this feature.
In this post I only intended to give a brief summary of the qcow2 L2 cache and how to tune it in order to increase the I/O performance, but it is by no means an exhaustive description of the disk format.
If you want to know more about the qcow2 format here’s a few links:
My work in QEMU is sponsored by Outscale and has been made possible by Igalia and the invaluable help of the QEMU development team.
|
Enjoy QEMU 2.5!
[*] Updated 10 March 2021: since QEMU 3.1 the default L2 cache size has been increased from 1MB to 32MB.
por berto el December 17, 2015 03:39 PM

Some time ago I had a problem with a server. It had two ethernet interfaces connected to different vlans. The main network traffic went via the default gateway in the first vlan, but there was a listening service in the other interface. Everything was right until we tried to reach the second interface from another node out of the second vlan but near of this. It seemed there was not connection, but as I saw with tcpdump, the traffic arrived.
el December 13, 2015 06:53 PM
 It’s certainly been a while since I attended this event for the last time, 2 years ago, when it was a WebKitGTK+ only oriented hackfest, so I guess it was a matter of time it happened again…
It will be different for me this time, though, as now my main focus won’t be on accessibility (yet I’m happy to help with that, too), but on fixing a few issues related to the WebKit2GTK+ API layer that I found while working on our platform (Endless OS), mostly related to its implementation of accelerated compositing.
Besides that, I’m particularly curious about seeing how the hackfest looks like now that it has broaden its scope to include other web engines, and I’m also quite happy to know that I’ll be visiting my home town and meeting my old colleagues and friends from Igalia for a few days, once again.
![]() Last, I’d like to thank my employer for sponsoring this trip, as well as Igalia for organizing this event, one more time.
Last, I’d like to thank my employer for sponsoring this trip, as well as Igalia for organizing this event, one more time.
See you in Coruña!
por mario el November 26, 2015 11:29 AM
First of all, let me be clear: no, I’m not trying to leave Emacs again, already got over that stage. Emacs is and will be my main editor for the foreseeable future, as it’s clear to me that there’s no other editor I feel more comfortable with, which is why I spent some time cleaning up my .emacs.d and making it more “manageable”.
But as much as like Emacs as my main “weapon”, I sometimes appreciate the advantages of using a different kind of beast for specific purposes. And, believe me or not, in the past 2 years I learned to love Eclipse/CDT as the best work-mate I know when I need some extra help to get deep inside of the two monster C++ projects that WebKit and Chromium are. And yes, I know Eclipse is resource hungry, slow, bloated… and whatnot; but I’m lucky enough to have fast SSDs and lots of RAM in my laptop & desktop machines, so that’s not really a big concern anymore for me (even though I reckon that indexing chromium in the laptop takes “quite some time”), so let’s move on
However, there’s this one little thing that still bothers quite me a lot of Eclipse: you need to manually setup the include paths for the external dependencies not in a standard location that a C/C++ project uses, so that you can get certain features properly working such as code auto-completion, automatic error-checking features, call hierarchies… and so forth.
And yes, I know there is an Eclipse plugin adding support for pkg-config which should do the job quite well. But for some reason I can’t get it to work with Eclipse Mars, even though others apparently can use it there for some reason (and I remember using it with Eclipse Juno, so it’s definitely not a myth).
Anyway, I did not feel like fighting with that (broken?) plugin, and in the other hand I was actually quite inclined to play a bit with Python so… my quick and dirty solution to get over this problem was to write a small script that takes a list of package names (as you would pass them to pkg-config) and generates the XML content that you can use to import in Eclipse. And surprisingly, that worked quite well for me, so I’m sharing it here in case someone else finds it useful.
Using frogr as an example, I generate the XML file for Eclipse doing this:
  $ pkg-config-to-eclipse glib-2.0 libsoup-2.4 libexif libxml-2.0 \
        json-glib-1.0 gtk+-3.0 gstreamer-1.0 > frogr-eclipse.xml
…and then I simply import frogr-eclipse.xml from the project’s properties, inside the C/C++ General > Paths and Symbols section.
After doing that I get rid of all the brokenness caused by so many missing symbols and header files, I get code auto-completion nicely working back again and all those perks you would expect from this little big IDE. And all that without having to go through the pain of defining all of them one by one from the settings dialog, thank goodness!
Now you can quickly see how it works in the video below:
VIDEO: Setting up a C/C++ project in Eclipse with pkg-config-to-eclipse
This has been very helpful for me, hope it will be helpful to someone else too!
por mario el November 07, 2015 12:35 AM
I originally submitted this post to Docker people in the celebration of the 2015 Sysadmin Day, and they selected it as one of their favorite war stories. Now I publish it in my own blog. Some time ago I was working as Linux sysadmin in a major company. Our team were in charge of the operating system, but other teams were the applications administrators. So in some circumstances we allowed them some privilleged commands via sudo.
el November 05, 2015 07:46 PM
Some weeks ago Fedora Magazine published a post about running vagrant in Fedora 22 using the libvirt provider. But if you try to repeat the procedure in OpenSUSE you’ll have to perform some different steps because currently there is not a vagrant package at OpenSUSE (I use 13.2). So you will: install ruby and ruby-devel tsao@mylaptop :~> sudo zypper in ruby ruby-devel download and install the Vagrant package from the project home web.
el October 10, 2015 09:39 PM
The second part of this post about time management I will write about the NTP and its daemon configuration. As I mentioned in the previous post, if you need a very accurate time the best option is using the ntp.org implementation of the protocol. If you need security over accuracy, then you can use OpenBSD project implementation. OpenNTPd is not a complete implementation of the protocol, but as usual in the OpenBSD software, it’s a good, well-documented, audited code.
el September 19, 2015 09:50 PM
A veces pienso que me gustaría escribir un “manual de radioaficionado” en español, porque no he encontrado mucho material por el estilo cuando quería prepararme para el examen de la licencia de radioaficionado española, y creo que al menos la mitad de la diversión inherente en aprender algo está en enseñárselo a otras personas. Aún así, eso sería un trabajo enorme y tardaría mucho tiempo en completarlo. Como de momento no tengo tiempo para ello, de momento he decidido preparar un miniexamen de ejemplo con el tipo de preguntas que podéis encontraros en el examen. Espero que os sea útil.
el August 25, 2015 12:00 AM
QEMU 2.4.0 has just been released, and among many other things it comes with some of the stuff I have been working on lately. In this blog post I am going to talk about disk I/O limits and the new feature to group several disks together.
Disk I/O limits allow us to control the amount of I/O that a guest can perform. This is useful for example if we have several VMs in the same host and we want to reduce the impact they have on each other if the disk usage is very high.
The I/O limits can be set using the QMP command block_set_io_throttle, or with the command line using the throttling.* options for the -drive parameter (in brackets in the examples below). Both the throughput and the number of I/O operations can be limited. For a more fine-grained control, the limits of each one of them can be set on read operations, write operations, or the combination of both:
Example:
-drive if=virtio,file=hd1.qcow2,throttling.bps-write=52428800,throttling.iops-total=6000
In addition to that, it is also possible to configure the maximum burst size, which defines a pool of I/O that the guest can perform without being limited:
One additional parameter named iops_size allows us to deal with the case where big I/O operations can be used to bypass the limits we have set. In this case, if a particular I/O operation is bigger than iops_size then it is counted several times when it comes to calculating the I/O limits. So a 128KB request will be counted as 4 requests if iops_size is 32KB.
All of these parameters I’ve just described operate on individual disk drives and have been available for a while. Since QEMU 2.4 however, it is also possible to have several drives share the same limits. This is configured using the new group parameter.
The way it works is that each disk with I/O limits is member of a throttle group, and the limits apply to the combined I/O of all group members using a round-robin algorithm. The way to put several disks together is just to use the group parameter with all of them using the same group name. Once the group is set, there’s no need to pass the parameter to block_set_io_throttle anymore unless we want to move the drive to a different group. Since the I/O limits apply to all group members, it is enough to use block_set_io_throttle in just one of them.
Here’s an example of how to set groups using the command line:
-drive if=virtio,file=hd1.qcow2,throttling.iops-total=6000,throttling.group=foo
-drive if=virtio,file=hd2.qcow2,throttling.iops-total=6000,throttling.group=foo
-drive if=virtio,file=hd3.qcow2,throttling.iops-total=3000,throttling.group=bar
-drive if=virtio,file=hd4.qcow2,throttling.iops-total=6000,throttling.group=foo
-drive if=virtio,file=hd5.qcow2,throttling.iops-total=3000,throttling.group=bar
-drive if=virtio,file=hd6.qcow2,throttling.iops-total=5000
In this example, hd1, hd2 and hd4 are all members of a group named foo with a combined IOPS limit of 6000, and hd3 and hd5 are members of bar. hd6 is left alone (technically it is part of a 1-member group).
I am currently working on providing more I/O statistics for disk drives, including latencies and average queue depth on a user-defined interval. The code is almost ready. Next week I will be in Seattle for the KVM Forum where I will hopefully be able to finish the remaining bits.
 |
I will also attend LinuxCon North America. Igalia is sponsoring the event and we have a booth there. Come if you want to talk to us or see our latest demos with WebKit for Wayland.
See you in Seattle!
por berto el August 14, 2015 10:22 AM
I decided to write about handling the time at UNIX/Linux systems because a message like this: [29071122.262612] Clock: inserting leap second 23:59:60 UTC I have similar logs in my servers last June 30, 2015. Of course, I was aware about it some months before and I have to do some work to be ready (kernel/ntpd upgrades depending on the version of the package, we work with 8 main releases of 3 GNU/Linux distributions).
el August 11, 2015 02:20 PM
Today I begin a new blog. This will be my third project. More than 12 years ago three friends began linuxbeat.net. Juanjo, Cañete and me wrote about technology, the University where we were studying, politics… That was the age when people socialised at blog level, you could trace a social network following the links in the blogs to other blogs. Most of them were written in free services like Blogspot, Photoblog… People left behind the unconfortable, ugly, poorly updated static pages of the 90’s, and new hobbyists and experts in different areas (but with no idea on web developing) began to write and enrich the Wide World Web.
el July 07, 2015 08:41 PM
I have a chrooted environment in my 64bit Fedora 22 machine that I use every now and then to work on a debian-like 32bit system where I might want to do all sorts of things, such as building software for the target system or creating debian packages. More specifically, today I was trying to build WebKitGTK+ 2.8.3 in there and something weird was happening:
The following CMake snippet was not properly recognizing my 32bit chroot:
string(TOLOWER ${CMAKE_HOST_SYSTEM_PROCESSOR} LOWERCASE_CMAKE_HOST_SYSTEM_PROCESSOR)
if (CMAKE_COMPILER_IS_GNUCXX AND "${LOWERCASE_CMAKE_HOST_SYSTEM_PROCESSOR}" MATCHES "(i[3-6]86|x86)$")
    ADD_TARGET_PROPERTIES(WebCore COMPILE_FLAGS "-fno-tree-sra")
endif ()
After some investigation, I found out that CMAKE_HOST_SYSTEM_PROCESSOR relies on the output of uname to determine the type of the CPU, and this what I was getting if I ran it myself:
(debian32-chroot)mario:~ $ uname -a
Linux moucho 4.0.6-300.fc22.x86_64 #1 SMP Tue Jun 23 13:58:53 UTC 2015
x86_64 x86_64 x86_64 GNU/Linux
Let’s avoid nasty comments about the stupid name of my machine (I’m sure everyone else uses clever names instead), and see what was there: x86_64.
That looked wrong to me, so I googled a bit to see what others did about this and, besides finding all sorts of crazy hacks around, I found that in my case the solution was pretty simple just because I am using schroot, a great tool that makes life easier when working with chrooted environments.
Because of that, all I would have to do would be to specify personality=linux32 in the configuration file for my chrooted environment and that’s it. Just by doing that and re-entering in the “jail”, the output would be much saner now:
(debian32-chroot)mario:~ $ uname -a
Linux moucho 4.0.6-300.fc22.x86_64 #1 SMP Tue Jun 23 13:58:53 UTC 2015
i686 i686 i686 GNU/Linux
And of course, WebKitGTK+ would now recognize and use the right CPU type in the snippet above and I could “relax” again while seeing WebKit building again.
Now, for extra reference, this is the content of my schroot configuration file:
$ cat /etc/schroot/chroot.d/00debian32-chroot
[debian32-chroot]
description=Debian-like chroot (32 bit)
type=directory
directory=/schroot/debian32/
users=mario
groups=mario
root-users=mario
personality=linux32
That is all, hope somebody else will find this useful. It certainly saved my day!
por mario el July 03, 2015 01:31 PM